Showing posts with label Review. Show all posts

Thursday, 18 December 2025

2025: The Year in Reviews


I'm posting this earlier that I have in past years because I'm pretty sure I won't get another review up before Four reviews and one (P)review. Not even five actual reviews this year. This is where I feel like I haven't lived up to my own expectations the most. I'd gone into 2025 with the hope of managing at least one review a month, one roughly every four and a half weeks. I'm very happy with the reviews I managed to prepare, but four is less than half my goal for the year. I'm not angry; I'm disappointed.

I'm not going to try to make excuses. In my first calendar year (only eleven months) of A Fast Game, I managed twelve reviews. Admittedly, the early ones weren't very good; I was still finding my feet. Then in 2024, I still managed to post ten wargame reviews, all generally better than those from the previous year.

I have some guidelines for myself when it comes to writing up a game review. This is something I've gestured at before, but I think I can now finally articulate my thoughts in a few brief notes. My prerequisites for reviewing a game are:

1) Familiarity - as I've said probably several times now, I'll always have played a game at least three or four times before I'm comfortable criticising it;

2) Understanding - I won't try to review a game unless I'm confident I get what it's trying to accomplish and what's going on under the hood, and that I have a chance of making it clear and maybe interesting for the reader;

 3) Fun - I won't waste my time and yours going into intricate detail about why I didn't like a game or thought it was rubbish. Life is too short.

 Every game on this list I have enjoyed immensely, and believe it does what it sets out to do. Usually (but not always) , I also try to single out games that haven't - in my view - garnered the kind of attention I think is warranted. I probably won't ever write a review of, say, Twilight Struggle (GMT Games, 2005), but I might one day write up 1989: Dawn of Freedom (GMT Games, 2012). 

So, without further ado, here are give wargames (of varying war-y-ness) that I gave enough of a fig about to spend some extra time over. Enjoy.


Breizh 1341 (Shakos, 2022) 


Commands & Colors: Medieval, Expansion 1: Crusades Mid-Eastern Battles 1 (GMT Games, 2024) This was undoubtedly my most played game of the year.


Fire and Stone: Siege of Vienna 1683 (Capstone Games, 2022)


Napoléon 1806: La Campagne de Prusse (Shakos, 2017)


With the Hammer (Conflict Simulations Ltd, 2025 - playtest preview)


Previous years reviews can be reached by the links below:

2023: The Year in Reviews

2024: The Year in Reviews - Interesting fact: the chap in the photo at the top of the post is Guy Debord, philosopher and author of the prescient Society of the Spectacle. I only learned last year that Debord was also an avid wargamer. So, D&D may have Vin Diesel, but we have French intellectuals!


Saturday, 13 December 2025

Review: Breizh 1341


2022 Charles S. Roberts Best Medieval Wargame Nominee


Laurent Gary's Breizh 1341 (Shakos, 2022) is a small, fast-playing game about the War of Breton Succession, itself a relatively short and geographically constrained campaign woven into the broader tapestry of the Hundred Years’ War. The game is deceptively simple mechanically, but it rewards good planning and execution. Breizh 1341 is as tactically challenging as it is visually engrossing. But I’m getting ahead of myself; let’s just dive straight in.


Appearance

Shakos understands the importance of presentation. This shines though in the elegant consistency of the Conquerors series games, and that same consideration is here in spades. Breizh 1341 is a small box game – 9” by 7”, 2” deep – with a landscape aspect and an illustration of a siege in progress on the cover (I posted an unboxing of the game already, so check that out if you’re interested). It’s not what I’d call travel-size (at the size of a trade paperback, Nuts! Publishing’s Combat Rations games better fits that bill), but it wouldn’t take up a lot of room in an overnight bag. The box is solid, the lid fits snuggly, and the moulded plastic storage tray accommodates the components and (un-sleaved) cards very well.

Set up at start of game. The French begin in control of Trégor (Castle Guingamp and
a Partisan present), and with a head-start (another Partisan) on gaining control of
Saint-Brieuc. The English control Nantes (Castle Gu
érande and a Partisan) and
two troops in place to besiege another Castle. The game also comes with a
deck of eight Area cards for a variant rule allowing random
starting areas for each side. 

The board is small (about 17” by 12”, and mounted), and represents the Breton peninsula, divided into eight areas, each with a varying number of castles. Each castle has a rating of 1, 2 or 3. This represents the defence value of the castle during a besieging action. Control of castles in a given area is part of the equation for establishing who controls that area.

The board also includes a turn track (with handy mnemonics reminding the players of the cards played in each turn), and card places marked along the long edges (also proving reminders of varying cards played during turns. The map is thematically reminiscent of maps from the time without slavishly trying to replicate their appearance – function in this case triumphs over form. All in all, it’s attractive and usable, and works as a focus for the outcomes of the game.

The game uses a combination of counters and wooden pieces. The counters are mostly administrative – the majority are control markers for castles or areas – while the wooden piece represent the “human resources” at play. Cubes represent soldiers, while cylinders represent Partisans, the administrative infrastructure that ceases and maintains control of an area for one or the other player. To claim control of an area, a player must both hold a castle and have a Partisan present. If both players meet the requirements, then whoever has the highest number of castles and Partisans combined claims control.

Sample cards: an English Event card (right) and a Special Event Card. Event cards may
be played for the Event (if matching the playing faction), or for an Order at the bottom
of the card (while most cards offer all four options, some only display three orders).
The Special Event cards must be played in the round they are drawn; the Special
Event is executed first, and will affect both sides, then the phasing player can
play one of the listed Orders.

There are enough control counters for the areas and for each level of castle, and no more. These are each printed on both sides, with a blue border on the front and a red border on the verso, to indicate French or English control. There are other tokens as well; a Turn marker, three Highwaymen markers representing roving bands of unemployed mercenaries making their way in an area (and n turn making it ungovernable by either side), and a single chit marked with a +2 on both sides – this is a reminder token related to a single card event which may or may not come up in the game, but it’s nice to see such attention to detail.

Where the game really shines, though, is in its cards. There are several types of cards. The Event Deck is made up three parts, each consecutive part being added to the remainder of the deck at separate stages of play. The cards can be played for in exchange for an Action or, depending on the card, for its Event’ each card is bordered in royal blue or vermillion, indicating which player can use a given card for its Event. The event will have a game effect, accompanied by a brief description of the historical event portrayed (and a unique illustration drawn from historical sources) These events are mostly of acute significance to the War of Breton Succession, and they make up the bulk of the players’ hands in each round. There is a deck of ten Special Event cards. From the second turn on, each player draws a Special Event card that must be played as one of their cards in that turn. This guarantees each of the events will occur through the course of the game. These events are more pan-European in nature; events from the Hundred Years’ War influencing the local conflict, or natural incursions on the affairs of Man, like the Black Death. These events will affect both players, usually adversely, but the player playing the card gets a consolation prize of performing an action from those listed at the bottom of the card after the Event has been executed.


French (left) and English Personality cards. These are retained until used, and offer 
assistance in the execution of some orders.

Finally, there are two decks of eight Personality cards. Each turn, along with their due event cards and, after the first turn, a Special Event card, the players draw a Personality card from their side’s deck. The Personality cards fill a different role in the game; these are played for an advantage in a given situation, like offering a +1 to a battle die-roll, or placing a free Partisan unit somewhere on the board. There are two more Personality cards in each side’s deck than will be drawn in a game, so you can never count on a particular card appearing in a game.

All in all, the game is a joy to look at; in fact, I’d take a little time when you first get it to go through the cards and just soak up some of the history sewn into them, so it’s not so distracting when you play your first game. Nicolas Triel was the artistic director for Breizh 1341 (wrangling contributions from a few dozen fourteenth century painters, sculptors, and stonemasons). The finished product presents all the hard work he put into its creation – Breizh is both exceptionally beautiful and eminently playable.

The white cards represent non-playable events, events
that occurred during the War of Breton Succession but
had little or no influence on the outcome of the war.
These may still be played for their available Orders.

Play

Breizh 1341 plays out over six turns. At the end of the sixth turn, whichever player controls the majority of areas is the winner; if the players each hold an equal number of areas, the game ends in a draw (unsatisfying for some, but there you have it).*

For the first turn the entirety of the First Epoch deck (fourteen cards) is dealt out, and the players each draw a Personality card. The English player starts, and the players take turns playing cards from their rather large hands. At the play of the last card, the remaining cards in the players’ hands are gathered, barring any unused Personality cards. These, and the Second epoch deck (twenty-two cards) are shuffled together to make up the deck for turns two through five. Each turn, unused event cards are returned to the deck, which is then reshuffled. From turn two, each player receives one Event card, plus another Event card for each area they control – as mentioned previously, control is established by both controlling at least one castle and having at least one Partisan in the area – plus one Special Event card (which MUST be played for its event in the turn it is drawn), and another Personality card from their side’s deck. In the sixth and final turn, the six Third epoch cards are added to the deck, which is shuffled and dealt out in its entirety between the players.

Near the end of Turn 2, England has secured Castles in Vannes, Saint-Malo & Dol and
Rennes, but have only gained control of Rennes (by rallying a Partisan there). The
French player is about to play a white "non-event" card for a Besiege order. Unlike
the other orders, that only allow their action to take place once in one area, any
number of sieges may be attempted with a besiege order, so long as the
required numbers of troops are available for each siege attempt. Once a
siege has been attempted, the troops involved are removed
regardless of success, then the next is attempted.

With the play of a card, the phasing player may enact the event on the card, if factionally appropriate, or choose one of the actions on the base of the card. The choice of actions is usually to Recruit (place up to three troops in an area or areas on the board, though some multiple card events will allow recruiting four or more plus a die-roll value in troops in a single action), Rally (place a Partisan in an area), Besiege (use your troops in an area to besiege a castle in that area), or Fight (roll the three-sided dice and take a number of your opponent’s troops off the board equal to the result rolled), though some events will limit the available actions.

Having troops on the board allows you to perform a Besiege action. A single besiege action will allow you to attempt to take as many castles as you have troops to use in a siege. The castle rating – 1, 2, or 3 – represents that location’s ability to resist a siege.  At least one troop block is required to perform a siege. The target number for a successful siege is the Castle’s strength plus 2 (representing overwhelming force, and resolution of the siege involves the phasing player to roll the die and add the total number of besieging forces to the result. If a player besieges a 1 strength Castle with a single troop cube, they will need to roll a 2 or a 3 on the die to be successful. If successful, a marker of the player’s colour is places over the castle, and the phasing player moves on to the next siege until all are resolved, Troop pieces are removed form the board as sieges are resolved whether or not the siege was successful. A turn represents roughly a campaigning year; at the end of each turn, any troops remaining on the board are removed.

If there are ever more than five troop blocks in a single area with representation of both sides, a battle ensues. This happens immediately and will occur independently of any other unresolved actions. Each side counts the number of their troops in the area and adds the result of a dice roll (a Personality card may be used to raise their total as well, if available), and the player with the higher overall result is the winner. The difference in the two resulting numbers is established; if the differential is two or lower, each side loses one troop; if the difference is three or higher, the defeated side loses half their force (rounding up), while the victorious faction loses half the defeated side’s losses, rounding up. At the resolution of the Battle, if the total number of troops from both sides remains above five, the players battle again, and again until the total is sufficiently low. Battles are a costly but sometimes useful tactic to frustrate the opponent’s plans in an area.

This game ended in a draw. At the end of the game, France held control of Léon, Trégor,
and Saint-Brieuc; England held Nantes, Rennes, and Cornouaille. After changing hands
several times through the course of the game, Vannes was brought to a stalemate, and
the presence of Highwaymen in Saint-Malo & Dol would have made that area a draw
had it not already been a stalemate, with France and England each having three
assets there (Castles and Partisans). 

The events described on the Event cards are, in the main, playable by one side only (there are about four Event cards that have a shared red/blue border, allowing use by either player). The English player may play a French Event card, or vice versa, but only for an action listed at the bottom of the card. While not an optimal play, using an opposition card for an action can remove a particularly good card from play, if no better alternatives present themselves.

Personality cards may remain in a player’s possession until played. There is no benefit to retaining them until the end of the game, so it is best to use them as an opportunity arises, or to retain them for an edge in an upcoming play. With consecutive games you begin to get a feel for when their use will be appropriate.

Play is constrained, particularly in the middle in the game, by the number of cards each player can play. In the first and last (sixth) turns each player plays five cards, but only three cards in each of the four middle turns. Hand size is constrained to one card plus one for each area controlled, plus a Special Event card, but unless you’ve already lost the game, you’ll always have enough cards to fill the slots. In the middle turns, each player’s options are further constrained by those Special Events, some of which can play havoc with the intentions of both sides in one fell swoop. These constraints force the players to think of each turn as a campaign. Everything you want to achieve has to be done in the three acts of a turns card-play; you can’t set things up for the next year, because over the non-campaign season, everyone goes home and holes up for winter; the next turn is a completely new campaign.

The way unplayed cards are recycled is interesting and adds intrigue to the card-play. With each turn, the unplayed cards from the previous turn go back into the mix. This makes for a whole extra set of tough decision-points, gambling on a potentially helpful card returning to your hand in the future or letting that opposition “Recruit Six + Die Roll” event fall into your opponent’s hand instead of removing it from the game as a Rally action. Also, in your first game (maybe your second) it’s easy develop a tunnel vision and get caught up securing real estate – Castles – to shore up the areas you hold at the expense of expending to taking new territories. Its better to get a foothold in multiple areas early on than to turtle on what you have – your opponent will run roughshod.

Breizh 1341 offers an intense gaming experience in a relatively short time. It’s a little like Twilight Struggle (GMT Games, 2005) in that, having gained some familiarity with the deck, you know that certain events are likely to come up, and if they’re not in your hand they’re likely in your opponents. And like Twilight Struggle, it’s definitely a game for two players. One could conceivably play both sides, but it would lose much of its magic with foreknowledge of the cards both sides could or must play; better to find an opponent and introduce them to the game’s particular pleasures.


Appraisal

More than many games cast during the turmoil of the Hundred Years’ War, Breizh 1341 is a game of operational combat in the service of personal ambition and broader international politics. It’s a microcosm of many of the themes that mark the broader European conflict of the period. There is a genius in Breizh’s simplicity. This also makes it a perfect introductory game for non-wargamers. With blocks and pard-play it feels like an aggressive Eurogame, but for my money this ticks enough wargame boxes to qualify.

Looking back over the previous section, my description of Breizh’s game-play reads rather dryly, but you have to keep in mind how quickly – analysis paralysis notwithstanding – the game plays out. The mechanics are relatively simple and, some may argue, repetitive – each turn you are essentially trying to gain territory aand hold on to previous gains – but the card-helps create an unfolding narrative of the see-sawing fortunes of the stalwart French and their interloping English cousins. It really is a rich play experience, far richer than my fairly stilted description suggests.

A big plus for Breizh is the speed of play. Our first game took about an hour and a half, but as I explained in the playthrough write-up, we were learning it on the fly. Subsequent games have clocked in at an hour pretty much on the mark. After about a half-dozen games, it still offers a challenge and doesn’t feel repetitive. This may change after twenty or more games, but I think games like Breizh are designed to fill the same gap as Paulo Mori’s Blitzkrieg!: World War Two in 20 Minutes (PSC Games, 2019) or GMT’s Lunchtime Game series. As a filler-game after a long afternoon session, or an evening’s respite from worldly cares, Breizh 1341 meets my requirements; brief, drenched in history, and offering a gripping, satisfyingly rich experience.


* After beating my brother-in-law quite convincingly in our first two games, our third came to a draw (three areas each), which T found hard to reconcile as he held half again as many castles as me. I don’t think he truly accepted the result.


Monday, 24 February 2025

Review: Fire and Stone: Siege of Vienna 1683


Nominee: Best Gunpowder Game, Charles S. Roberts Awards, 2022


Siege games have always been a popular topic for wargames. I haven’t done the research to back this up, but I think it’s likely that siege games were the earliest examples of asymmetric conflicts in board wargames. The earliest siege-themed game I could track down was Asalto (also known as Assault and Citadel, among others), a variation of Fox and Geese dating back to the early nineteenth century. It characterised the asymmetric nature of siege warfare simply and effectively and is still worthy of consideration. 


Fire & Stone: The Siege of Vienna, 1683 (Capstone Games, 2022) is game of deep strategy based on one of the most famous sieges of the Early-Modern era. In 1682, Sultan Mehmed IV broke a twenty-year peace with the neighbouring Habsburg Empire. After some successes, the Ottoman army ventured deep into Habsburg territory to lay siege to the Empire’s capital, Vienna. The siege of Vienna lasted sixty days, from mid-July to Mid-September 1683, and if relief hadn’t arrived in the form of a joint column of troops from Poland and the Holy Roman Empire arrived within a day of the breach of its walls, the city would have almost certainly fallen. A near-run thing, and a worthy subject for a game treatment.


Appearance

The first thing to mention is Fire and Stone is a really gorgeous game. Capstone Games is better known as a producer of English-language versions of popular Eurogames like Ark Nova (Feuerland Spiele, 2021), Maracaibo (Game's Up, 2019), and Weimar: The Fight for Democracy (Spielworxx, 2023). There is a strong graphic theme that runs through every single aspect of Fire and Stone, from the constrained colour palette to the modest expediency of the map-board, the component illustrations (the ornate Soldiery of the Troop cards down to the simplicity of the spades on the Mining tokens). The artist on the project was Domhnall Hegarty, an Art Director by trade who also handled the graphics on a several of my favourite boards, including Navajo Wars (GMT Games, 2013) and Versailles 1919 (GMT Games, 2022), so it’s no surprise the game has such a solid and thoughtful presentation. More than simply looking good, every aspect of the visual and tactile design lifts the experience of the game to a higher level.

Set up and ready to play (Ottoman's POV).

Fire and Stone is a siege game. The action is localised, and the board reflects this. At one end is the edge of the Ottoman camp. After surveying Vienna’s fortifications, Ottoman engineers decided the most promising place to breach was the curtain wall between the Löbl and Burg bastions. Before this wall lay strata of outer defences – earthworks, redoubts, and trenches. Between the outer defences and the city walls lay the glacis, a clear field set at a gradient to the wall to slow the progress of an attack and give the defenders a free field of fire to wreak havoc on their assailants.

The board-side components of the game are made of wood, rendered in red for the Ottoman aggressors and yellow for the Viennese defenders. These include simple matchsticks representing improvised protective earthworks, corner-sets for structural fortifications, and more ornate cannon meeples in two styles for the Habsburgs’ defensive cannons and the Ottomans’ siege artillery.

Sample Strategy cards.

The cards are all of excellent quality, printed on a good weight of cardstock, and present in a good, readable font. There are three kinds of cards in play, and the two sides get their own decks of each. The Strategy cards are the most numerous; these are what you will play though for your actions each turn, either spending them to perform an action or triggering the card’s event.

Sample Tactics cards.

The smaller deck is made up of tactics cards, of which there are about a dozen. Each player will only draw five of these for the whole game (another nod to building replayability into the game). These, played at the right moment, can change the fortunes of a particular play, but will be unlikely to win the game outright. Three or for changes of fortune added together will nudge your cause further ahead.

Sample Army cards, Habsburgs (top) and Ottomans.

Finally, there are the Army cards. These represent the forces each side has at their disposal. Ton both sides, the cards are a spread of values between one and three points. Each time you get into a fight, you will pull out three army cards of your choice. Some events may push a card or two back to a second rank (these won’t participate in the fighting for that round), and some troops may not make it through the battle (these are removed from the game altogether). The ones that survive are exhausted for the current turn; these will return to the deck at the start of the next turn, but attrition is a danger to both sides.

On top of a formidably presented game, the publishers have included a twelve-page booklet offering a potted history of the lead-up to the siege and a reckoning of the particular events that unfolded over the months of the conflict, indicating those events reflected in the tactical and strategic cards but their deck prefix and card number. This also includes a brief Designer Notes article to finish off an immersive and informative read.


Play

Fire and Stone wears its Euro credentials on its sleeve but in its heart, it is an asymmetric historical conflict game of deep strategy. This is no system dressed up in historical garb. Every mechanical device put into service in Fire and Stone approximates an element of the complex and multifaceted story of the Ottoman siege of Vienna in 1683.

The game is played out over five turns (or possibly less) – if the Ottomans have not managed to take the city by the end of the fifth turn, a relief army arrives, headed by the famous Winged Hussars (a sixth space marked on the turn track).

At the start of the game each player draws five Strategy cards. These are your currency for taking action (up to five in a turn). At the beginning of the first turn, each player also draws five Tactics cards. These are often powerful adjuncts to actions in the game, usually spent during battles, but they are a finite resource, these five are all you will have for the entire game, and each can only be used once. They can tip the scales in a crucial battle, but the trick is recognising which battles are crucial (spoiler alert: they’re ALL crucial). There is a danger in saving these for later use in the game; like a person found dead from thirst in the desert with half a canteen of water, there is no value in hording them when they can be of use in the moment.

Habsburg and Ottoman cannons face off.

A turn involves each player (starting with the Ottoman player) taking turns to play a Strategy Card from their hand. When playing a Strategy card, the payer may choose to conduct and action or play the card’s Event. The actions each side may conduct vary a little; Ottomans can Bombard Habsburg fortifications, while Habsburgs can Barrage the Ottoman troops, potentially thinning the herd; the Ottomans – as the aggressors – can Assault a Habsburg-controlled hex, leading to a battle, while the Habsburgs can Sortie into an Ottoman-controlled hex adjacent to one of their own. Many of these actions can achieve an increase in your side’s morale, or conversely a drop in the other’s, sometimes both. This is important, because morale, like everything else in the game, is a limited currency, and one more way to defeat your opponent; when a side’s morale drops to zero, the other side claims victory.

Much of the game’s action is abstracted; Troops are represented by a deck of slender cards selected from a pool (deck) by each side for each discrete engagement. When a battle is instigated by either side, each chooses up to three cards from their troop deck. Each player has a selection of troops with values of one through three points. The Ottomans have a selection of twenty cards, the Habsburgs only twelve. These will be the troops deployed for this battle and are placed face-down in a row in front of the owning player (there are circumstances where the Ottoman player can increase the number of troops committed to battle, but for this illustration we’ll keep it simple). Each player may also play a Tactic card, also face-down, thought they are not obligated to do so. Once the cards have all been chosen, both sides reveal their hands and Tactics cards, and the effects of the revealed Tactics cards are applied.

Next, the attacking side must move one of his armies back to a second line for each enemy fortification in the hex where the battle is taking place (two for a structural fortification); the attacking player decides which troops to withdraw. Only front-line troops are tallied for the final resolution of the battle.

The fickle hand of Fate. Every round, you’ll want or need to do two or three things,
and have to respond to whatever the other side just did, which always leads
to challenging decision points in every card-play.

Finally, dice are rolled by each side; the Ottoman rolls one die for each of his cannons either in or adjacent to the attacked hex, while the Habsburg player rolls a die for every cannon still on the board. Each six rolled will eliminate a troop from the front line, and if there are more sixes than troops remaining on the front line, second-line troops are then eliminated. Eliminated troops are removed for the remainder of the game.

Resolution of a battle involves adding the values of any remaining troops on each player’s front line and comparing the results. The highest total wins, while draws go to the defender.

 The progress of the game is a slow creep for the Ottoman forces forward to the outer defences, then the glacis, and finally to the last defensive line. The final aim for the Ottoman player is to gain control of either the curtain wall hex or the two redoubts to either side of the curtain wall, and control is gained through combat, the exchange of lives for a few yards of ground. In this respect, Fire and Stone may well be compared to a World War I Western Front game, that both the actual siege and the action of the game are forgivingly shorter in duration.


The top of the Third.

Appraisal

Some will argue that Fire and Stone isn’t really a war game. I’m not going to jump into that particular briar patch; one can’t shift opinions already fully formed. I will posit that Fire and Stone is a deep historical simulation – dressed in the trappings of a Eurogame – the requires from its players particular consideration and careful resource husbandry. Fire and Stone is a conundrum. It’s a challenge whichever side you fight. After more than a dozen plays, I’m no closer to fathoming a clear course to a happy outcome for either side, which is, of course, a part of this game’s charm. Every game has had a similar beginning, but a radically different middle and end. A couple of games have played out to the final round (one to the penultimate card-play) for an eleventh-hour Ottoman win; in three the Habsburgs managed to hold out by the skin of their teeth to the arrival of reinforcements. Two victories to one side and another one to the other came from exhausting the opposition’s morale. Pasha Mustafa was strangled by the the Sultan's executioner for his failure at the Vienna siege and subsequent battle. Of the scores of ways to die in Fire and Stone, the one never mentioned is “old age.”

Habsburg defeat at the bottom of the fourth turn, with the Ottoman player breaching
the Curtain Wall and placing their Control marker.

The game is very well balanced, though it may not feel it at times, whichever side you are playing. The Ottoman player has more men at his disposal – more meat for the grinder – than the Habsburg player. In the beginning, at least, the Habsburg player has more artillery at his disposal, though this number will inevitably reduce with the press of the Ottoman’s advance.

For the Habsburgs, the situation can seem like a waiting game, trying to delay the progress of the Ottomans’ efforts until reinforcements arrive. This is deceptive. If they simply wait for help, the game will be over before the Fifth turn.

Fire and Stone is an immersive experience. What makes the game such a challenge is the sparse resources available to each side. I don’t think it’s possible to pick a plan at the beginning of the game and see it through to a successful end. Each turn of the card is a challenge. For both sides, each turn requires all of your attention to marshal your resources and survive well enough to function in the next turn. Victories in Fire and Stone are piquant, while defeats carry a familiar taste of inevitability. This game demands al your attention, all your resourcefulness and cunning, and may still find you wanting. All this makes for an extraordinary experience.


Thursday, 13 February 2025

Review: Commands & Colors: Medieval, Expansion 1: Crusades Mid-Eastern Battles 1


Commands and Colors: Medieval (GMT Games, 2019) offered a new theatre of war to be viewed through the lens of the Commands & Colors system. There was some discontent expressed in the usual forums regarding the decision to begin the series at the beginning of the medieval period, at the decline of the Eastern Roman Empire. Eventually, however, the unique qualities of the game and the strengths of the system shone through, leading to a second printing, and, eventually, the product we’re addressing here, Commands & Colors: Medieval, Expansion 1: Crusades Mid-Eastern Battles 1 (GMT Games, 2024). As we’re told on the back-of-the-box description, this set of twenty (yes, that’s “20”) scenarios, spanning ninety years, through the First and Second Crusades and the intervening years, up to the Battle of Hattin in 1187. The course of the scenarios is a journey through history, with the rise and waning of successive Arab and Turkish powers challenging the European knights over control of the Holy Land.

Let me be clear (again) that this is an expansion for Commands & Colors: Medieval game. That is to say, you need the base game to be able to play Crusades. I would also not right now, that given the unwieldy name of the expansion, I will hereon refer to it as either Crusades, or the expansion, mostly for the sake of my own sanity.

Antioch set-up, from the Crusaders' edge. Note the sneaky (if ultimately unsuccessful)
counterattack from behind by the Seljuq Turks. Also worth noting is the Auxilia Infantry
unit carrying a piece of the True Cross, or maybe a finger of St Andrew (lower right).
In Crusades, relics have power.

Appearance

I’m not going to spend too much time on the look or the component quality of the Crusades expansion; I’ve already posted an unboxing of the set, and anything else I added would simply be repeating myself, something I try not to do (though sometimes, I just can’t help it). Everything will look familiar to those who have played C&C Medieval, with the exception of new units introduced in this expansion. The Crusades leverages the existing blocks form C&C Medieval. Some have complained that this lessens the distinctive flavour of the expansion, but I would have to disagree. I’m truly grateful for the designers and panners of this expansion not insisting on a completely new set of blocks for two full armies, with all the extra cost in materials and shipping that would entail, let alone the hours of stickering, and the need to house a full second army. I can live with anachronistic uniforms or armour (if they are really that radically different) for the sake of these savings alone.


New units included in the Crusades expansion, Left to right: Mid-Eastern Auxilia Bow
Infantry, Turcopole Light Bow Cavalry, Medium Crossbow Infantry,
Heavy Knight Cavalry, and Foot Knight Infantry.

As it is, you’re still going to put some time into preparing new forces and augmenting existing ones with this expansion. Five new categories of fighting units have been introduced in Crusades, and these are mostly on the side of the Crusaders. The only new Mid-Eastern unit is the Auxilia Bow Infantry. Like their regular Auxilia brethren, they fire at range and fight in close combat with two dice, and in melee will hit on sword results. Unlike the spear-throwing auxilia, they have a firing range of four hexes.

The only Light unit joining the Crusader ranks is the Turcopole Light Bow Cavalry. Turcapole cavalry were local men who had converted to Christianity from Islam, and who hired themselves out as mercenaries to the Crusaders. As converts who had departed from Islam, if they were caught by the enemy, they would be executed immediately under the code of law. These, like all mounted units, may momentum advance and engage in a second round of close combat.

Arguably the greatest man-portable technological advance in the years between C&C: Medieval’s Late Roman Empire and the world of Crusades was the crossbow. Crusades introduces Medium Crossbow Infantry (four units in all). Like all bow-capable units in C&C: Medieval, the Crossbow infantry roll two dice in ranged combat. Unlike other bow units, they cannot engage in ranged combat after movement. They fight with two dice in melee as well, but can ignore a sword from lower ranked units, and, truth be told, there is a psychological aspect to having crossbow-armed soldiers on the field of battle, especially when playing the Mid-Eastern faction.

The Poor Fellow-Soldiers of Christ and of the Temple of Solomon (Knights Templar -
white blocks), and Order of Knights of the Hospital of Saint John of Jerusalem 
(Knights Hospitaller - red blocks) may appear mounted or unmounted.

Finally, the Crusades saw the Super-Heavy Cavalry of the base game fade from view to be replaced by European Knights, fearsome warriors whether mounted or unmounted. Crusades offers both options; Foot Knight Infantry, identified by crossed swords transecting the white-bordered Red-square unit indicator and by the look of grim determination on the figures in the illustration, fight with four dice, but they may ignore one flag and ignore the first Sword hit from a lower-ranked unit. They may momentum advance over the corpses of their vanquished enemies and fight on for a second round of melee. These units are formidable.

They are even more formidable in the saddle. Well, as formidable, but a tad more impetuous. Heavy Knight Cavalry share the same fighting parameters as their unmounted brothers, but unlike regular Heavy Cavalry, the Knights are “motivated” (the term used in the rules) by their training, sense of honour, and a goodly measure of bloodlust, and may advance a second space to engage the enemy in their second round of close combat.

Then there are the Knights Orders. Crusades introduces branded crusaders in the form of Knights Templar and Knights Hospitaller, one unit each of Infantry and Cavalry (representing the cohort as mounted or unmounted, as the scenario dictates). These units function very much as their regular Knight-unit collieries, except that these guys always hit on Leader symbols, whether a leader is present or not. Meaning they will have a four in six chance of delivering a result on each die in every fight.

Now we’ve met the new guys, let’s have a look at how Crusades plays out on the table.

I don't want to spend column inches waxing eloquent on it, but the quality of the art in
the terrain tiles really should be noted. For me, it lifts the experience of play a notch.

Play

Commands & Colors games all use essentially the same system; this is how we know a game is a Commands & Colors game. If you’ve played a couple of C&C Games before and you come across a new one, you shouldn’t run into any problems getting your head around the new game. But the beauty of the system is in its flexibility. You’ll never achieve anything close to a true historical a simulation with a C&C game of any stripe – it’s worth noting that this is true of many wargames, no matter how granular you get – but each flavour of Commands & Colors brings a lot of situational verisimilitude of the battle type to the table, no small thing for a single rules set; the only comparable system I can think of off hand would probably be Great Battles of History (GBoH), covering battles from 500 BCE to the Early Modern period.

Crusades is no exception to this, except in that the departure from its original game seems more radical than most expansions achieve. C&C: Medieval was very much its own creature compared to its closest analogue, Commands & Colors: Ancients (GMT Games,2006). I really enjoy playing C&C: Ancients, but playing Expansion 2: Rome and the Barbarians (GMT, 2007) or Expansion 3: the Roman Civil Wars (GMT Games, 20070, while interesting situations and improving learning experiences, don’t really feel like a departure from the play style of the core game   By contrast, Crusades has a feel and a flavour all its own.

The unique qualities Crusades brings to the table are achieved by a combination of novel and interesting scenario design, and the introduction of some new, expansion-specific rules. The big system innovation with C&C: Medieval was the introduction of the Inspired Leadership Action economy. This bears some similarities to the Tactics cards introduced to Commands & Colors: Napoleonics (GMT Games, 2010) in the General, Marshals and Tacticians expansion (GMT Games, 2015), except that instead of choosing from a selection of generic cards that could potentially be used by either side, each player begins with a number of tokens (and my earn more through card play, which they may spend in an action to give one unit some advantage in the execution of their activation (these are referred to as Battlefield Actions), or, if actioned during and Inspired Leadership order, maybe used to unlock one of a selection of special orders, these being mostly unique to one or the other side of the conflict. In the core set there was one set of Inspired Actions for the “Romans” and one for the Huns.

Inspired Action options for the Seljuq and Artuqid Turks.

With Crusades, the stops have been pulled out, and while the Crusaders set of options remains static, the opposing Mid-Eastern forces’ options change depending on their ethnicity. The three different sets of Inspired actions reflect the differences in fighting styles between the Ayyubids, the Fatimids, and the Seljuq and Artuqid Turks.

Another new rule involves the Feigned Retreat; after a medium of heavy Crusader cavalry unit declares an attack on an enemy light cavalry unit, if the unit is in a position to evade, it may instead declare a feigned retreat, before retreating the full four-space distance. Here the Crusader player first rolls for damage, hitting only on green circles (not swords, retreats or helmets, if otherwise appropriate). Then, if any of the light cavalry unit hasn't been eliminated, it retreat its full distance (four spaces), then will the Crusader player rolls two dice; if the roll results in at least one crossed swords symbol, the attacking unit will follow the “retreating” unit, ideally ending up deep among the enemy forces. In their very next turn, provided their hand facilitates such an action, the Mid-Eastern payer may be able to destroy a prize Crusader unit with repeated bow attacks – death by a thousand cuts – or with a handy until of comparable strength, especially if the Crusader cavalry’s retreat has been blocked.

Another shockingly effective manoeuvre introduced in the Crusades expansion is the Light Infantry Swarm attack, available to some Mid-Eastern factions as a Battlefield Action (at the cost of an inspired action point). After any movement from a played order card, the Mid-Eastern player may attack a single opponent’s unit with up to four ordered light cavalry units in either ranged or close combat, with all the dice being rolled effectively simultaneously (the defending unit doesn’t get to retaliate to each attack in turn). Moreover, if a unit in Close Combat rolls a sword result, ALL sword results count as hits, and if a Close-Combat engaged unit has an attached leader, all Leader symbols are considered hits also. If all this hasn’t finished the defending unit, and it was forced to retreat, a single Close-engaged unit may momentum advance and have another shot.
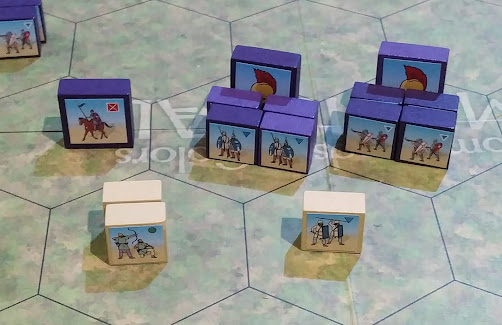
A disproportionate use of force; or, picking the low-hanging fruit.

Between the Crusaders new units and the Mid-eastern factions’ new tactics, Medieval warfare has got a whole lot more interesting. Added to these are the curious set-ups for the scenarios.

One of the virtues of Commands and Colors is the scenario set-up. This is always relatively straight-forward; lay out the terrain tiles, then the two sides’ units, as per the helpful map. With C&C Medieval you may also have to declare whether some cavalry units carry bows and mark them with a Bow marker. When the set-up is complete, the players will often launch straight into aggressive actions. There may be some jockeying for better positions in the first round or two, but you feel like you’re getting straight into the action, This is because the set-ups are designed to pick up the story just at the moment the two sides are about to engage one another.

Set-up map for the first of the four Hattin scenarios. The Crusader army was strung
out over several miles and Saladin sought to fight the Europeans piecemeal through
envelopment manoeuvres. The noose tightens with each scenario.

But in Crusades, the set-ups are in themselves are often more interesting than in the core set. It’s rarely a matter or two sides lining up to slug it out, By the time the game starts, there has already been some serious manoeuvring underway. Maybe a quarter of the scenarios included in Crusades are envelopment situations. This was a tactic the Mid-Eastern armies preferred and excelled at, kind of a Light Cavalry Swarm attack but on a whole-of-battlefield scale. In these scenarios, the Crusaders are hardly lambs to the slaughter, and there are often additional rules to allow the Crusader player to gain an extra Victory Banner or two in a way that requires some planning and luck, rather than the annihilation of yet one more opposing unit.

For the seeming one-sidedness of some of the scenarios, they are quite well balanced. If there is a distinct preferred side on paper, the vagaries of the Command Card draw will often level the playing field somewhat. I would not call myself an expert in tactical warfare in the middle-ages, or in C&C: Medieval for that matter – I’ve accrued far more losses than victories playing this expansion thus far – but I’m beginning to see how some actions or tactics may pay off in a given situation. This is something that, with in the region of five hundred plays under my belt, comes as second nature in Commands & Colors: Napoleonics, but I have more games and more losses ahead of me before I can get to that stage with this game. So, it’s a good thing it’s such a fun and challenging game to play.

At the table with my Monday night gaming buddy (and brother-in-law), T. Note
the mass of Crusader casualties I've inflicted on my adversary (lower left corner),
yet he still managed a pretty convincing win.

Appraisal

I already liked Commands & Colors: Medieval a lot, right from the get-go. Either side of this game, chronologically, the antagonists on the two sides feel a little samey, with similar army make ups (though often with radically different Orders of Battle or disproportionate strengths), Commands & Colors: Ancients and Commands & Colors: Samurai Battles (GMT Games, 2022), In fact, the armies in Samurai Battles are each a mirror image of the other. With C&C: Medieval, we were introduced the concept of the Inspired Leadership counters, a currency the player can spend to gain a slither of advantage in a given situation from a table of possible tactical improvements. These have been doubled-down upon in Crusades, particularly for the Mid-Eastern factions.

For me, there was an element of Might is Right to C&C: Medieval (this can be a thing in C&C: Ancients as well, perhaps more so, where you don’t have the game-changing (well, game-modifying) Inspired Leadership currency to weight a given situation on your side a little), where if you can get your heavy units into play, you’ll have a better chance of a win. I don’t know if this is entirely fair to either system, but it was an instinctual response to seeing the action play out in early games, and it’s a tendency I’ve noticed all my opponents I’ve ever played at either game. The new options in Crusades have, I think, broken me of this unconscious preference. I’m keen to go back to the core C&C: Medieval scenarios and apply what I’ve gleaned from Crusades to those.

Nobel prize-winner Issac Bashevis Singer said he chose to write his stories in Yiddish, then translate them himself into English because Yiddish had "vitamins" that other languages didn't possess. As I've already mentioned here and elsewhere, each form of the Commands & Colors system has its own flavour, its own vitamins. This could be why some people adore one stripe of C&C and loathe another. As a first expansion, Crusades offers a lot. Pound for pound, I think there’s (for me at least) a deeper challenge and more thorough enjoyment in these scenarios than in the core box. This isn’t to disparage C&C: Medieval; like I said at the beginning of this post, that is a great game in itself that I’ve gleaned many hours of enjoyment (and moments of frustration) out of. Crusades just brings a little more intrigue into the mix. Okay, I’m going to say it; Crusades is The Godfather, Part II to C&C: Medieval’s The Godfather. The core game is fantastic, but the sequel is, beyond expectations, just a little bit better. But (to torture the analogy just a little more) You really need to have enjoyed the original before you can truly appreciate the follow-up.


A Fast Take: limiting Command and Control in wargames - part 2

    Staff work makes the Dream work.   This will make more sense if you read the first part first. You can find it here . If you haven’t rea...