
Commands and Colors: Medieval (GMT Games, 2019) offered a new theatre of war to be
viewed through the lens of the Commands & Colors system. There was some discontent
expressed in the usual forums regarding the decision to begin the series at the
beginning of the medieval period, at the decline of the Eastern Roman Empire. Eventually,
however, the unique qualities of the game and the strengths of the system shone
through, leading to a second printing, and, eventually, the product we’re
addressing here, Commands &
Colors: Medieval, Expansion 1: Crusades Mid-Eastern Battles 1 (GMT Games, 2024). As we’re told on the back-of-the-box description, this
set of twenty (yes, that’s “20”) scenarios, spanning ninety years, through the First
and Second Crusades and the intervening years, up to the Battle of Hattin in
1187. The course of the scenarios is a journey through history, with the rise
and waning of successive Arab and Turkish powers challenging the European
knights over control of the Holy Land.
Let me be clear (again) that this is an expansion for
Commands & Colors: Medieval game. That is to say, you need the base game to
be able to play Crusades. I would also not right now, that given the unwieldy
name of the expansion, I will hereon refer to it as either Crusades, or the
expansion, mostly for the sake of my own sanity.
 |
Antioch set-up, from the Crusaders' edge. Note the sneaky (if ultimately unsuccessful)
counterattack from behind by the Seljuq Turks. Also worth noting is the Auxilia Infantry
unit carrying a piece of the True Cross, or maybe a finger of St Andrew (lower right).
In Crusades, relics have power. |
Appearance
I’m not going to spend too much time on the look or the
component quality of the Crusades expansion; I’ve already posted an unboxing of
the set, and anything else I added would simply be repeating myself, something
I try not to do (though sometimes, I just can’t help it). Everything will look
familiar to those who have played C&C Medieval, with the exception of new
units introduced in this expansion. The Crusades leverages the existing blocks
form C&C Medieval. Some have complained that this lessens the distinctive flavour
of the expansion, but I would have to disagree. I’m truly grateful for the
designers and panners of this expansion not insisting on a completely new set
of blocks for two full armies, with all the extra cost in materials and
shipping that would entail, let alone the hours of stickering, and the need to
house a full second army. I can live with anachronistic uniforms or armour (if
they are really that radically different) for the sake of these savings alone.
 |
New units included in the Crusades expansion, Left to right: Mid-Eastern Auxilia Bow
Infantry, Turcopole Light Bow Cavalry, Medium Crossbow Infantry,
Heavy Knight Cavalry, and Foot Knight Infantry. |
As it is, you’re still going to put some time into preparing
new forces and augmenting existing ones with this expansion. Five new
categories of fighting units have been introduced in Crusades, and these are mostly
on the side of the Crusaders. The only new Mid-Eastern unit is the Auxilia Bow
Infantry. Like their regular Auxilia brethren, they fire at range and fight in
close combat with two dice, and in melee will hit on sword results. Unlike the
spear-throwing auxilia, they have a firing range of four hexes.
The only Light unit joining the Crusader ranks is
the Turcopole Light Bow Cavalry. Turcapole cavalry were local men who had
converted to Christianity from Islam, and who hired themselves out as mercenaries
to the Crusaders. As converts who had departed from Islam, if they were caught
by the enemy, they would be executed immediately under the code of law. These,
like all mounted units, may momentum advance and engage in a second round of
close combat.
Arguably the greatest man-portable technological advance
in the years between C&C: Medieval’s Late Roman Empire and the world of
Crusades was the crossbow. Crusades introduces Medium Crossbow Infantry (four
units in all). Like all bow-capable units in C&C: Medieval, the Crossbow infantry
roll two dice in ranged combat. Unlike other bow units, they cannot engage in
ranged combat after movement. They fight with two dice in melee as well, but
can ignore a sword from lower ranked units, and, truth be told, there is a
psychological aspect to having crossbow-armed soldiers on the field of battle,
especially when playing the Mid-Eastern faction.
 |
The Poor Fellow-Soldiers of Christ and of the Temple of Solomon (Knights Templar -
white blocks), and Order of Knights of the Hospital of Saint John of Jerusalem
(Knights Hospitaller - red blocks) may appear mounted or unmounted. |
Finally, the Crusades saw the Super-Heavy Cavalry of
the base game fade from view to be replaced by European Knights, fearsome
warriors whether mounted or unmounted. Crusades offers both options; Foot Knight
Infantry, identified by crossed swords transecting the white-bordered Red-square
unit indicator and by the look of grim determination on the figures in the
illustration, fight with four dice, but they may ignore one flag and ignore the
first Sword hit from a lower-ranked unit. They may momentum advance over the
corpses of their vanquished enemies and fight on for a second round of melee. These
units are formidable.
They are even more formidable in the saddle. Well,
as formidable, but a tad more impetuous. Heavy Knight Cavalry share the same
fighting parameters as their unmounted brothers, but unlike regular Heavy
Cavalry, the Knights are “motivated” (the term used in the rules) by their training,
sense of honour, and a goodly measure of bloodlust, and may advance a second
space to engage the enemy in their second round of close combat.
Then there are the Knights Orders. Crusades
introduces branded crusaders in the form of Knights Templar and Knights
Hospitaller, one unit each of Infantry and Cavalry (representing the cohort as
mounted or unmounted, as the scenario dictates). These units function very much
as their regular Knight-unit collieries, except that these guys always hit on
Leader symbols, whether a leader is present or not. Meaning they will have a
four in six chance of delivering a result on each die in every fight.
Now we’ve met the new guys, let’s have a look at how
Crusades plays out on the table.
 |
I don't want to spend column inches waxing eloquent on it, but the quality of the art in
the terrain tiles really should be noted. For me, it lifts the experience of play a notch. |
Play
Commands & Colors games all use essentially the
same system; this is how we know a game is a Commands & Colors game. If you’ve
played a couple of C&C Games before and you come across a new one, you shouldn’t
run into any problems getting your head around the new game. But the beauty of
the system is in its flexibility. You’ll never achieve anything close to a true
historical a simulation with a C&C game of any stripe – it’s worth noting
that this is true of many wargames, no matter how granular you get – but each
flavour of Commands & Colors brings a lot of situational verisimilitude of
the battle type to the table, no small thing for a single rules set; the only comparable
system I can think of off hand would probably be Great Battles of History (GBoH), covering battles from 500
BCE to the Early Modern period.
Crusades is no exception to this, except in that the
departure from its original game seems more radical than most expansions
achieve. C&C: Medieval was very much its own creature compared to its
closest analogue, Commands &
Colors: Ancients (GMT Games,2006). I really enjoy playing
C&C: Ancients, but playing Expansion 2: Rome and the Barbarians (GMT, 2007) or Expansion 3: the Roman Civil Wars (GMT Games, 20070, while interesting situations and improving learning
experiences, don’t really feel like a departure from the play style of the core
game By contrast, Crusades has a feel and a flavour
all its own.
The unique qualities Crusades brings to the table
are achieved by a combination of novel and interesting scenario design, and the
introduction of some new, expansion-specific rules. The big system innovation with
C&C: Medieval was the introduction of the Inspired Leadership Action
economy. This bears some similarities to the Tactics cards introduced to Commands & Colors: Napoleonics (GMT Games, 2010) in the General, Marshals and Tacticians expansion (GMT Games, 2015),
except that instead of choosing from a selection of generic cards that could
potentially be used by either side, each player begins with a number of tokens
(and my earn more through card play, which they may spend in an action to give
one unit some advantage in the execution of their activation (these are
referred to as Battlefield Actions), or, if actioned during and Inspired
Leadership order, maybe used to unlock one of a selection of special orders,
these being mostly unique to one or the other side of the conflict. In the core
set there was one set of Inspired Actions for the “Romans” and one for the
Huns.
 |
| Inspired Action options for the Seljuq and Artuqid Turks. |
With Crusades, the stops have been pulled out, and
while the Crusaders set of options remains static, the opposing Mid-Eastern forces’
options change depending on their ethnicity. The three different sets of Inspired
actions reflect the differences in fighting styles between the Ayyubids, the
Fatimids, and the Seljuq and Artuqid Turks.
Another new rule involves the Feigned Retreat; after
a medium of heavy Crusader cavalry unit declares an attack on an enemy light
cavalry unit, if the unit is in a position to evade, it may instead declare a
feigned retreat, before retreating the full four-space distance. Here the
Crusader player first rolls for damage, hitting only on green circles (not
swords, retreats or helmets, if otherwise appropriate). Then, if any of the
light cavalry unit hasn't been eliminated, it retreat its full distance (four spaces), then will the Crusader player rolls two
dice; if the roll results in at least one crossed swords symbol, the attacking
unit will follow the “retreating” unit, ideally ending up deep among the enemy
forces. In their very next turn, provided their hand facilitates such an action, the Mid-Eastern
payer may be able to destroy a prize Crusader unit with repeated bow attacks –
death by a thousand cuts – or with a handy until of comparable strength, especially
if the Crusader cavalry’s retreat has been blocked.
Another shockingly effective manoeuvre introduced in the Crusades expansion is the Light
Infantry Swarm attack, available to some Mid-Eastern factions as a Battlefield
Action (at the cost of an inspired action point). After any movement from a
played order card, the Mid-Eastern player may attack a single opponent’s unit
with up to four ordered light cavalry units in either ranged or close combat, with
all the dice being rolled effectively simultaneously (the defending unit doesn’t
get to retaliate to each attack in turn). Moreover, if a unit in Close Combat
rolls a sword result, ALL sword results count as hits, and if a Close-Combat
engaged unit has an attached leader, all Leader symbols are considered hits also.
If all this hasn’t finished the defending unit, and it was forced to retreat, a
single Close-engaged unit may momentum advance and have another shot.
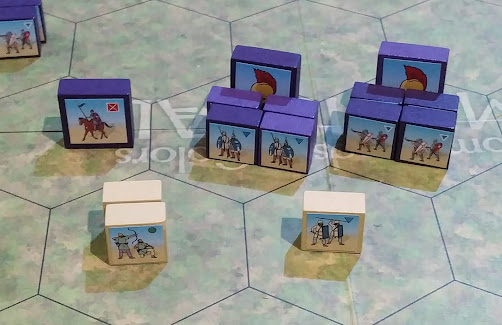 |
| A disproportionate use of force; or, picking the low-hanging fruit. |
Between the Crusaders new units and the Mid-eastern
factions’ new tactics, Medieval warfare has got a whole lot more interesting.
Added to these are the curious set-ups for the scenarios.
One of the virtues of Commands and Colors is the
scenario set-up. This is always relatively straight-forward; lay out the
terrain tiles, then the two sides’ units, as per the helpful map. With C&C
Medieval you may also have to declare whether some cavalry units carry bows and
mark them with a Bow marker. When the set-up is complete, the players will
often launch straight into aggressive actions. There may be some jockeying for
better positions in the first round or two, but you feel like you’re getting straight
into the action, This is because the set-ups are designed to pick up the story
just at the moment the two sides are about to engage one another.
 |
Set-up map for the first of the four Hattin scenarios. The Crusader army was strung
out over several miles and Saladin sought to fight the Europeans piecemeal through
envelopment manoeuvres. The noose tightens with each scenario. |
But in Crusades, the set-ups are in themselves are
often more interesting than in the core set. It’s rarely a matter or two sides
lining up to slug it out, By the time the game starts, there has already been
some serious manoeuvring underway. Maybe a quarter of the scenarios included in
Crusades are envelopment situations. This was a tactic the Mid-Eastern armies
preferred and excelled at, kind of a Light Cavalry Swarm attack but on a
whole-of-battlefield scale. In these scenarios, the Crusaders are hardly lambs
to the slaughter, and there are often additional rules to allow the Crusader
player to gain an extra Victory Banner or two in a way that requires some
planning and luck, rather than the annihilation of yet one more opposing unit.
For the seeming one-sidedness of some of the scenarios,
they are quite well balanced. If there is a distinct preferred side on paper,
the vagaries of the Command Card draw will often level the playing field somewhat.
I would not call myself an expert in tactical warfare in the middle-ages, or in
C&C: Medieval for that matter – I’ve accrued far more losses than victories
playing this expansion thus far – but I’m beginning to see how some actions or
tactics may pay off in a given situation. This is something that, with in the
region of five hundred plays under my belt, comes as second nature in Commands & Colors: Napoleonics, but I have more games and more losses ahead of me before
I can get to that stage with this game. So, it’s a good thing it’s such a fun and
challenging game to play.
 |
At the table with my Monday night gaming buddy (and brother-in-law), T. Note
the mass of Crusader casualties I've inflicted on my adversary (lower left corner),
yet he still managed a pretty convincing win. |
Appraisal
I already liked Commands & Colors: Medieval a
lot, right from the get-go. Either side of this game, chronologically, the
antagonists on the two sides feel a little samey, with similar army make ups
(though often with radically different Orders of Battle or disproportionate
strengths), Commands & Colors: Ancients and Commands
& Colors: Samurai Battles (GMT Games, 2022), In
fact, the armies in Samurai Battles are each a mirror image of the other. With C&C: Medieval, we were introduced the concept of the Inspired Leadership counters, a
currency the player can spend to gain a slither of advantage in a given
situation from a table of possible tactical improvements. These have been
doubled-down upon in Crusades, particularly for the Mid-Eastern factions.
For me, there was an element of Might is Right to
C&C: Medieval (this can be a thing in C&C: Ancients as well, perhaps
more so, where you don’t have the game-changing (well, game-modifying) Inspired
Leadership currency to weight a given situation on your side a little), where if
you can get your heavy units into play, you’ll have a better chance of a win. I
don’t know if this is entirely fair to either system, but it was an instinctual
response to seeing the action play out in early games, and it’s a tendency I’ve
noticed all my opponents I’ve ever played at either game. The new options in Crusades
have, I think, broken me of this unconscious preference. I’m keen to go back to
the core C&C: Medieval scenarios and apply what I’ve gleaned from Crusades
to those.
Nobel prize-winner Issac Bashevis Singer said he chose to write his stories in Yiddish, then translate them himself into English because Yiddish had "vitamins" that other languages didn't possess. As I've already mentioned here and elsewhere, each form of the Commands & Colors system has its own flavour, its own vitamins. This could be why some people adore one stripe of C&C and loathe another. As a first expansion, Crusades offers a lot. Pound
for pound, I think there’s (for me at least) a deeper challenge and more
thorough enjoyment in these scenarios than in the core box. This isn’t to
disparage C&C: Medieval; like I said at the beginning of this post, that is a great game
in itself that I’ve gleaned many hours of enjoyment (and moments of
frustration) out of. Crusades just brings a little more intrigue into the mix.
Okay, I’m going to say it; Crusades is The Godfather, Part II to C&C: Medieval’s The Godfather. The core game is fantastic, but the sequel is,
beyond expectations, just a little bit better. But (to torture the analogy just
a little more) You really need to have enjoyed the original before you can
truly appreciate the follow-up.


