Showing posts with label Task Force: Carrier Battles in the Pacific. Show all posts

Tuesday, 24 October 2023

State of Play: Task Force: Carrier Battles in the Pacific, Scenario 1 (Solo tutorial)


I had to run some errands today, but I managed to do something I’ve been meaning to since it arrived in May; I finally got Task Force: Carrier Battles in the Pacific (Vuca Simulations, 2023) to the table. If you’d like a better look at the whole game, Task Force was the first game I “stripped down for parts,” and my effusive commentary and component photos of questionable quality can be found here.

The first three scenarios are single-player tutorials, introducing the concepts and rules gradually. I’m somewhat a novice when it comes to modern-era naval games so I appreciate the approach. There are some excellent materials available on YouTube; Ruff at Rough Swordsman and Michael at Boardgames Chronicle both have good playthrough videos, and I’m not embarrassed to say I’ve been checking both out. Thanks, fellas.

Helpful scenario set-up board, populated,

The first scenario is the Attack on Pearl Harbor by the Imperial Japanese Navy (IJN). The intention is to introduce how the air-to-surface combat and air-defence rules work (a crucial part of carrier operations), before moving on fleet movement and conducting search operations. I always appreciate the opportunity to learn new games with unusual concepts or mechanics in bite-sized chunks rather than the sink-or-swim approach. I’m not saying it’s the best way to teach and learn, but it works for me.

The set-up took a little longer than it might have if I’d used counter trays; there is so much in the box that there was no way the three GMT trays I’d need to accommodate everything were going to go in it (one would have been snug). I bagged up the ships for each side by class, except for the carriers, which each got their own bag to accommodate their air assets. While some of the planes were generic land-base planes, three-quarters of them were from the carriers involved in the actual Pearl Harbor raid, so I had to go fishing through extra zip-loc baggies to make up their numbers.

Once the helpful scenario template was filled, setting up the game map was a simple task and quickly done. The Scenario 1 map is printed on paper; it’s the only one in the whole box not mounted, I’m guessing because the scenario was written specifically as a teaching exercise, and not meant to be repeated more than a time or two.

Initial set-up (the calm before the storm).

The attacking IJN planes are a mixture of high-altitude bombers (B), dive-bombers (D) and modified Torpedo bombers (T). To make it a bit more of a challenge each wave completely, then rolled, so as not to be able to cherry-pick weakened targets. Well, that’s not entirely true; the scenario rules allow the first four planes attacking to strike without dealing with AA fire from their targets. These were straight runs, so I set these up first. I went straight for Battleship Row, and the two closest to the mouth of the harbour channel, the USS Oklahoma and USS West Virginia. I paired a much weaker B-Kate unit with a T-Kate unit from Yamamoto’s flagship, the Akagi. The West Virginia got a full-strength unit of T-Kates from the Akagi and the half-strength T-Kate unit from the Kaga.

Remainder of the First Wave; they'll have to deal with AA fire.

In air-to-surface combat in Task Force, a low roll is a good roll. The attacker also gains a -2 modifier when the target is stationery (e.g., a land-base or a docked ship). Reader, I rolled ones on the Air-to-Surface Chart, sending the Oklahoma to the bottom of the harbour and falling just one point of damage short of sinking the West Virginia as well. Big ship damage is handled quite well in Task Force. A battleship can shake off repeated hits of a few points (it’s a battleship, after all), but each one has a rating on the lower left corner, usually a 7 or higher. Let’s talk about the Oklahoma (7-rating). Meet or exceed that number in a single attack, and that puts a Minor Damage marker on the ship. But it doesn’t stop there; one more point of damage takes that marker off and flips the counter to its Reduced side. The Oklahoma has a 7 on this side as well. If the result you rolled was ten (7 + 1 + 2), it would end there; the big old battleship would shake off those last few points. If the result was a fifteen though (7 + 1 + 7), that would tear through that extra seven points and put a Critical Damage marker on the ship. A critically damaged ship can’t manoeuvre or defend itself, and just one more point of damage will end it. The Kates hit the Oklahoma for nineteen points.

The USS Arizona sustaining damage.

The West Virginia was a younger ship, and structural improvements had been incorporated from the laying of her keel. Her initial integrity factor was 9, with another 7 on her reverse side. Her initial attack fell just one point short of sinking her outright.

The Second Wave attacks.

I could go and on with stories of the glory my brave pilots brought to the Emperor, and of the sheer tonnage of metal sent to the bottom of Oahu harbour, but suffice it to say five ships were sunk,  four battleships (the West Virginia among them) and the light cruiser Honolulu with another two battleships damaged (the Arizona significantly, the Maryland only lightly – probably operational again within days) and a cruiser, the San Francisco, for a total of 30 scenario points, a full battleship short of the prize. To “win” the scenario, 35 points would be required to reach a major tactical victory, 40 for a decisive tactical victory.

The USS Maryland, takes 9 points damage; one more would have flipped her.

I could run though it again, see if I can sink even more ships, but I don’t think so. This was meant to be a learning scenario, and I think I’d like to take the lessons and move on to Scenario 2: Sinking off the Prince of Wales and the Repulse.


Casualties of war.


Tuesday, 11 July 2023

Stripped down for parts: The Chase of the Bismarck


Vuca Simulations have gained a reputation for producing games of exceptional quality in regard to both in components and play. Many of their games, such as Task Force: Carrier Battles in the Pacific (Vuca Simulations, 2023), and Traces of War (Vuca, 2023), have been reprints of classic Japanese games from the eighties and nineties that have never had the exposure in the West that they deserved. But Vuca isn’t simply a European language reprint company. In-house developed games like 1914: Nach Paris (Vuca, 2022), Operation Theseus: Gazala 1942 (Vuca, 2022), and Donnerschlag: Escape from Stalingrad (Vuca, 2022), and have been gaining plaudits from reviewers and players across the hobby.

The Chase of the Bismarck: Operation Rheinübung 1941 (Vuca, 2022), designed by Jack Greene and is another original publication by Vuca, is a simulation of the Kriegsmarine’s attempt to disrupt shipping to the United Kingdom with surface taskforces headed by the battleship Bismarck. This is a big production; a two-board game incorporating a novel hidden movement, search and discovery system, with a separate battle board for the almost inevitable confrontation between capital ships. I scored a copy of The Chase for the Bismarck and Task Force (you can get a look inside the Task Force box here). This is something I’ve been meaning to get to since getting the game. There is a lot packed into this box, let’s dive right in.

The components

The cover-art style will be familiar with anyone who has had experience with Vuca games. Personally, I like the spare, almost lino-cut quality. It’s a severe look that declares right off the bat that this is a serious game, not for the faint of heart.

The rulebook is a little confronting with its white-on-black cover, until you open it. The interior is lush, full colour, with lots of illustrative explanations, and all printed on good paper stock. It has obviously been put together with a view to assisting rather than challenging the new player, easing them the concepts of the game. The Rulebook runs to 28 pages, but only eighteen of these are actual rules. These are clearly written and laid out, in a sequence that makes sense. 

Sample page from the Rulebook. Helpfully illustrated.

I always enjoy reading historical and designer notes, especially for situations that I am less versed in. Jack Greene provides a short (single page) but very informative Designer’s Notes essay, which Patrick Gerhardt adding some further notes, and a bibliography for those of us who like to dig into the history behind the game. This is followed by a thorough Glossary of terms used in the game (another two pages), some size-comparison charts of the ships involved, and silhouettes of the planes used in search and interception role by both sides. This sort of thing, I think, is always a nice addition, and adds to the sense of history being played out on the boards in front of you.

The Allied Operational Tracking board.

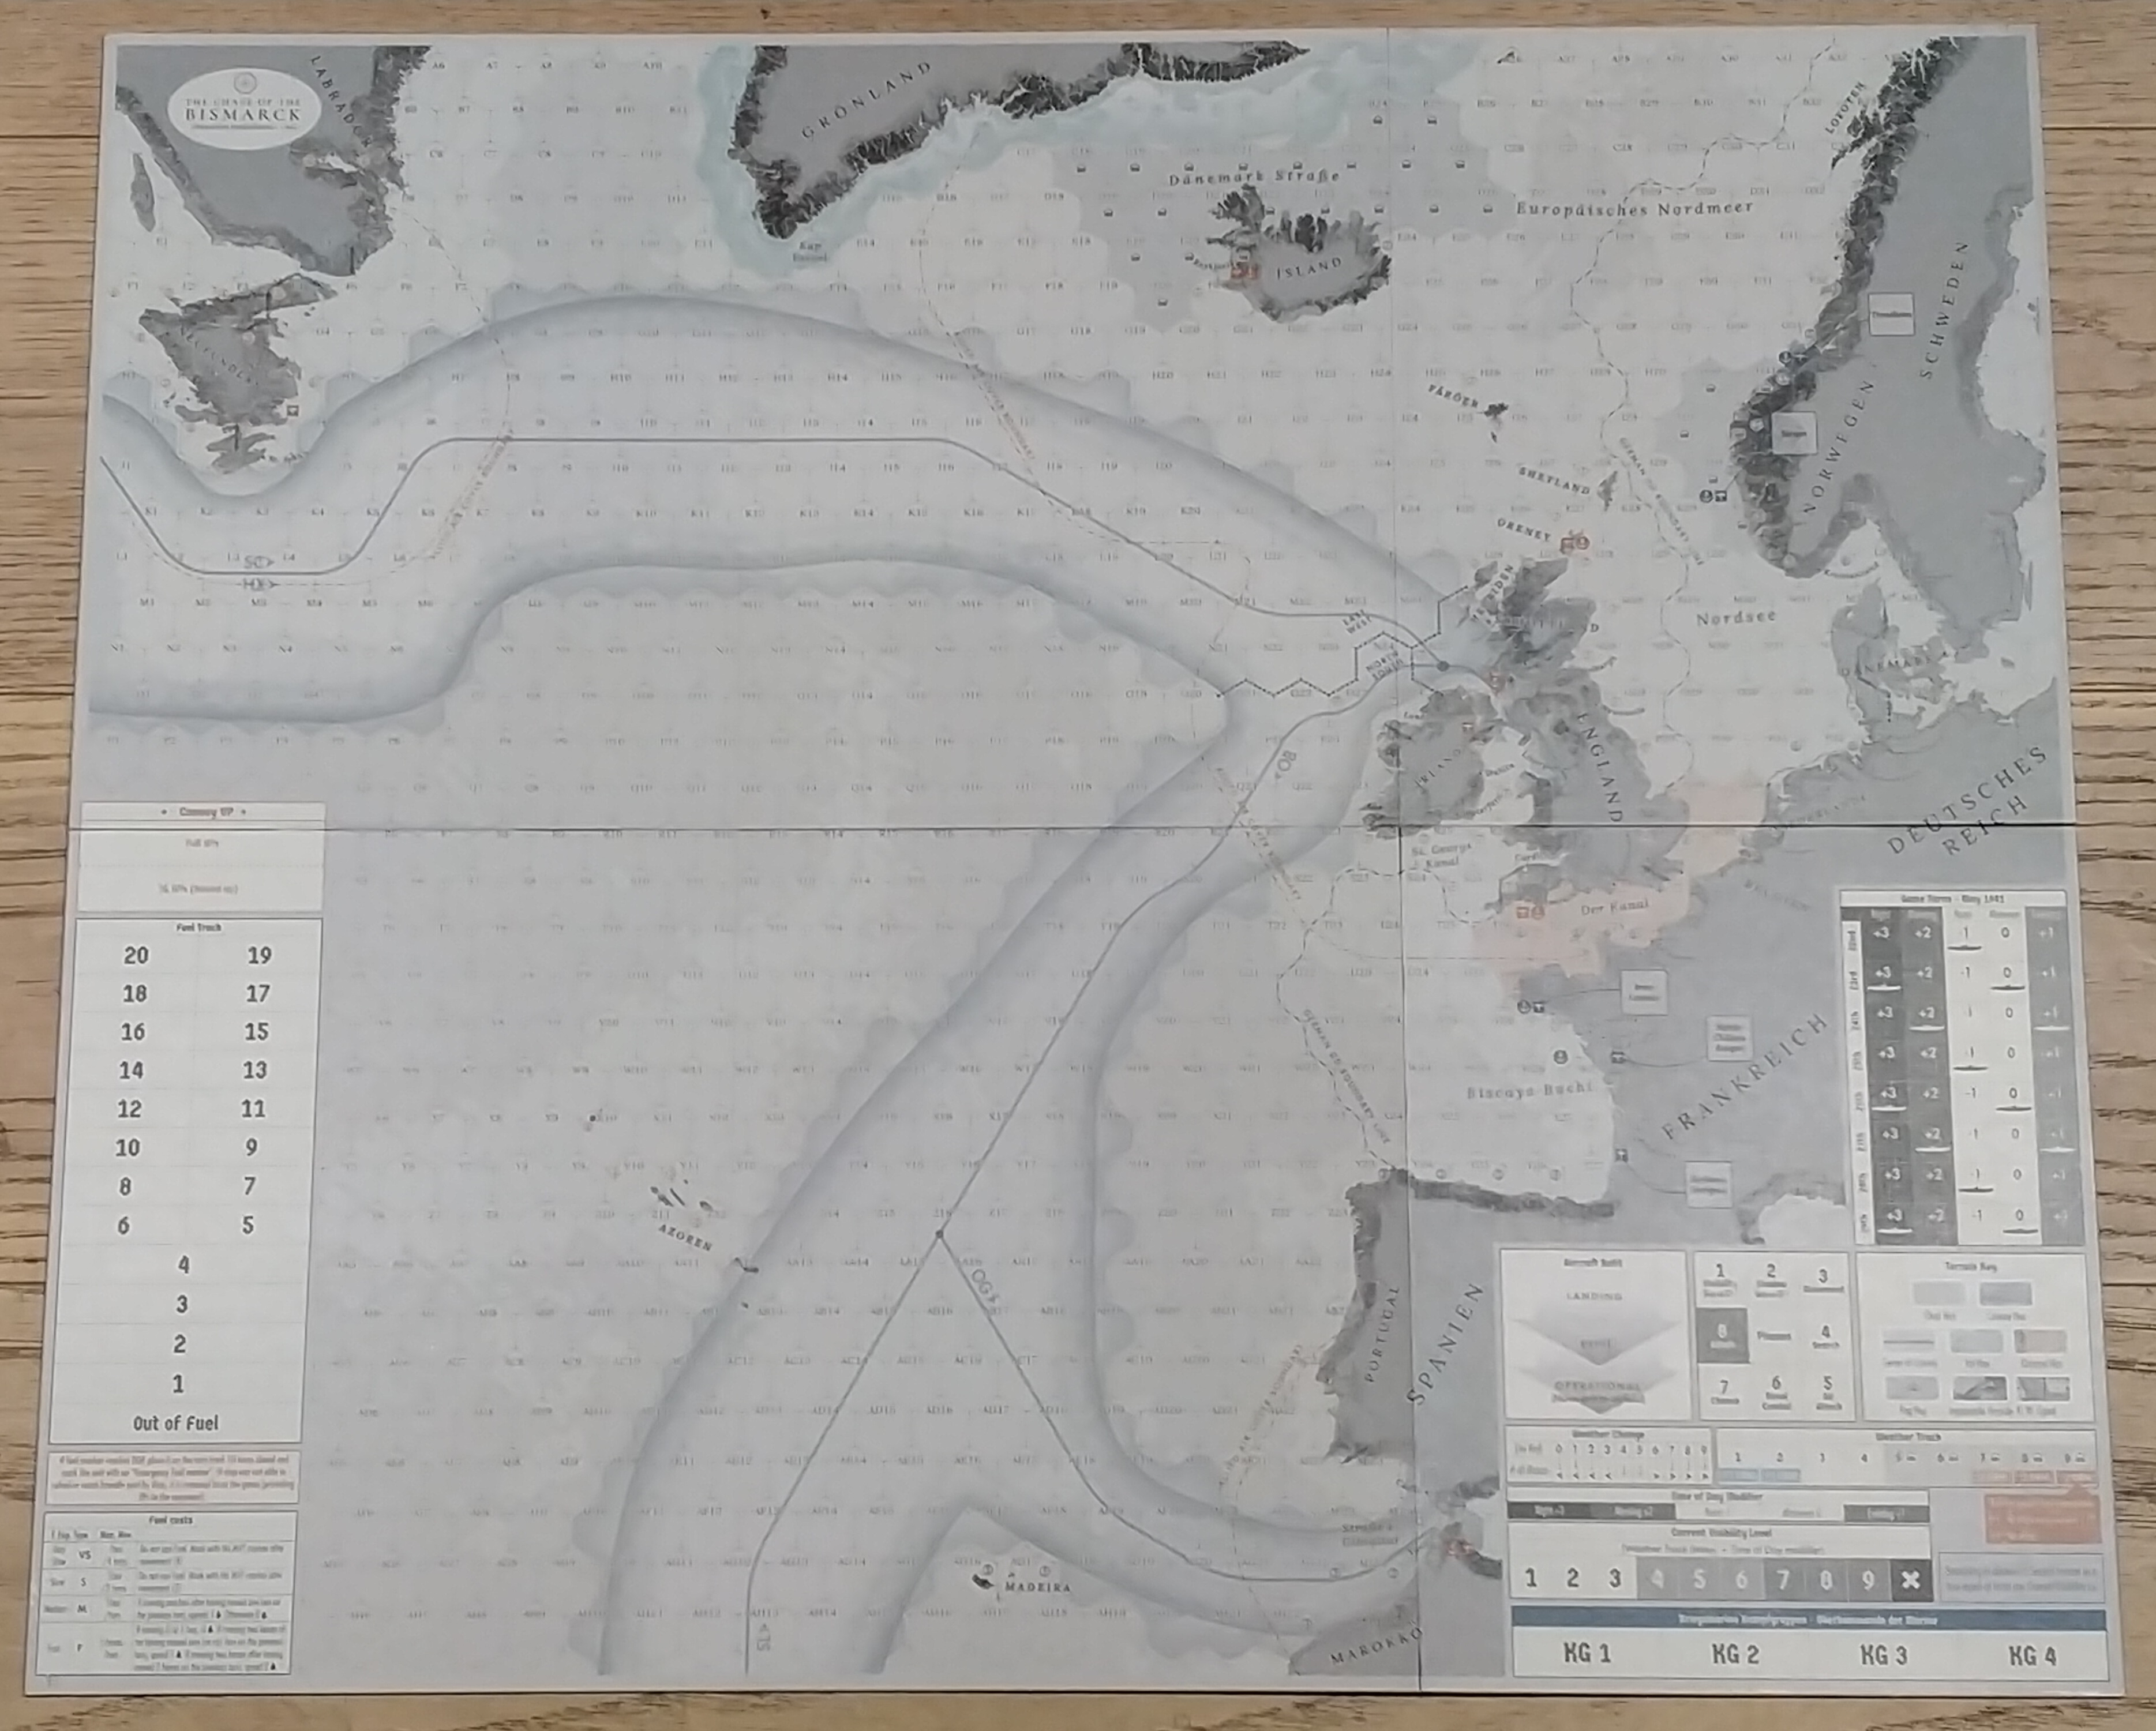
The game features two near-identical maps, one each for the British and the German player. These are the Operational Tracking boards and they are used to accurately track the location and movement of your assets in play, and to make educated guesses and record provisional and confirmed contacts with the enemy. The maps are on good board-stock and, while monochromatic, are nonetheless very attractive, with the feel of actual navigation charts.

Der deutsche Operational Tracking board

The scale of the board is about 74 nautical miles (137 km) to a hex, so acquiring a sighting of an enemy ship is no guarantee of being able to find it when your ship gets there. The map detail is very close, but in a nice touch, the Kriegsmarine board features German names for all identified positions and locations on the map, with the British Navy map reflecting the English names. Each board also features tracks and other graphical aids to assist with play.

A top-right panel comparison.

The boards are each screened from the opposing player’s view with by identical, rather high screens. On the player-facing side of the screen is a wealth of useful information and tables, including a detailed turn sequence, as well as concealing your assets’ locations and dispositions.

Screen (above) and Tactical Battle board.

The majority of the play-time of The Chase of the Bismarck will be spent for the Allied player on the cat-and-mouse search for the Kriegsmarine Kampfgruppe (if the mouse was a 41,000 long ton-displacement battleship bristling with armaments) and the German player's search for shipping convoys to target. Actual confrontations play out on the Tactical Battle board, which is actually two slim ladder-maps, mounted on the same weight board as the tactical maps, designed to be placed together to form essentially a measurable distance between the antagonists, and allow a simple, representation of their disposition (broadside or end-on). The distance is broken up into a series of sea-zones to regulate combat distances (establishing range for for gun and torpedo attacks between ships).

Player Aid Card (front and back).

German set-up card.

Allied set-up card.

The game includes two matching Player Aid cards, which pick up much of the detail not presented on the board screens, and a set up card each for the German and Allied players. Each player also has his own set-up card for the game. These are all printed on the same thicker cardstock used for the counters.

Six counter sheets, all pre-rounded and easy-punch (apologies for the glare).

This is a game with lots of counters (582, in fact). The good news is, like the PACs and the Set-Up cards, the counters are (to these old, squinty eyes) perfectly readable. The come in three sizes. The majority of the counters are informational markers (search or ship status). It’s worth noting here that you’ll need a couple of opaque cups for drawing evasion markers (for when you’ve been spotted), and damage types (for when you take a hit). I like this two-factor randomness in both cases; the skill of the observer or the hand guiding the gun accounts for some measure of success, but the chit-pull for the success of an evasion manoeuvre or the dumb luck of where that successful hit connected captures some of the vicissitudes of war.

British ship tokens, small ship markers (orange) and various markers.

There are also markers to designate search and interceptor aircraft (either land- or carrier-based), Milchkühe (Milk cows; the tankers used by the Kriegsmarine to refuel their vessels), and Task Force markers to reduce the number of tokens needed on the board. Most of the counters are 15mm in size (a touch under 9/16”).

Bismarck? Fount it!

The ship counters for use on the Tactical Battle board are gorgeous; at 45mm long, a little shy of two full inches, with a 15mm beam, and sporting a quite detailed birds-eye view of the individual ships or destroyer flotillas represented.

There are also quite small (12mm) counters representing. indicating individual ships, one for each of the individual ships represented in the game. These are presumably for marking Which ships are in which task force on the Operational Tracking board, or to account for ships not assigned to a task force. (I’m taking a leap here because I’m still working through the rules myself).

Ship cards (bundled), red and blue wooden cubes,
and six (count 'em) d10s.

Each capital ship has its own representative card for recording damage, fuel expenditure and the general disposition of the ship. Smaller ships (destroyers, etc.) share a card between two, to minimise the space requirement.

Damage and Fuel use are recorded on tracks on a card with the use of wooden cube markers (the game includes 100 of these, in red and blue). These are placed on tracks on the ship status cards singly to indicate that function’s current level. Cardboard markers are used to indicate specific conditions, such as propeller, rudder, or radar damage.

One thing I found disappointing with this game was the misrepresentation on the box back of the number of dice included in the game. The box declares two ten-sided dice are included with the game. Imagine my surprise when, upon opening the box, I was confronted with no less than six ten-siders; three in black and three in red. In Vuca’s defence, I would point out that this is the only mistake I have come across in my exhaustive look at the materials included, but I will say that I hope it doesn’t indicate the company's adopting a more cavalier attitude toward meeting the customer’s expectations. 

I am, however, happy to note that I managed to fit the superior number of dice into the box provided.

Chase of the Bismarck footprint

The Set-up

That covers the contents. I’ll admit, when I first opened the box, I was a little overwhelmed. This is a lot of game. What’s more, when set up, Chase of the Bismarck has a big footprint. I wouldn’t normally indulge in a set-up, preferring to depict the components and make some helpful comments, but Chase fort the Bismarck deserves an exception to this.


Long Battle Board - short battles.

This is not a game for the faint-hearted, but at the same time you shouldn’t let the sheer size and scope of it put you off. But you will need some table real-estate to accommodate Bismarck. There is a lot going on, but it’s manageable, and Greene and Gebhardt have done a lot of work aimed at smoothing your entry into the game.

My wife and I live in an apartment that is probably a tad smaller than would be ideal. We do however have a nice, big eight-seater, Tasmanian oak dining table. This is where the magic happens. Our dining table is 2,400mm by 1,200mm (pretty damn close to exactly 8’ by 4’). I did a practice set-up of Chase of the Bismarck just to make sure the two stations (German and Allied) and the Tactical Battle board would fit. It does, just, but it does take up about three fifths of the dining table (not a game I’ll be able to leave set up overnight).

Kriegsmarine tactical station (note the ship cards to the left).

Still, I regret nothing. This is a really beautiful game; every detail has been considered and refined. The production value is top-notch (as one would expect form Vuca Simulations), and just taking out the components, examining and shooting them for this essay, I got a sense of the narrative of the game unfolding. I know how wishy-washy that sounds, but it’s the best way I can think of to describe it. I saw Sink the Bismarck with Kenneth Moore when I was barely in double-digits, and I have a vague sense of how the story played out, but just looking at the Operations maps lends a sense of the enormity of the task before both the British and the German forces. 

This is going to be one hell of a game.


Thursday, 25 May 2023

Stripped down for parts: Task Force: Carrier Battles in the Pacific (Vuca Simulations)


I like YouTube for the wargame content that’s available these days. I don’t aspire have my own YouTube channel. I’ll leave that up to the extroverts. I am, however, really grateful for the unboxings, rules tutorials and playthroughs you find there.

So, here I want to try something different; a new article type that looks at the materiel of games. Kind of like an unboxing, but without the misguided commentary that sometimes accompanies an unboxing video. Just the best pictures I can manage with my cheap-ass phone, and maybe a few words about the quality of the components and such. If it works, I might even invest in a better camera.

So, without further ado, let’s take a look at Vuca Simulations’ Task Force: Carrier Battles in the Pacific (2023).

Now, that's some really lovely cover art.

Task Force is a reprint of a Japanese naval battle game designed by Ginichiro Suzuki and first published in that country in 1982. Vuca is starting to demonstrate that there is a strong market for updated versions of older games that haven’t necessarily had their moment in the sun for Western audiences.

I love the Vuca era-scale that features on all their games. 

Task Force comes in a three-inch box and it needs every bit of that space. With the exception of the map for the first Scenario, Attack on Pearl Harbor, all the map-boards are mounted (double-sided), as are the two player task force displays, and the land base display; even the player’s aids are printed on pretty solid card-stock. The game also comes with six counter sheets, all on thick card-stock (and all pre-rounded).


Lots of ships, lots of planes.

The ship counters are elongated rectangles boasting a bird’s eye view of the ship with its name in Roman and Kanji scripts, surrounded by its numerical values and letter-designation (BB for battleship, CV for Carrier, CL for heavy cruiser, etc.). A coloured corner swatch on the top right corner indicates the ship’s nationality. Along with the ships of the United States Navy (USN) and Imperial Japanese Navy (IJN), a respectable showing of vessels from the United Kingdom, the Netherlands, and Australia are presented.

The game comes with two books; the 20-page rulebook and a 28-page scenario book. Following what is (I think) best practice in games with innovative rules or novel ideas, the first three scenarios are solo teaching scenarios with the fourth being a two-player rules-teaching match.

Scenario 1 – Attack on Pearl Harbor, is basically a snapshot of the attack on the ships anchored by or near Ford Island, and serves to demonstrate in an instructive way how the air attack rules work. Because you’re unlikely to place this more than twice, the Vuca folks made the sensible choice to put this map on (very good quality) paper.

Attack on Pearl Harbor (obviously).

The remaining seven scenarios are a mix of historical and speculative situations, increasing in complexity. The Scenario book also has advice and tables for creating your own balanced scenarios using the available components.

Battle of the Java Sea


Combined Fleets scenario (kind of a speculative naval Battle Royale).

Sinking of the Prince of Wales and Repulse (Solitaire scenario).

The remaining maps are mounted on sturdy board-stock, one 11” by 17”, and two 17” by 22”. These are where the tactical game plays out. The scale of the ocean maps is 75 miles to a hex, and the task forces appearing in a scenario are represented on the board by a TF marker. The fog of war is represented by other dummy TF markers. Part of the fun of the game is trying to identify your opponent’s real task forces before they can identify yours.

Battle of the Eastern Solomons

Battle of the Coral Sea

Battle of Midway

The maps are beautifully presented. The colour chosen for the ocean looks right for the Pacific, a richly dark, green-tinged blue that evokes the deep, deep water of the open sea.

There are five double-sided scenario set-up charts to help you identify the ships. Planes and markers you’ll need for each scenario.


This isn’t a new thing, but I’m always happier to see it in a new game. While it’s double handling, I find it actually cuts down the prep time by a significant factor.


You set out all the units before transferring them to the Task Force Display boards. Turns are tracked on a slender two-day mounted turn-track.

From the top: USN TF display; IJN TF display; Turn tracker (eight day turns,
four night turns - most scenarios don't run more than a day or two)..

Land base display.

The counters have a shiny linen finish that make them pop on the board,
but they're terrible to try to photograph,

But the heart of the game is the PACs. These are, again, mounted on good, firm card-stock. They are double sided, easy to read, and the contain everything you’ll mee dot play the game. Once you get the hang of the rules, you should only have to refer to the PAC in the regular course of play.

Seriously, one of the most well-designed PACs I've ever seen.

These photos don’t do justice to the quality of the materials in Task Force. A lot of attention has been given to every aspect of the game’s presentation. The rules are well laid out, presented in a sensible order, and with only a little duplication. The same with the scenarios, which all come with brief historical notes and sensible advice. The only thing I could possibly gripe about would be the size of the font; it's a blocky serif font that is perfectly readable in the maybe nine-point it's been printed in, but I tend to complain like a restaurant critic if I have to reach for my reading glasses, so that one’s on me.

The ship counters are lush, with the battleships cruisers and carriers all getting their own individual representations. The destroyer counters all look the same but that is perfectly forgivable. The plane counters are a tad more functional, but the little silhouettes of the aircraft are clearly representative of the plane in question – you can tell a Zero from a Kate from a Val by the image alone. The markers are functional as well, but all have some small flourish that adds to the charm of the game. It’s a spectacularly gorgeous package.

The artwork on the box-lid and the two booklet covers also warrants a mention. The simple, screen-printed style evokes a poster style from the era. It’s becoming something of a trademark look for Vuca Simulations, and I think it really works for WWII games generally, certainly in this case.

I hope this has been an interesting tour through the contents of Task Force: Carrier Battles in the Pacific. It’s not something I intend to do with every game that passes through my hands, but I already have the next one or two in mind for this treatment.

Thanks for reading all the way to the end.


Tuesday, 2 May 2023

State of Play: Aces of Valor, Undaunted: Normandy, 1565: Siege of Malta


I feel like the drought has broken. T and I got together for another round of Undaunted: Normandy (Osprey Games, 2019) on Monday, the first time since the beginning of April. That makes game five of six. We’re slated to play the sixth game in a fortnight. The lapse between games has been mostly due to T’s unavailability, but I can’t be too hard on him; last week he was in Boston at a conference, and he offered to bring some stuff back, so I took him up on the offer with a with an order from Noble Knight Games, delivered in good order to T’s hotel, of two Vuca Simulations games that I’m surprised didn’t put T over his luggage allowance. The Chase of the Bismarck (2022) and Task Force: Carrier Battles in the Pacific (2023) have now joined the long list of games I hold but have yet to play, but I’ll try to present something about each of them in the near future.


But back to the games at hand. As mentioned, las night we got to Scenario 6: Desperate Withdrawal. We were going to play this a few weeks ago, but T had to beg off due to illness. Taking some care with packing it away last time, I was able to get the scenario set up in under ten minutes – something of a record for Undaunted: Normandy.


The scenario is an interesting one; it seems quite unbalanced on the face of it, with the Germans being able to field two squads, plus machine-gunners, a mortar-crew, and a sniper, to the Americans’ two rifle squads and scouts. With the reduced resources comes a clarity of mission. The Americans are practically adjacent to the German riflemen at the beginning of the game, and they must traverse the length and breadth of the board to reach safety (secured by the capture of a victory marker), before they are both pinned. (It’s worth noting that this is the first scenario we’ve played that uses all eighteen map-tiles.) The difficulty for the German player is getting the resources into place to effectively prevent both rifle squads from reaching the flag. T perhaps tried to bolster (get into his deck, and sop potentially into play) too any units rather than concentrating on a couple to keep his draw deck leaner. If he had ignored the mortar and sniper and got this two machine-gunners and a scout onto the board sooner, he would have probably been able to suppress my riflemen long enough to get his guys up to pin both units. As it was, both my rifle squads took hits but were both still in the game ad able to press forward (the presence in my draw-deck of the Platoon Guide helped a lot).


Every scenario (after the first one or two) is an interesting puzzle to be nutted out. I don’t think this takes away from the game’s wargame credentials – a lot of wargames are interesting puzzles (1944: Battle of the Bulge (Worthington Publishing, 2020) springs readily to mind) – but nonetheless it works on that level as well, which is probably why so many point to the Undaunted series of games as good gateway games to wargaming. It also helps that they’re a lot of fun

In other news, I’ve been working at a medium-length campaign (twelve missions) of Aces of Valor (Legion Wargames, 2023 – at time of posting, still available from the publisher at the CPO price). I’m not quite half-way though the campaign, having just completed my fifth mission. I’m eager to review this game – there is so much to like here – but I want to get all the way through the campaign before I write it up. So far, all five missions have been at least partially successful, and in this last one I managed to take down two enemy fighters and drive off another three with some serious damage. I’ve lost one plane (in the fourth mission), but the pilot – a rookie – still managed to glide the machine back to a position behind friendly lines and hitch a ride back to our home airfield.


One of the strengths of the game is the ability to pack it up at the end of a mission and pull it out again when I have an hour or two to spare. It requires a little organisation with the mission cards and the relevant counters, and I take a photo of my current mission-point and victory-point status, but the bookkeeping isn’t too arduous. Look for a review in a couple of weeks.


Finally, I’ve been playing 1565: Siege of Malta (Worthington Publishing, 2022), with the view of writing a review of this. I recently posted a review of 414BC: Siege of Syracuse, so I was keen to revisit this one and 1759: Siege of Quebec. For all their similarities, I’m beginning to see how radically different the three games are in play. Dan Fournie and Maurice Suckling, the designers of Syracuse and Malta respectively, are no slouches, and have each managed to create a game experience that is superficially similar to Siege of Quebec, but that offer radically different challenges. Look for this review soon as well, but not too soon, as my wife and I are taking a well-earned break and visiting some interstate friends for a few days. Regular transmission will return next week.


Stripped Down for Parts: Commands & Colors: Napoleonics – The Grand Battles Expansion

        Note: I started writing this post about a week before the GMT Monthly Newsetter for July came out and was struggling to get it ...