Showing posts with label Legion Wargames. Show all posts

Sunday, 9 August 2026

Stripped Down for Parts: La Bataille de Hanau (Vive l’Empereur series)


The last fortnight or so has been a perfect storm of arrivals. Seven games arriving this quarter, and two more in transit, and we’re not half-way through August. But right now, I want to focus on one of these, because it’s something I’ve been anticipating grabbing for a while, and when the opportunity arose, I couldn’t not get it.

Legion Wargames had a sale recently, with a number of excellent titles being offered for significant discounts. I would have liked to take the opportunity to fill a couple of perceived gaps in my collection – Dien Bien Phu: the Final Gamble (Legion Wargames, 2016) and Nemesis: Burma, 1944 (Legion Wargames, 2018), among others – but alas, the budget would only stretch to a single game this time, so it had to be La Bataille de Hanau (Legion Wargames, 2021), the tenth and most recent addition to Didier Rouy’s Vive l’Empereur! series.*


Like a lot of the Legion games I already own, La Bataille de Hanau comes in a light but well-constructed box. Light is good, because it meant the postage cost to Australia was only US$20.00, which matched the (discounted) cost of the game. In all, game and freight set me back a shade over A$60.00, which is about half of what I'd expect to be paying at a FLGS, assuming I could even find a copy. One happy customer.

The cover features a painting, Charge of the Grenadiers-à-Cheval of the Imperial Guard, battle of Hanau,1813 by Richard Knötel, a German artist best known for his Uniformenkunde, an exhaustive visual study of European military uniforms over three centuries to 1914, but who was also an accomplished painter of military scenes.

Box back

The box back presents most of the map, along with a brief historical consideration of the situation presented and a visual guide to how the unit and leader counters function in game.  The Vive l’Empereur! series presents a smaller formation focus than many Napoleonic systems, with the Regiment being the essential building block of the game. Each strength point represents around 300 men, and the map-scale is 250 meters to a hex (so roughly 6 ½ hexes make up a mile). Turns represent 30 minutes, and we are warned that the game can take between two and eight hours to play through to completion.

The play guide suggests the game's complexity is about Medium, and sets the Solitaire Suitability at Medium-High. I think I'd agree with both of these appraisals. While I think the Vive l'Empereur! rules make for a better two-player experience, I can't see anybody experiencing particular difficulties double-handing the game, especially with the reduced scope of the Hanau situation.

The Rulebook. Napoleon salutes you, brave soldier.

The Vive l’Empereur series rules are printed in full colour on a medium-weight, low-gloss paper stock, and runs to forty pages. Of these, the front and back covers are illustrated with extracts from the left (front) and right (back) of the painting, Napoleon saluting the 12th Cuirassier regiment, by Ernest Meissonier (1815–1891).

Rulebook - sample spread.

The rules have been honed over the nine previous publications, and the current configuration presented here is version 3.3 (June 2020). The booklet is set out in a readable is divided into Standard and Advanced rules. The Standard Rules run to roughly 23 pages (a column on the first page offers a clear Table of Contents, and the rules are sensibly set out and quite navigable). The designer recommends mastering the Standard rules before embarking on incorporating the any or all of the Advanced rules. The Advanced rules are designed to introduce more “realism” into the action, with rules for the stratification of command and control, strategic deployment, and the introduction of time limits (with penalties for tardiness).

The four-page Special Rules brochure.

The Special Rules included for Hanau are more of a brochure, a mere four pages long; in reality, just two and a half pages pertaining to game play. Two scenarios are on offer; the initial action on October 30th, and Wrede’s follow-up attack on the 31st. The special rules amount to barely a page and a half, to there is very little extra load to bring to the essential game rules. Rules-wise, Hanau should run as a fairly clean game, though if history is anything to go by, the play will undoubtedly become heated.

The map of Hanau and its environs.

The game map is a standard 22" by 34"  in size, printed on a a descent weight of gloss paper, and is truly a thing of beauty. This is a feature of all the Legion-released Vive l’Empereur games, which are all rendered by one of my favourite game artists, Charlie Kibler. The colour-palette is subdued, cast in autumnal tones appropriate for an October battle. Features are clear without being obtrusive, and the overall appearance highlights the units in play. But the detail I really love it that every feature is presented in a perspective view oriented toward the bottom of the map-sheet. Each tree, bridge and building appears to possess height. While the roads, rivers and creeks appear flat, this is relieved by the aligning trees dotted along the banks and roadsides. It’s conceit that fits well with the subject and the era.


Hanau comes with just a single counter sheet (165 counters in all). The units are split slightly in favour of the French (fifty units to forty Austrian units). Historically the battle of Hanau didn’t end well for Wrede the Austrians. Given the Austrians are on the defensive, this should be a fairly even match for two players at roughly the same level.

The counters are all elongated, 1” by 1/2”. So far as I’m aware, the Vive l’Empereur! games were the first to present their unit counters in Line on one side and in March Column on the other, with artillery batteries either limbered for movement or unlimbered for business (of course, this is getting a broader showing with Mark Herman’s Civil War Heritage series). The remainder of the counters represent Leaders, various administrative aids and mnemonic reminders of the status of affected units in play.

Unit Explainer and Terrain Key card.

Terrain Effects Chart.

The game comes with a selection of Player’s Aid Cards, each single sided. The first is a Key card; the top portion has a visual explainer of how to read the unit and Leader counters, the larger lower portion presents an enlarged Terrain Key demonstrating (and showing off) the various terrain features of the map. This is separate to the Terrain Effects Chart (the second chart), a matrix listing the varying terrain types by name and indicating their effects or limitations on in-game actions of units.

Aide de jeu pour le combat

There are two copies of the Combat Resolution PAC included in the game. These present the Fire and Melee Tables as well as a Formation Table. The Fire and Melee Tables are fairly self-explanatory; a Fire attack is based on a single die roll with modifiers (as applicable), against the Fire strength of the attacking unit. The success a Melee attack relies again on a modified die roll indexed to the ratio of Attacker to Defender melee points. Combat is potentially brutal, but, as in most things, fortune favours the well-prepared.

The Formation Table is a one-stop shop covering the basics of movement, manoeuvre, and combat for each kind of unit fielded in the game. Everything presented here will probably become second nature after a handful of games with the system, but it’s nice to see it easy to hand for newbies.

The crucial Formation Tables for tracking losses on each side's units, and a Turn Track at
the bottom. I think this card is dry-erasable, but I'd be inclined to either make copies
to use or to put the card in a stiff plastic slick and write on that instead. 

The last Player Aid Card is the most crucial, for this offers both the tracking of cohesion loss of the units, and the Turn Track for keeping track of how long you have before loss of light brings the bellicosity to a close. I like how points loss is tracked off map; Steve Ruwe offered this as an option in his game, The Late Unpleasantness: Two Campaigns to Take Richmond (Compass Games, 2019). Here it also serves as a handy reminder of which units fall under whose command. The only difficulty that might arise comes from having both armies on a single tracking sheet, but this may be a bonus for teaching new players the system; either the mentor can keep score for both, or guide the initiate in the practice. 

Box, dice and baggies.. And the ubiquitous blue paper sheet.

Finally, the game comes with two dice, one lobster red, one uniform bleu, and a couple of zip-loc bags with which to separate the warring formations. Also, Legion always – or nearly always – packs their games with a sheet of blue typewriter paper in the bottom of the box. I don’t know why. I suspect it may be to prevent wear from the map rubbing against the bottom of the box when in transit, but I can’t say with any certainty. If anyone does know, please leave a comment.

-----

Writing up this unboxing has reminded me that I never got around to posting an unboxing of my other Vive l'Empereur! volume, Quatre Batailles en Espagne (Legion Wargames, 2015). I'm pretty sure I still have all the component photographs filed somewhere from when the game first arrived, so I may have to do an exposition of that volume as well. 

I'm keen to get to playing Vive l’Empereur!, but I have been waiting for Hanau to have a more manageable starting point for introducing others to the game. I really think it offers that; not necessarily a short game, but one with less unwieldy forces and command structures, in a more constrained area.


* I had cause to correspond with M. Rouy recently, and he mentioned that Volume 11 in the series, La Bataille de Wargram (Legion Games, ~2026), should be released either this year or early in the next, which gives us all something else to look forward to.


Sunday, 28 December 2025

Stripped Down for Parts: Fire on the Mountain (Legion Wargames catch-up order, Part 2)


I recently blew a windfall of PayPal credit on some games I’ve wanted to try for varying lengths of time. One is still on its way from another publisher, but the other three I was able to order directly from Legion Wargames. I’m looking at these in order of release; the first one I looked at was The Battle of Blenheim, 1704 (Legion Wargames, 2018). You can check out that unboxing here. The second game in the order is John Poniske’s Fire on the Mountain: The Battle of South Mountain September 14, 1862 (Legion Wargames, 2022). I’ve had a lot of fun with Mr Poniske’s Ball’s Bluff (Legion Wargames, 2015), and I’ve heard that this, Fire on the Mountain, and Belmont: Grant's Baptism of Command, November 7th, 1861 (Compass Games, 2017) are variations on a theme, essentially the same system, but with something extra to fit the individual battle situations.

The Battle of South Mountain is an interesting battle to game, and is or has been available in several American Civil War game systems. It is also significant in one respect of ACW lore. As mentioned in an anniversary post by the Wisconsin Veterans’ Museum;

This battle also is the most-commonly accepted origin for the famous name “Iron Brigade.” Late in the day an infantry brigade consisting of the 2d, 6th, and 7th Wisconsin and 19th Indiana attacked in the Union center along the National Road. “What troops are those fighting along the Pike?” asked General McClellan as he looked on. “They must be made of iron.”


Fire on the Mountain’s box cover features and extract from a painting by H. Charles McBarron Jr (1902-1992), a noted illustrator for US military publications and a founding member of the Company of Military Historians, as well as a consultant to the Smithsonian. This painting, known alternatively as “The American Soldier, 1862”, “The Citizens Corps of Wisconsin at South Mountain, Maryland,” and “6th Wisconsin at Turner’s Gap, South Mountain,” was originally prepared as part of a series of fifty illustrations released in five sets of ten by the US Government Printing Office, called The American Soldier: 1775 to the Present (released around 1974).

Lookout Mountain. This photo was taken quite soon after the Union attack 
on the Confederate forces. One of the rigid ladders used in the assault
is just visible (here's a better view (Courtesy of WIkipedia)).

McBarron worked very quickly, was an early adopter of photographic media, often working off existing photographs of his own polaroids to more accurately portray the landscape’s details in his subjects. In this case, McBarron worked from a photograph taken after the battle, but misattributed. Paul McKee, a friend of a friend on Facebook, has conclusively established the photograph from which Barron worked was actually of Lookout Mountain in Tennessee (site of the Battle Above the Clouds), rather than South Mountain, Maryland.* Nonetheless, the painting is beautifully executed and quite compelling. And popular; it graces at least one other wargame box cover – Grant Wylie’s South Mountain 1862 (Worthington Publishing, 2025), from Worthington’s Brigade Battle series.

Box back. I forgot to mention in the post, Fire on the Mountain is recommended
for grognards fourteen years and older.

As I’ve probably mentioned before, Legion box-backs are, in my opinion, a benchmark for how game information should be presented, The box-back of Fire on the Mountain offers a two-paragraph historical precis of the battle for context, and a much shorter statement of he parameters of the game at hand. This would be my only point of criticism in the presentation of the game; The black print on the muddy brown background made me work a little harder at reading than I’d otherwise like. It’s a small thing, but a slightly lighter shade for the background (or white print, as used in the game details inset near the bottom) would be appreciated.

The box-back also features a representation of the map (which looks great, even in miniature, but we’ll get to that), a sample of the game’s unit counters and markers at their actual size, and the relevant game details. These tell us the game’s scale – 300 yards to a hex, brigade-sized units, and one-hour to a turn – a truncated component list, and the game credits, which we’ll return to soon. The Fire on the Mountain has a complexity rating of Medium-Low and, while designed as a two-player game, is rated Medium-High for solitaire suitability.

The Rules of Play.

The rulebook for Fire on the Mountain is printed on a matte-finish paper-stock of roughly 100gsm, lending the booklet a satisfying heft for its size. The booklet runs to sixteen pages, but the first two pages are occupied with an introductory note *as seen in the above photograph) and thorough Table of Contents, and the back cover features the Confederate and Union Orders of Battle, so the rules take up a mere thirteen pages. There is an addendum to this count, which we will come back to in due course.

Sample pages.

I keep harping on this, but I can’t say often enough how much I appreciate the rules layout in Legion games; Fire on the Mountain is no exception. The rules here are set in a nice, easily readable sans-serif font and presented in two columns with coloured bars marking the beginning of each new section (these follow the numbering convention familiar to anyone who grew up on SPI games. Examples are set in text boxes, and the whole thing has colour illustrations when necessary (pictures appear sparingly, but not frugally).

Rules Revision sheet and Errata note. Seriously, if the errata fit on just a half-sheet
of paper, somebody deserves a commendation..

Fire on the Mountain, as it is presented, is not a wholly historical representation of the battle; the Confederate Order of Battle includes R.H. Anderson’s Division, which did not participate in the historical battle. The designer has included a rules revision to accommodate this shortening of the Confederate forces to equate any loss of balance caused by playing the historical Order of Battle (making Confederate defences a little more resilient in the face of Union assaults), and a second to use Anderson’s Division, but with an uncertain arrival time across four game turns.

Two small items in the rulebook remained uncorrected at the time of printing, and these are addressed by a half-page Errata note, also included in the game, one involving Movement Costs and the other a reference mis-naming a brigade’s commander. In the latter case the counters and Orders of Battle contain the correct information. No harm, no foul.

The map-sheet. Even with some encouragement, the folds didn't want
to give up completely.

The game map was prepared by Edmund Hudson. If that name sounds familiar, I’ve noted Mr Hudson’s excellent work previously on the map for All Are Brothers, Solferino, 1859 (Legion Wargames, 2025). He is also responsible for the game-maps for several of Revolution Games’ Blind Swords series games, including the recent Gettysburg: the First Day (Revolution Games, 2025). This map is simply stunning.

A map extract highlighting Frosttown and its environs. The terrain details
are clear, but subtle and unobtrusive.

The game focusses on the action in the vicinity of Fox’s Gap and Turner’ Gap, and is topographically challenging, both in play and in its representation. Changes in elevation are noted by a shift from darker hues of green though near-grey to yellows and browns (the Altitude key runs in 100’ increments from 400’ to a dizzying 1,600’). Features on the map – farmsteads, roads, trails, woods, and escarpments – are clearly defined without being jarring, and the hexes are large enough to comfortably accommodate the elongated (1.2”) unit counters.

The map-sheet incorporates a terrain legend and Turn Track along the Right-hand short edge (the Confederate left). Also built into this column are Casualty boxes for the two sides.

The game's two counter-sheets.  

The game comes with two counter-sheets, each printed on a medium weight white-core cardstock and each consisting of a mix of square 0.6” and the aforementioned 1.2” by 0.6” counters. The double-width counters are brigade-sized units representing the two sides’ complements of infantry, cavalry, and artillery units. The square counters represent the two side’s divisional and corps Commanders and also provide an assortment of administrative counters.

The unit counters are a study in usability and at-a-glance identification. Each unit has a silhouette of an unmounted or mounted soldier or a cannon to identify it as an Infantry, Cavalry or Artillery unit respectively. Each infantry counter also exhibits a white silhouette of the brigade’s home state. At the right-side end of the units is a big, easily read number (two numbers for Artillery units) indicating the unit’s current battle strength in Strength Points (SP). This number represents the number of dice that unit will roll in combat (attack or defence), with an overall ceiling on ten dice per roll. Many units are represented by two or more counters, which are flipped or replaced as the unit suffers losses in combat and loses SP. Finally, each brigade is identified by their brigade commander’s name, which appears on the bottom edge of the counter, superimposed over a colour-bar that identifies their divisional affiliation (this is something reflected in the layout of the Confederate and Union Order of Battle cards, which we’ll see coming up). The regiments that make up the brigade are also listed on each counter, which has no game value, but adds to the historical depth of the game and is a nice, respectful touch.

The orientation of the unit counters is crucial in the game; the top long edge of the counter represents the front facing side of the unit, and the unit is paces in the hex side to side, to that edge is acing two hexes. These represent the front. The two hexes below the counter are the units rear, and the remaining hexes meeting the side edges of the unit are its flank. This configuration will, of course, impact on movement and combat. Up to three brigades may stack together in a hex (as well as up to two leaders), but only two of these may be infantry brigades. That's all I'm going to say about brigade units at this point. I'm no expert yet - wait for the AAR.

The Players' Aid Card. Only one is provided, but by the end of the second game,
you'll probably remember most of the regular tables.

Fire on the Mountain comes with a single Player Aid Card, a Set-Up and Reinforcements schedule, and two Order of Battle cards, one each for the Confederate and Union players. All of these are single-sided and printed on a sturdy weight of card-stock.

The PAC offers a quick reference Sequence of Play and charts for the Burnside Roll (reflecting Burnside’s order to all Union formations on his arrival at the battle to disengage with the enemy until he had taken stock of the situation), and charts for Rallying and Regrouping units, checking Morale, and a set of guidelines for Commander behaviours (various Commanders may be subject to different conditional rules in certain circumstances).

The Union Order of Battle;

...and the Confederate Order of Battle. Note how provision has been made
for the multiple-step units.

The Orders of Battle cards allow for the setting out of each side’s units in a coherent and organised fashion. Each Brigade has a corresponding template of each of its step-counters on the Order of Battle (one, to or three counters), and these are grouped by division. This is unusual in this kind of set-up, but it removes the need to stack and swap out units' step-counters on the fly.  Personally, I think this is a great approach; it should speed up solo play especially.

The game should exhibit a low counter-density. This is partly due to staggered arrival of the reinforcements for both sides over the course of eight turns, but also because, even if every unit from both sides were to be deployed at exactly the same time, this would still only come to twenty-nine units for the Confederate player and thirty-five for the Union.

The Set up and Reinforcement Schedule (as I like to call it).

The Set Up and Reinforcements schedule is just that, a card that lists the set-up locations for the initial forces, and breaks down the reinforcements list turn by turn to make it easier to track. Each unit that starts on the map is represented by its divisional commander and a reference to its position or on the board’s numbered hex-grid. The reinforcements are presented as a list of Confederate or Union divisions, with a map entry hex for those units.

Some games build the reinforcement schedule into the Order of Battle, but given both the size of the unit counters and the relatively low density on the board – there are only about sixty units among the two sides combined – I think this is a more sensible approach.


As always, the good folks at Legion Wargames have provided zip-loc bags in sufficient quantities to house the game’s loose components. I’m old enough to remember when coins still came in paper rolls and the best way to store game counters was in empty matchboxes or, if you were lucky enough to have a supplier, typewriter ribbon cases, so I always appreciate it when these are provided, even when they don’t get used. Fire on the Mountain also comes with ten dice, five each in red and black. Ten in all, which (as mentioned earlier) is the total highest number of dice to be used in a single roll, so that makes sense. I’m not sure if there is any significance to the two colours of dice as I haven’t finished going through the rules yet, but for what it’s worth, they do look like nice dice.

-----

So, that covers the components of Fire on the Mountain. Everything looks functional and really quite nice. The counters should really stand out on the map, and the housekeeping should be a breeze with the Orders of Battle cards and the reinforcement schedule. I should point out that the Set Up and Reinforcement Schedule isn’t actually called that, but that’s how I thought about it and now I can’t stop calling it that. The word “schedule” never appears on the card or – so far as I’m aware – in the rules. Don’t get uptight when your copy just has “19.0) GAME SET UP” at the top.

This has been the second part of my exploration of my three-game Legion catch-up order. I don’t think I’m going to get to part three, A Glorious Chance (Legion Wargames, 2023) for a couple of weeks, given family commitments over the holidays, but I may surprise myself. In the meantime, thanks for reading this far, and hope the season is good to you and yours.


* This is not meant to be an indictment against the misuse or wrongful allocation of the picture; Barron no doubt did his best with the resources he had to hand. The US Army Center of Military History still represents the painting on their website as being Turner’s Pass. These things when left this long tend to take on a life of their own, and while everyone else appreciates the fine work or the stirring narrative, only pedants and curmudgeons mutter their disapproval.


Sunday, 21 December 2025

Stripped Down for Parts: The Battle of Blenheim, 1704 (Legion Wargames catch-up order, Part 1)


Long-time readers will know I’m a fan of Legion Wargames. I made a point of grabbing All Are Brothers: Solferino, 1859 (Legion Wargames, 2025) when it came out because I was worried about the title selling out quickly. I don’t think I’d ordered anything directly from the publisher since Aces of Valor (Legion Wargames, 2022). Legion produces interesting games with thoughtful design elements, often covering more obscure aspects of history.  

I try to support publishers directly where I can, and Legion has a CPO (Customer Pre-Order) section on their website that lists their proposed and in-development games. Customers can indicate their intention to buy a copy of a game on publication, which gives the publisher an indication of a title’s popularity and a guide for its print run. The CPO is based on the honour system; no payment details are collected, but Legion will send you an email when the game is available for order.

I’ve been feeling guilty for some time about not following through on my own CPO order of A Glorious Chance: The Naval Struggle for Lake Ontario in the War of 1812 (Legion Wargames, 2023) when it became available about two years ago, due to financial constraints. So, when I managed to sell some old RPG books, I suddenly had some “found money” to put toward A Glorious Chance and two other titles I’ve been interested in a while. So, here is the first of a three-part unboxing of my Legion Wargames catch-up order. I’ll cover them in release order, so we’re starting with The Battle of Blenheim, 1704 (Legion Wargames, 2018). Next, we’ll take a look at Fire on the Mountain: Battle of South Mountain September 14, 1862 (Legion Wargames, 2022), and we’ll close it out with A Glorious Chance. I may not get to these until the new year, so you’ll just have to be patient.

Box cover.

The cover image on the Battle of Blenheim, 1704 is an extract from a classic Baroque battle portrait of “The Duke of Marlborough and the Earl of Cadogan at the Battle of Blenheim,” by Pieter van Bloemen. Well, this painting was by van Bloemen, but it is actually a copy rendered by the artist of a collaborative work that he was invited to assist with (van Bloemen was, in his day, a renowned painter of horses). The painting, primarily by Balthasar van den Bossche, was presented to Marlborough on a visit to Antwerp after his success at the Battle of Ramillies, two years after Blenheim. The original work is no longer extant, but we still have this credible, acknowledged copy by one of the original participating artists. This work now resides in at Marlborough House in London, as part of the national collection administered by the Commonwealth Secretariat.

The cover also mentions that Battle of Blenheim is the first volume of a series called the Seven Hex System. It’s this system that intrigued me about the game. Justin Fassino, on his Justegarde YouTube channel, did a great two-part play-through of the game and the intricacies of the system that together make for a better introduction to the game than I could offer here.

There are two more volumes in development using the Seven Hex System. The second volume will offer two battles from Napoleon’s Russian campaign, The Battles of Borodino & Polotsk 1812 (Legion Wargames, ~2026), and third, two battles of the Great Northern War, The Battles of Kliszow 1702 and Fraustadt 1706 (Legion Wargames, ~2026). Mr Fassino mentioned in his video that he’d heard the series was unlikely to continue, so I contacted Randy Lein, publisher at Legion Wargames. Mr Lein said that the current plan was to release the next two volumes in zip-loc bags, and that we should see them in some time in 2026.

Box-back.

For readers unfamiliar with the Battle of Blenheim, here’s a link to the Wikipedia article for some context. Blenheim (pronounced Blen’m by the English and referred to by the French as la Bataille de Höchstädt), has been described as “the battle that saved Europe.” It was one of the most important battles of the War of Spanish Succession and built Marlborough’s reputation as the greatest soldier of his era (this was further secured by his victory at Battle of Ramillies twenty-one months later). The box back offers a paragraph of context for the battle, followed by a brief explanation of the Seven Hex System (which we’ll spend a little time on when we get to the map). Also displayed is a picture of the game-map in its entirety, as well as a sampling of unit and administrative counters (at actual size).

The game components are listed (but we’ll be getting to all of them in the course of this post), and the credits are prominently featured. Steve Pole is the game’s designer and developer of the Seven Hex System, and he was assisted in the development by two Legion alumni, Andy Loakes (Toulon, 1793: Napoleon’s First Great Victory (Legion Games, 2014), and the late Godfrey Bailey (Hill of Doves: The First Anglo-Boer War (Legion Wargames, 2013), with map and counter art by Knut Grünitz (with an assist on the map-art by Mr Lein); a veritable team of champions.

The units are battalions or cavalry squadrons, and scale of the game is 500 yards to a three-hex wide manoeuvre hex, with turns representing about twenty minutes, with the whole game playable in inside of three hours. Another thing I like about Legion games is the standardised Game Meter, which for Blenheim tell us the game is suitable for one or two players, of Medium-Low complexity (two out of five), and the Solitaire Suitability is Medium-High (four out of five).

The Battle of Blenheim Rules of Play. Greater than the sum of its parts.

The rulebook is a 24-page booklet printed on a heavier weight, high-gloss paper-stock. Some might experience issues with glare (such as the slight flaring in my photos) but depending on your lighting situation, this should be negligible. Legion rulebooks have a particular layout style that I find makes the rules a breeze to read and to refer back to at the table. I’m sure some people won’t like them, but the style is consistent over all the games I own, and it works for me personally.

Rulebook sample page. I really appreciate the clean and simple layout of Legion
rulebooks in general. The Blenheim rules are a good example of the house style.

Of those 24 pages, the rules take up barely ten pages of the overall count. The front page offers an Introduction and Table of Contents, and the rules are followed by three pages of design notes on the Seven Hex System (and a column-length bibliography covering the battle and the War of Spanish Succession more broadly), four pages of illustrated combat examples, and a five-page military history of the battle covering the two sides’ battle plans, a timeline of the battle, and its broader outcomes. Basically, there’s nothing here you’ll want to skip over – it’s all gravy.

The game-map. Once again, apologies for the poor lighting and photographic work
that fail to do justice to the fine work here.

The maps a standard 22” by 34” sheet printed on a nice weight (I’d guess about 110 gsm paper-stock) and flattens out reasonably well with some encouragement. I’ll be honest; the map is a little jarring at first blush – not so much the enlarged and subdivided large hexes called Areas (creating a twelve by sixteen area hex-grid), but the smaller hexes they’re made up of all tilting about fifteen degrees off-kilter. Initially, this for me was the visual equivalent of fingernails on a blackboard. When you get past that, though, the battle area is nicely presented, with clearly readable terrain and the centre (manoeuvre) hexes of each greater hex numbered. When the phasing player conducts movement, units move from one numbered hex to another, adjacent numbered hex. This is called Strategic movement and is conducted in the first phase of the turn. Each unit has an Occupancy Factor number in a black box in the top-right corner, usually a 3 (artillery batteries have a weight of 0), and units adding up to no higher than six can occupy a greater hex at a time, so as an average two units can remain in the same hex after movement, plus a battery.

Map detail. Normally I resent the use of caltrop corner markings for indicating hex
boundaries, but in context hexes within the larger Strategic hexes, I think
it makes perfect sense.

Getting back to the map, the representation of the terrain and features is clear and not at all distracting from the activity of the game. I particularly like the representation of the marshy lowland areas lining the Nobèlbach River, which meanders diagonally through the map, west to east, before joining the Danube. The map-sheet also features a Terrain legend, Turn Track, and an Order Modifier track. I’ll expand on the use of the Order Modifier track in our first game AAR.

The game's single counter-sheet. The colours chosen for the two factions contrast 
well against the battle map, highlighting the action
.

Blenheim comes with a single sheet of 5/8” counters, half of which is comprised of units. The other half is a set of administrative order-markers for units, Ranged Fire markers, and Turn and modifier markers. The counters are printed on decent-weight white-core cardstock and look like they should punch out and clip up cleanly.

The game has a low counter density, with just forty-seven French/Bavarian and forty Allied unit counters, plus three and two leader counters respectively. The units are nicely presented, illustrated a with single soldiers, mounted cavalrymen, or a cannon representing Infantry or Cavalry units or batteries respectively. Each unit is named for their regimental commander, which helps with the setting up of the game, as we’ll see. The background colours for the two sides – royal blue for the French and a dark mustard for the Allies – offer clear differentiation between the factions, and both will stans out well against the muted greens of the battle map, and the digits on the counters are large enough for me to make out without resorting to reading glasses.

Player Aid Card 1, which deals with the Movement, positioning and Cannon fire.

The charts for the game appear on two single sided Player Aid Cards (PACs), and there are two each of these in the game. Like their rulebooks. Legion has a particular style of formatting for their games’ PACs that is clear and functional and immediately recognisable. The title boxes for each table is colour-coded, with related tables sharing the same banner colour, and more loosely related ones exhibiting similar colours in different shades. This approach isn’t exclusive to Legion games, but with the otherwise austere presentation of the charts and tables, it is for my money one of its best implementations.

Player Aid Card 2, dealing with Combat (Attack and Defence). The cards aren't actually
numbered, but this PAC references rules that appear later in the rulebook.

The first PAC presents a Unit Occupancy Table, Command Association Table for the five leaders represented in the game, Strategic Movement (articulating three types of movement permitted within this phase), a Ranged Fire Hit Table all ranged fire is executed before the Orders, Tactical Movement and Combat phase) and short tables dealing with asymmetric Order Values, Morale Adjustment and Attrition value Modifiers. The second PAC brings the necessary tables for Defending and Attacking in combat.

Blenheim's Set-up Guide, colour-coded and leader-referenced.

The game also comes with a 11” by 17” set-up chart, printed on the same cardstock as the PACs. This sets out the starting locations of each unit. This is why the leaders of each regiment appear on the unit counters – Their names correspond to the various units’ starting positions on the set-up guide.

Personally, I really appreciate this kind of visual guide. I can cope with a typed list of unit names and numbered hex positions, but a set-up map like this just speeds up the pre-game prep significantly.  

Dice and baggies.

To wrap up, the game comes with some zip-loc baggies for sorting and storing the counters, and two dice, one white and one red, for reasons that I’ll get into in the AAR. I should have mentioned that, like most Legion games, the box ix on the lighter side compared to those used many larger publishers. That’s not to say it isn’t up to the task; so long as you don’t go sitting on them or leaving them in the rain, they’re certainly solid enough, and lighter for shipping.

------

So, that’s The Battle of Blenheim, 1704. I’m looking forward to getting this to the table, which is something I say a lot, but in this case the subject is right in my wheelhouse – my Honours thesis dealt with early Eighteenth-Century history and literature. With Christmas and the end of the year bearing down, I’m planning on playing through a handful of games, nearly all playing against myself, and Blenheim might just get pushed up to first off the rank for its clear ease of two-handed play. An After-Action Report will follow.


Thursday, 24 April 2025

Stripped Down for Parts: All Are Brothers: The Battle of Solferino, 1859


I’ve only really started to gain a big picture view of the many, many conflicts in Europe through the time between Napoleon’s defeat Waterloo and the assassination of Archduke Ferdinand over the last two or three years. I knew a little about the Crimean War, of course, and I’d heard of the Franco-Prussian War. I knew the Italian states became a sovereign nation around 1870, but I knew nothing about the two wars of unification that lead to that point. It’s an incredibly rich patch of history, particularly military history, and a chapter ripe for wargaming.

My latest addition is Bryan Armor’s All Are Brothers: The Battle of Solferino, 1859 (Legion Wargames, 2025), a tactical, brigade-level game dealing with the pivotal Battle of Solferino, which took place during the Second War of Italian Unification. At any given time, I probably have thirty or forty (or fifty) games on preorder with a handful of publishers, or that I’m keeping an eye out for in the case of crowdfunding campaigns, but within that number, there’s always a subset of four or five games that more keenly anticipating. That subset dropped one in number when All Are Brothers arrived.


The box cover sets the tone for the game with a portion of a painting, The Battle of Solferino, by Swiss-born Italian artist, Carlo Bossoli. Bossoli was present during the campaign, having been commissioned by a London-based publisher to produce paintings and lithographs for their British audience. The painting is an extraordinary work that seems to ripple with energy, capturing a moment of the French army’s surge forward to a waiting victory. You can see the full painting here, courtesy of Wikipedia.

The box itself is standard a standard 9” by 12”, 1½“ deep, and solid enough to protect the components. I think the weight of Legion’s boxes is very good, a nice balance between weight and durability. A box of this weight is prone to a little dishing in the front and back panels if it’s mishandled, but that would be on the owner (or his lazy cousin who doesn’t know how to respect other people’s games, but I digress).

All Are Brothers was designed by Bryan Armor. This appears to be Mr Armor’s first published design (at least so far as I can ascertain from Boardgamegeek.com), which makes the whole effort that much more impressive.

The back of the box.

The game description on the back offers a brief historical outline of the battle and after. I find it extraordinary that, for event that hard such a profound social and cultural effect on Europe and the world, it doesn’t feature as significantly in the public imagination as Balaklava, Gettysburg, or even Sedan. Jean-Henri Dunant, a Swiss businessman who witnessed the aftermath of the battle, was so moved by the suffering of the wounded, he became the driving force behind the development of both the Geneva Conventions and the International Red Cross.

The box back also informs us that the scale of the game is brigade-sized units and 500 metres to a hex, with each turn representing an hour of real time. We’re advised the playing time will run from four to six hours, depending on the scenario (though the game does come with a two-turn introductory scenario that shouldn’t take this long), with the full campaign taking twelve or more hours to complete. The components list for the game is both long and deep, but I’ll get into all of these in due course.

Legion use a five-position Game Meter which works well for their oeuvre. This covers the number of players (one-two), the Complexity of the game in question (All Are Brothers is rated Medium, or three out of five), and Solitaire Suitability (in this case, Medium-High, or four out of five). On the face of it, I think I would agree with both measures. I’m hoping to put the solitaire suitability to the test inside of the next week.

The Rulebook. 

The rulebook runs to 20 pages, laid out in the two-column format typical for Legion games, and is printed in full colour on a low-gloss paper stock (about 100 gsm, if I had to guess), making it eminently readable. I really appreciate the effort that goes into the company’s rule- and scenario-books They are among the most easily readable and navigable I’ve come across in the whole industry. The rules proper come to about sixteen and a half pages, with the cover page given over to a table of contents and historical introduction to the game situation, about a page and a half of designer’s notes, and the back cover devoted to a pretty thorough bibliography that I’m looking forward to diving into.

Rulebook - sample spread.

The rules are clear and well-presented. The rulebook is printed in colour (another bonus), with good counter illustrations and the odd explanatory diagram, but the pics have been kept to a minimum to keep the page count down. I’ve only glanced at the rulebook thus far, but I think anyone who has played a Blind Swords game before won’t have too much trouble getting All Are Brothers to the table.

Scenario Book.

The separate Scenario Book shares the layout of the rulebook, and is also printed in colour on the same paper stock, with the distinction of each scenario – of which there are five – possessing a colour-coded title bar. I’ll park this until we get to the Army set-up cards.

Of the scenarios, the first (entitled The Final Assault) is a two-turn learning scenario, utilising just one corps each side, and some Imperial Guard units for the French, and just a nine-row slither of the map. If you’ve played Position Magnifique: The Battle of Mars-la-Tour, 1870 (Paper Wars, Issue 81) (Compass Games , 2013), At Any Cost: Metz, 1870 (GMT Games, 2018) or any one of the Tiny Battle Publishing or Revolution Games releases utilising the Blind Swords system, you could probably skip this scenario in favour of one of the longer ones. I’m a cautious player, so I like to start with an introductory scenario if its available (sometimes, though certainly not always, these can also be a good option for a game it you only have a limited time available; a good introductory scenario should still have some replayability).

The other three shorter scenarios each examine aspects of the battle; San Martino, Campo de Medole (Medole Plain), and the Heights of Solferino each bring an aspect of the fighting into focus. The campaign game, All Are Brothers – the Battle of Solferino brings all the boys to the yard in a truly massive undertaking, both historically and in the reduced setting of the play area. I can appreciate why the box-back advises setting twelve or more hours aside for this battle. Realistically, I can’t see myself getting to play the full campaign in anytime soon, but I’m already thinking about we might manage it.

The map. The play area takes up nearly the entire sheet.

The game map art is the work of Edmund Hudson. I confess before now I was unfamiliar with Mr Hudson’s work but it turns out I’ve admired his work in ignorance for some time; he’s responsible for several of maps for Revolution Games’ Blind Swords system Civil War series, as well as Kerry Anderson’s Death of an Army: Ypres, 1914 (Revolution Games, 2022), and Vance von Borries’ Invasion: Malta (Legion Wargames, 2024). The map for All Are Brothers is very nice to look at, and I think it will be an interesting geography to play. Everything, from the various terrain types to roads, railways, and settlements, is clear without being showy or distracting. Every aspect looks right and fits in well with the whole, but perhaps more importantly, looks quite usable; you shouldn’t have any problems working out movement costs or combat DRMs.

All Are Brothers' two counter-sheets. My only criticism would be that a couple of the
colours identifying the individual Austrian corps are a little hard to pick apart at a glance. 

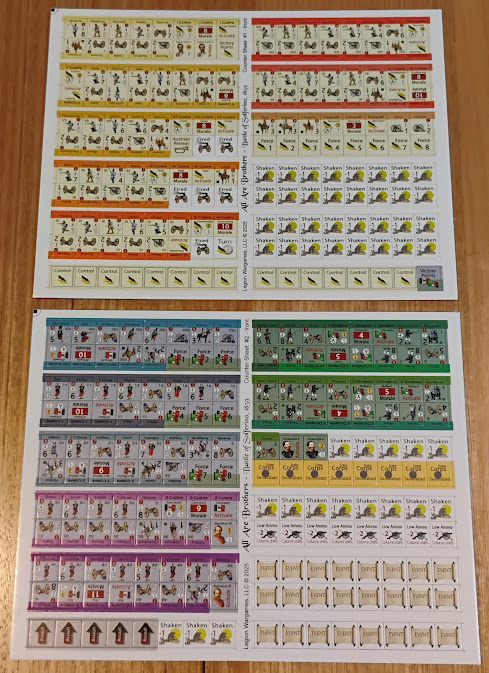
The counters for All Are Brothers are clear and readable, quite nice in appearance, and look great set out on the map. The two sheets are printed on a good weight white-core cardstock which will be familiar to Legion fans. The counter art was contributed by the game’s developer and Legion Wargames stalwart Kim Kanger, who I understand also did the work on the PACs. I’ve only ever considered Mr Kanger in terms of his design work – La Primogenita (Legion Wargames, 2022) was one of my favourite releases from 2022. As it turns out, Mr Kanger contains multitudes.

There are three basic types of fighting units in All Are Brothers, infantry, cavalry, and artillery, but headquarters (for establishing command range) and individual leaders are also present. Headquarters tokens display the flag of that army’s nation, and a portrait of each leader markers adorns his token. Infantry units bear the figure of a soldier in uniform, cavalry markers a horse-born trooper, and Artillery, a light field piece.

Units bear several pieces of information. Atop each counter is a coloured band baring the name of the particular unit. The band colour identifies the formation to which that unit belongs. The numerical information is easy enough to interpret; the number in the red circle is the unit’s Morale Rating, its movement value is shown in a white arrow (I see what you did there), and the Strength Point Value is represented in a slightly larger font in the corner of the counter. The mix also includes HQ and Leader markers, admin and status tokens and the usual VP trackers and such.

The Austrian Set-Up Chart...

And the French and Sardinian Set-up Chart. Note the colour-coded bands for
each scenario. These correspond with the title banners for each Scenario
in the Scenario Book.

The set-up charts incorporate another cool innovation* for scenario set up. Rather than separate set-up cards for multiple scenarios in All Are Brothers, the entire force for each side is represented on two 11” by 17” bi-fold cards, broken down into their respective commands, and each command (division or corps) is underlined with two or more coloured stripes. These stripes each correspond to a scenario, with the lowest stripe – appropriately in a lighter shade of claret or blood – corresponds to the full campaign. Superimposed over the various stripes beneath each unit is the location hex number for that unit to be placed for that scenario.

I’m a fan of scenario set-up cards. This might seem like double-handling, but I find it much quicker that trying to read set-up hexes in one-pica tucked into a corner of every unit counter and matching it to the hex. I’ve managed to get nearly all the counters into a twenty-pot counter-tray (some of the admin counters had to go bagged), with one formation to a pot, so these set-up cards should quicken the set-up process quite a bit.

The rather neat, simply named Terrain Chart. The future of TECs.


All Are Brothers comes with a Terrain Chart; no surprise there. But I don’t think I’m overstating it to say this might be the best approach I’ve seen in a terrain chart in some time. Rather than a table of terrain graphics, the centre of the card features a couple of map abstracts, representing the full gamut of terrain features found on the map. Against each of these is a label and three numbers in colour-coded squares, indicating the movement costs for Infantry, Cavalry and Artillery respectively. It’s an intuitive approach that’s immediately understandable for novices and grognards alike.

The Terrain chart also provides reminder lists for units that are Out of Command or have failed their activation, as well as the the allowed actions for HQs in Aggressive or Defensive postures. This is the kind of thing that I’d be going back to the rules for repeatedly for my first couple of games, so having these reminders in reach will be a boon at the table.

Fire Combat Table (top) and Assault Combat Table.  

The Fire and Assault Combat Tables are clear, simple and easily understandable, but where these charts excel is, again, in the presentation of the peripheral information, particularly the roll modifiers. These are presented in a series of coloured arrows, pointing left for negative modifiers and right for positive ones. The higher value the modifier, the longer the arrow. I’m a big fan of these kinds of visual cues in everyday life. It feels revolutionary to se so many packed into a wargame. I don’t know who was behind these, but I applaud their vision.

The Track PAC, with its serpentine Game Turn Track.

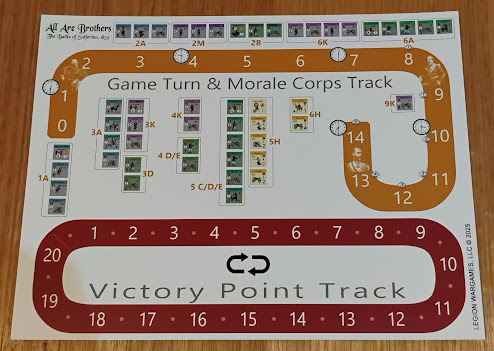
Another PAC is devoted to the Turn Track and Morale Track. The Turn track takes up the upper two-thirds of the card. At first blush, it looks a little confused, a burnt orange band scrolling across the width of the card, adorned with numbers, clocks, icons, and portraits, and surrounded by pictures of units. I’m used to plainer looking, more linear turn tracks, but again, there’s a reason for everything here.

The turns in All Are Brothers represent an hour of the battle. The clock-faces are a reminder of the actual time of the battle. In truth, I haven’t discovered yet if this is germane to play, but it does serve as a reminder of the carnage that was wrought by both sides in a single thirteen-hour span of daylight. The Cloud icons are mnemonic devices for players incorporating the optional Variable Thunderstorm rule for the second half of the game. The rows of unit markers are reminders of which units come on as reinforcements at which turn and from which entry hex (helpfully marked on the map borders with corresponding letters).

The Victory Point Track by contrast is a simple race-track loop running up to twenty. VP markers are included in the counter-mix for singles and twenties. The curling path of the Turn Track may be look a little odd, but everything presented is there for a reason, and if should all add to the smooth running of the game.

Austrian (top) and French/Sardinian Force Displays. These may not be absolutely
necessary in this game in particular, but they are worthwhile having in case
of serious stacking events.

The Force displays are helpful way to eliminate board crowding and potential accidents with on-board counter stacks. In All Are Brothers, stacked units may not add up to more than ten strength points, with just the top-most six SP or part thereof making up the actionable front for the force. The two Force Displays allow the player to use a representative marker on the board for a given stack, while the stack itself I laid out on that marker’s column, with the front units closest to the top of the column. I’ve seen this kind this before in terms of unit pools, but the force ladders make perfect sense in this instance. And as someone who will admit to occasionally spilling a stack, it makes for an elegant answer to table clumsiness.

The table of Event Descriptions. Feeling lucky? 

Nobel Prize-winning author Isaac Bashevis Singer was once asked why he wrote his stories in Yiddish before translating them himself into English, He replied, “Yiddish contains vitamins that other languages don’t have.” This is kind of how I feel about the Blind Swords game system (and its sister system, Black Swan).

All Are Brothers is built on the Blind Swords system. System designer Hermann Luttmann has made reference to a version of the Three Fs of War; in this case they stand for the Fog of War, The Fortunes of War, and the Friction of War. The Fog of War is represented in part by the chit-draw activation of units – even the best units and leaders have bad days – while the vagaries of war’s fortunes are simulated in the Random Event Draw during each turn. You’re going to need multiple opaque containers; I prefer rounded-bottom ramekins or coffee cups, as these seem to put less wear on the counters.

The Event chits are Nation-specific. There are five for the Austrian player, six for the French and three for the Sardinians. Each scenario in the game will dictate how many event chips go into the draw mix for that game. That number is picked at random from the faction’s selection and placed in the aforementioned draw-cup. The legend on each on each chit corresponds to an explanation of the game effect on the Event Description Chart (above). This will usually be applied to a single event, such as an engagement, and will offer a discrete benefit to the owning player in a given situation and can be carried over from turn to turn.

The whole box and dice. And baggies. I managed to get most of the counters into a
single tray, with just two bags used for some of the more populous admin counters.

All Are Brothers comes with three dice – two six-siders, one blue and one red, and a yellow ten-sider. At first, I wasn’t sure I liked the smaller Legion dice (familiar from Skyhawk (Legion Wargames, 2022 and Aces of Valor (Legion Wargames, 2022)), but I usually use a snap-fast hexagon dice tray and I’ve found these almost never bounce out of the tray when rolling, unlike some slightly larger dice (*coughs* commandscolors *clears throat*) and they’re still quite readable at a glance.  The ten-sider is a standard size and so a little larger than the others, but I’m sure they’ll all do the job.

Having Skyhawk, I don't know if I can justify Thunderchief as well, but I'm really
tempted to get Knights Over Stalingrad. A Forgotten Sideshow and
Failure at the Tugela are auto-buys.

Anyone who has ordered a game directly from Legion will probably be familiar with these, but my copy of All Are Brothers came with two additions not directly related to the game. The first was an ad card. I’ve received advertisements in Legion games a couple o times before (and as often as not they lead to further purchases). This one was different. Businesses often avoid humour because they don’t trust their audience to get it or to not take offence. The folks at Legion trust their customers.

Awww.

The other thing was the Thank You note. About half my Legion games I’ve bought directly from the publisher. Every time, without fail, I’ve got a card, signed by Randy Lein and Jodi Joachim (the collective beating heart of Legion Wargames), thanking me for the purchase and wishing me luck with my rolls (spoiler alert: this second part hasn’t tangibly helped so far). It’s a little thing, but it means something. And I’ve lined them all up and looked – each one is actually signed by hand. That is just so cool.

-----

I think I’ll be writing about All Are Brothers again soon. The game promises to be a rewarding game experience. This peek inside the box has taken me longer to write than I’d anticipated, but I didn’t want to rush it. Every part of it looks great, and it’s a learning opportunity. Now I’m going to go mine the bibliography for a book or three on the subject.


* I should say that the scenario colour-coding of the set-up charts and the novel approach to the Terrain Chart are both new to me, though not necessarily new to wargaming. If there are earlier examples of these, call me out on it in the comments; I’d be curious to know.


Blog Note: a recent arrival

   I’ve been a little quiet on A Fast Game of late due to a combination of circumstances; my wife’s aunt and uncle are over from England at ...