Winner of the Charles S. Roberts Award for Best World War II Wargame, 2022
 |
| That is a lot of game. And it's good for developing upper-body strength. |
Welcome to part 3 of the Pacific Day unboxings. For those just tuning in, about a fortnight ago I received three Pacific theatre games split over two deliveries in a single day (I knew the second parcel was on its way, but it wasn’t due ‘til the following week). In Part 1, I looked at Last Battle: Ie Shima, 1945 (Take Aim Designs/Revolution Games, 2015), and in Part 2 I unpacked Return to the Rock: Corregidor, 1945 (Take Aim Designs/Revolution Games, 2020), two games designed by Mike Rinella. I bought these on eBay second-hand for a very fair price, especially considering it remained unpunched and pristine.
It
turned out that wasn’t all the fellow had for sale. The next day (after doing
some back-of-the-envelope calculations and wrestling with whether I’d actually
get it to the table myself, I gave in and bought his copy of Pacific War: The Struggle Against Japan, 1941-1945 (GMT Games, 2022). This is a revised
second edition of Mark Herman’s extremely well-regarded Victory Games release,
considered by some to be the final word on gaming the Second World War Pacific
Theatre. I’m relatively new to naval games, and to the Pacific in WWII specifically,
but this intrigued me. I think it will be a game I’ll work at, like a piece of
stone, coming back and chipping away a little more each time I pull it out. I
don’t think it will be a lifestyle choice, like Advanced Squad Leader
(Multi-Man Publishing, 1985); more a faithful companion that will come visit me
from time to time and keep me company as I slide into decrepitude.

We start our exploration with the box. This is a four-inch deep, heavy-duty box, and it needs to be. If you take everything out and put it all back the way you found it, there might be about 2mm of extra space in there (It’s not packed quite so tightly as Mr President (GMT Games, 2023), but it’s close. I don’t think I’ve ever seen an original Victory Games copy of Pacific War (Victory Games, 1985), but a size-comparison photo on BoardGameGeek puts it at about three inches deep, but then again, the Victory Games version didn’t have mounted boards to accommodate.
The cover
illustration is a classic photograph of the aircraft carrier, USS Yorktown, having just
been hit port-side by a Japanese torpedo bomber during the Battle of Midway. The
picture is well chosen; taken from a distance, showing a vast expanse of open
ocean, skies replete with AA shell-bursts. It captures both the grandeur of the
Pacific theatre and the desperation on both sides of the conflict, locked in an
all or nothing struggle for supremacy.
 |
| Let me apologise here for the quality of some of these photos. in my defence, I have a cold or really bad hay fever (it's Spring here) and everything is looking little blurry anyway. |
The description on the back of the box puts it best: “Pacific War is a source of limitless challenge and excitement for anyone ever fascinated with the fury and vastness of the war in the Pacific.” The play-information guide appears a little schizophrenic. While it lists the number of players as 1-2, it rates the solitaire suitability as a 2 out of 9 (in keeping with the classic GMT 1-9 scale). The Difficulty rating for the game is a hereto unseen (my me at least) 9 out of 9, while the playing time is suggested to be 3-100 hours. This sounds like hyperbole, until you realise the game allows you to – is you choose to accept the mission – play out the Pacific theatre conflict from Pearl Harbor to the end of the war in one continuous campaign, assuming you have somewhere you can leave the game set up and set aside two or three weeks to play it like you’re showing up to work. The suggested starting age for playing the game is 14. This is always a tricky thing to get right. I think a savvy fourteen-year-old could definitely learn to play the game form somebody already familiar with it, and probably even have a good shot at a win, I don’t think even a sixteen-year-old me would have been able to come to this cold. The sheer magnitude of the game would be overwhelming.
The
list of components is impressive, but you get the feel for it when heaving the
box. I won’t go through the list here. Let’s open up this bad boy and take a
look at everything.
 |
| Map A and Map B, together at last (with the Battle Scenario Rules Manual for scale). |
Pacific War comes with two 22” by 34” maps covering the Pacific Ocean from mainland Asia to Hawaii and the northern coast of Australia to the Bering Strait, all overlaid with hex-grid for regulation of movement. According to the component description in the rulebook, each hex is around 100 miles from side to side (I think this must be regular land-miles, not nautical miles). The projection of the map like no Pacific map I’ve seen before, but it seems to put everything in relative everything else, important for a game covering an entire theatre. Still, it is a little confronting at first glance. Looking at the map in its splendour, you gain an appreciation of the enormity of the task at hand, both for the Japanese creating their Greater East Asia Co-Prosperity Sphere, and the Allies attempting to push back against an aggressive, expansionist Japanese empire.
 |
| Extension map. |
The game also comes with a smaller (17” by 22”) paper map. It should be noted that many of the Engagement and Battle scenarios require only one of the mounted maps – Map A or Map B – to play, or this paper map (referred to in the concerned scenarios as the Map A (extended) map), so it’s possible to enjoy the game without needing to clear the whole table. (I’ll come back to the different scenarios a bit later).

Pacific War is a lot of game, but care has been taken to ease the novice player into the complexities of the system a little at a time. The game comes with five books in all. Three of these are rulebooks; the Core Rulebook covers the entire game system and is designed to be a reference source rather than something to be read from start to finish. The other two rulebooks are the Engagement Scenarios Rules Manual and the Battle Scenario Rules Manual.

To help you get familiar with the how the game works, Pacific War uses a programmed learning model, introducing new rules through successive scenarios to build player knowledge and confidence. It’s not a new idea – the original Squad Leader (Avalon Hill, 1977) introduced this model of learning through play. Like Task Force: Carrier Battles in the Pacific (Vuca Simulations, 2023), Pacific War uses solitaire scenarios to ease the neophyte into the system, with the first eight of the nine Engagement scenarios prepared as solo exercises. The intention is at the end of these seven scenarios, the new player will be ready to introduce the concepts they’ve learned to another new player through the eighth Engagement scenario, the Battle of Java Sea (this scenario isn’t even played out on a map – it just involves straight up ship to ship combat on the Combat Display (which we’ll be getting to shortly). This isn’t to say that despite the magnitude of the game’s scope, it doesn’t have a big table footprint, but I wanted to save some of that joy for later.
 |
| Sample page from the Engagement Scenarios Rules Manual (you'll have to take my word for that; it could be from any of them). |
The Engagement Scenarios Rules Manual is designed to support play through these programmed learning scenarios. It runs to 39 pages (the back cover page is blank), but take out the cover page, the extensive Table of Contents and the exhaustive seven-page Core Rules Index (for locating rules referenced in the text from the Core Rules Manual), and you have around thirty pages of rules to assimilate. You don’t have to memorise the rules before you start play, but giving them a read though so you know where to find things, and spending some time over the Sequence of Play will give you a leg up with the Engagement scenarios.

Similarly,
the Battle Scenario Rules Manual is intended to provide a pair of novice players
with what they will need to play the battle scenarios featured in the Scenario Booklet.
The Battle Scenario Rules Manual has a 44-page count, but taking out the cover,
Table of Contents and the two blank gages at the end, as well as a duplication of
the Core Rules Manual index, the actual rules material held within comes to
about 32 pages. When you get to this after working through the Engagement scenarios,
you’ll notice a lot of redundancy in the second rule book. The Battle Scenario Rules
Manual reproduces a lot of the rules material in the Engagement manual (maybe
all, I haven’t gone through it in detail yet), adding or embellishing where pertinent,
as well as introducing new material not featured in the former book.
If the Engagement scenarios are the appetisers of Pacific War, designed to give you a taste of what’s to come, the Battle scenarios are the entrée servings of the game. Where the Engagements offer learning opportunities, the Battles will let you put what you’ve learnt into practice and start to get into the meat of the game.
At this
scale, Pacific War isn’t necessarily the space hog you may expect, taking in
the mass of board real estate. Only three of the twelve Battle scenarios
require both boards (Maps A and B), and while we’re on the subject, seven of
the nine Campaign scenarios can also be played on a single board. This all
makes the game at this scale seem quite manageable.

As mentioned earlier, the scenarios are divided up into Engagement, Battle, Campaign and Strategic scenarios. The Engagement scenarios have proposed run-times from around twenty minutes to an hour. The Battle scenarios run to two to three hours in length (though I’d suggest budgeting for an extra hour or so on the suggested duration your first time or two out).
 |
| Scenario Booklet (sample spread). |
The Campaign scenarios have the largest sweep; they each cover one or more operations, running from two to six months of game time, and can run from three hours up to forty (for Campaign 9: China, Burma – Spring 1944) in playable hours.

Lastly, for the reading matter at least, there is a sixteen-page playbook, Battle of the Coral Sea Extended Example of Play. This is a tremendous resource, demonstrating how a battle unfolds through the application of the Sequence of Play, with box-text examples of how different types of altercation between sides play out on land, at sea and in the air (and air-to-surface). Personally, I’m going to hold off reading through this booklet until I’ve worked through the Engagement scenarios, at least, and maybe had a run at a Battle scenario or two, so I have a reference point to work from and some experience pushing the counters around.
 |
| Example of Play (sample spread - practical illustrations in this one). |
Having said that, the booklet also has a brief bibliography (about eighteen titles, although some of those are multi-volume works), and a short Designer’s Notes essay that I probably won’t be able to keep myself from delving into for too long.
 |
| Counter sheets 1 and 2. |
 |
| Counter sheets 3 and 4. |
As I’ve
noted previously, Pacific War is a game that covers an expansive theatre over
much of its historical duration, at a relatively granular level of detail. This
translates to lots of counters. Ten sheets in all, over two thousand half-inch
counters. These represent individual capital ships and carriers, squadrons of
destroyers, naval bases and ground forces, as well as lots of markers. I haven’t
delved into the game enough to express any firm opinions regarding the counter
except to say all the sheets have good registration, the faction colouring is
distinct and makes pieces easily identifiable, and the counter-information is
readable. And there sure are a lot of them. This may be the first game to make
me question my commitment to counter-clipping.
 |
| Counter sheets 5 and 6. |
 |
| Counter sheets 7 and 8. |
 |
| Falsified documents. No, just kidding. These are counter sheets 9 and 10. |
The counters are printed on typically good brown-core cardstock, and there are just so many of them. Ten sheets. To be fair, it was a big theatre of war.
 |
| Operations Display. |
Now we
come to the Player’s Aids. Pacific War has a veritable plethora of players’ aid
cards. Central to any game of Pacific War, even down to the Engagement
scenarios, is the Operation Display. Most of the features of this 22” by 8.5” display, such as the Strategic Initiative
Track and the Naval Movement Track (along the top of the card) will only be
used in the Operational and Strategic scenarios. But this is where the combat is
played out in all scenarios (Naval Combat Display, lower centre). The Display
also features a Day Track (bottom-right), Operational Intelligence mnemonics and
charts for Range Bidding and randomly establishing the light quality before battle
(bottom-left).
 |
| Allied Display Sheet (bottom) and Screen. |
Each player also has a Display Sheet and Screen (to obscure the display sheet. The Screens are essentially matching sets of charts and tables covering Merchant Shipping Attrition, Land and Air/Naval CRTs and a really wild Search Chart for establishing the results of searching for enemy formations in the open ocean.
 |
| Japanese Display Sheet (bottom) and Screen. |
The Display Sheets (they’re called sheets because they’re 34” across and page-deep) are identical in general layout, but each offer information unique to that side’s capabilities and limitations. The sheets offer a month-by-month Strategic Intelligence track to roll on (along the top left-to centre of the sheet). These vary somewhat, reflecting how accomplished the Allies grew in intelligence gathering and codebreaking compared to their adversaries as the war progressed. The sheets also offer a Phase Track (bottom-right) to keep track of the dozens of unique phases that may come into play during a round, depending on the manner of scenario being played (note: you only address all thirty-eight(!) phases in the Strategic scenarios), a General Record Track (lower left) for tracking Command Points (CP) in the various battle sectors, an Air Mission flowchart, Command Point accrual and Cost tables, and a Strategic Initiative Adjustment Summary table.
 |
| Force Display sheets 1 and 2 (Allies left, Japanese right). |
 | |
|
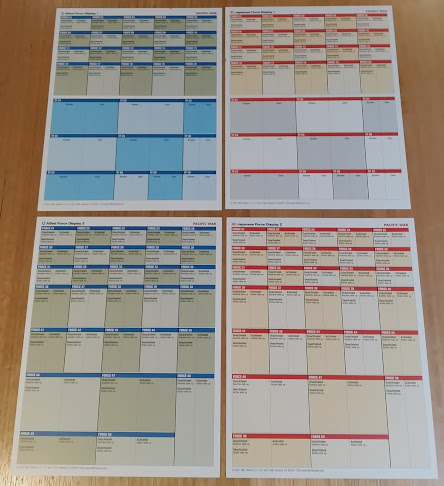
Then there
are the Allied and Japanese Force Displays. These sheets act as holding boxes
for the assets attached to a task force, and the corresponding numbered Task Force
(TF) markers are used on the board to show the approximate positioning (down to
the hex) of the flotilla or squadron.
 |
| Replacement Record Sheets. I'll be photocopying these, |
Lastly, there’s pad of Replacement Record Sheets to keep track of your monthly replacement steps (split over air and ground forces), a year to a column, with each month handily marked with a descending turn number. The game allows the accrual of steps turn-over-turn, so you can build a war-chest (no pun intended) for your upcoming push, when the weather improves, or another carrier becomes available.
 |
| Before I forget, the game also comes with two ten-sided dice. |
So, that's a brief and rather shallow look at Pacific War, undoubtedly one of the most complete games to be released in the last twenty years. To be
honest, the sheer scope of the project, combined with the granularity of scale,
is still a somewhat daunting prospect. I can’t imagine a situation in the near
future where I would be able to leave Pacific War set up for a full Campaign-scale
game, but I’m okay with that. The Battle and Campaign scenarios look interesting enough on their own to warrant multiple replays. There is certainly enough game here to keep me busy
for a long while yet.


