Showing posts with label Ray Weiss. Show all posts

Sunday, 2 February 2025

Stripped Down for Parts: Imperial Bayonets - We Were Not Cowards: Sedan, 1870


As of just recently, Conflict Simulations Ltd will no longer be shipping their games directly to overseas addresses. You can get CSL games though through Noble Knight Games in the US, Hexasim (France-based, but they cover EU delivery) and Second Chance Games in the UK. I managed to get in an order late last year for a handful of games, including the first in a system I’ve been eager to try, the Imperial Bayonets series.

Imperial Bayonets: We Were Not Cowards: Sedan, 1870 (Conflict Simulations Ltd, 2020) is an operational-level examination of the pivotal battle of the Franco-Prussian War. It comes in both boxed and unboxed editions. For the sake of saving some cash, I opted for the unboxed version.

I’ve nearly finished reading Rick Atkinson’s superb An Army at Dawn, and I’m planning to go onto Rachel Chrastil’s Bismarck's War: The Franco-Prussian War and the Making of Modern Europe, so the timing seems right to (finally) take a look at We Were Not Cowards.

The WWNC Exclusive Rules. Cover sheet matches the box art.

Bagged or soft-packed games usually get some kind of cover sheet displaying the same image as you would find on the front of the box. In a game like Return to the Rock: Corregidor, 1945 (Take Aim Designs/Revolution Games, 2020), the cover sheet does double-duty with a Player’s Aid Card on the verso.

The double duty in We Were Not Cowards is performed by the Exclusive Rulebook, which runs to sixteen pages. Only eleven of which are actual rules, along with a thorough contents listing (in lieu of an index, but nobody seriously expects an index in a rulebook these days, surely), a two-page Designer’s Notes essay, and a colour counter reading guide on the back page. The rules here pertain to the eccentricities of the situation presented in  the game, along with details for the game’s three scenarios. At first blush, everything seems clear and understandable.

I’d normally speak to the series rules first in an unboxing (or in this case, unbagging), but I wanted to lead with Ivan Caceres’ striking box art. The cover of the series rules booklet is disappointingly mundane by comparison.

I confess I do like the crossed muskets of the series logo.

The same can’t be said for the contents of this booklet. The series rules come in at twenty pages, but again, the rules themselves come to a forgiving seventeen pages in a very readable 12-point font. The rules are quite bare-bones, with no illustrations or visual explanations, merely text. But the whole system is explained succinctly and thoroughly, and should play quite smoothly when I get it to the table (We Were Not Cowards is one of my Ten Game Challenge choices for 2025, so I should be getting it to the table in the next couple of months).

The rules feel familiar. The designer has said that the bones of the system can be found in Kevin Zucker’s Library of Napolenic Battles series. To anyone who has played Napoleon’s Last Battles (SPI, 1976, and more recently, Decision Games), the Imperial Bayonet rules shouldn’t be difficult to assimilate.

The crappy photo doesn't do this map justice. Muted palette and lots of detail,

The 22” by 34” play area represents the verdant region around the city of Sedan, the scene of another crucial battle seventy years later. The map is quite delightful, again the work of Ilya Kudriashov. The historical battle was one of manoeuvre, strike and counter-strike; the network of roads and trails, the undulating terrain, meandering water-courses and patchy forest groves promise to deliver a fair challenge to both sides.

The map is presented on medium weight, low gloss paper. My copy exhibits a little puckering at the cross-fold points, but I’ll probably set this up under a plexi-sheet, so I don’t anticipate any issues with use.

Prussian unit and leader counters. The unit counters really do look a treat. I haven't
put up photos of all the units, but this gives you a good idea.

French Depot counters and various situational markers for game effects
(including "Asleep" markers - intriguing).

Like all the more recent CSL releases, the game’s counters are pre-rounded, and printed on a lighter stock than you might be used to. They are still thick enough to manipulate with tweezers if that’s your thing, and the registration is very good.

The game comes with eight half-sheets of counters. When I say half-sheets, they are larger than a folded letter-sized sheet, but about the same width on the long side. I’d say they are a half-foolscap (or legal pad) size. Anyway, there are eight half sheets, each with seventy counters. The units make up roughly three and a half of these, with various kinds of informational markers making up the rest.

The counters are quite attractive. Leaders are marked with little portraits, while the units themselves are identified with NATO symbology for type infantry, cavalry, artillery, each unit’s size, and supply depots, as well as colour bars for the unit’s formation (corps) and commander. The individual brigades within a corps – the battle is played out at brigade level – are identified by the colour of the unit-type symbol. All this makes identifying whether a given unit is still with command range so much easier. The other markers are simple and clearly understandable at a glance.

One thing worth noting is the counters come in their own separate Ziploc bag.
I would recommend keeping the sheets in this bag until you’re ready to punch
and sort the game. An artifact of the production process means that the counters
in some of the sheets show a definite propensity for just popping out on a frolic
of their own; keeping then sealed up until you’re ready for them
will save heartache later.


The game comes with two Payer’s Aid Cards. These are single sided, but packed with everything you’ll need to play the game, including an abbreviated Sequence of Play, Combat Results Table, and tables for Bombardment, Shock Combat and Cavalry Charges, all the things one might look for in mid-nineteenth century European warfare. The print is a little on the small side; I can make it out pretty clearly, but people with even worse eyesight than mine will probably struggle without their glasses. It shouldn't come as a surprise that I've taken to having a magnifying glass in reach when I'm soloing a new game. Age has it's compensations, but it kind of sucks as well.
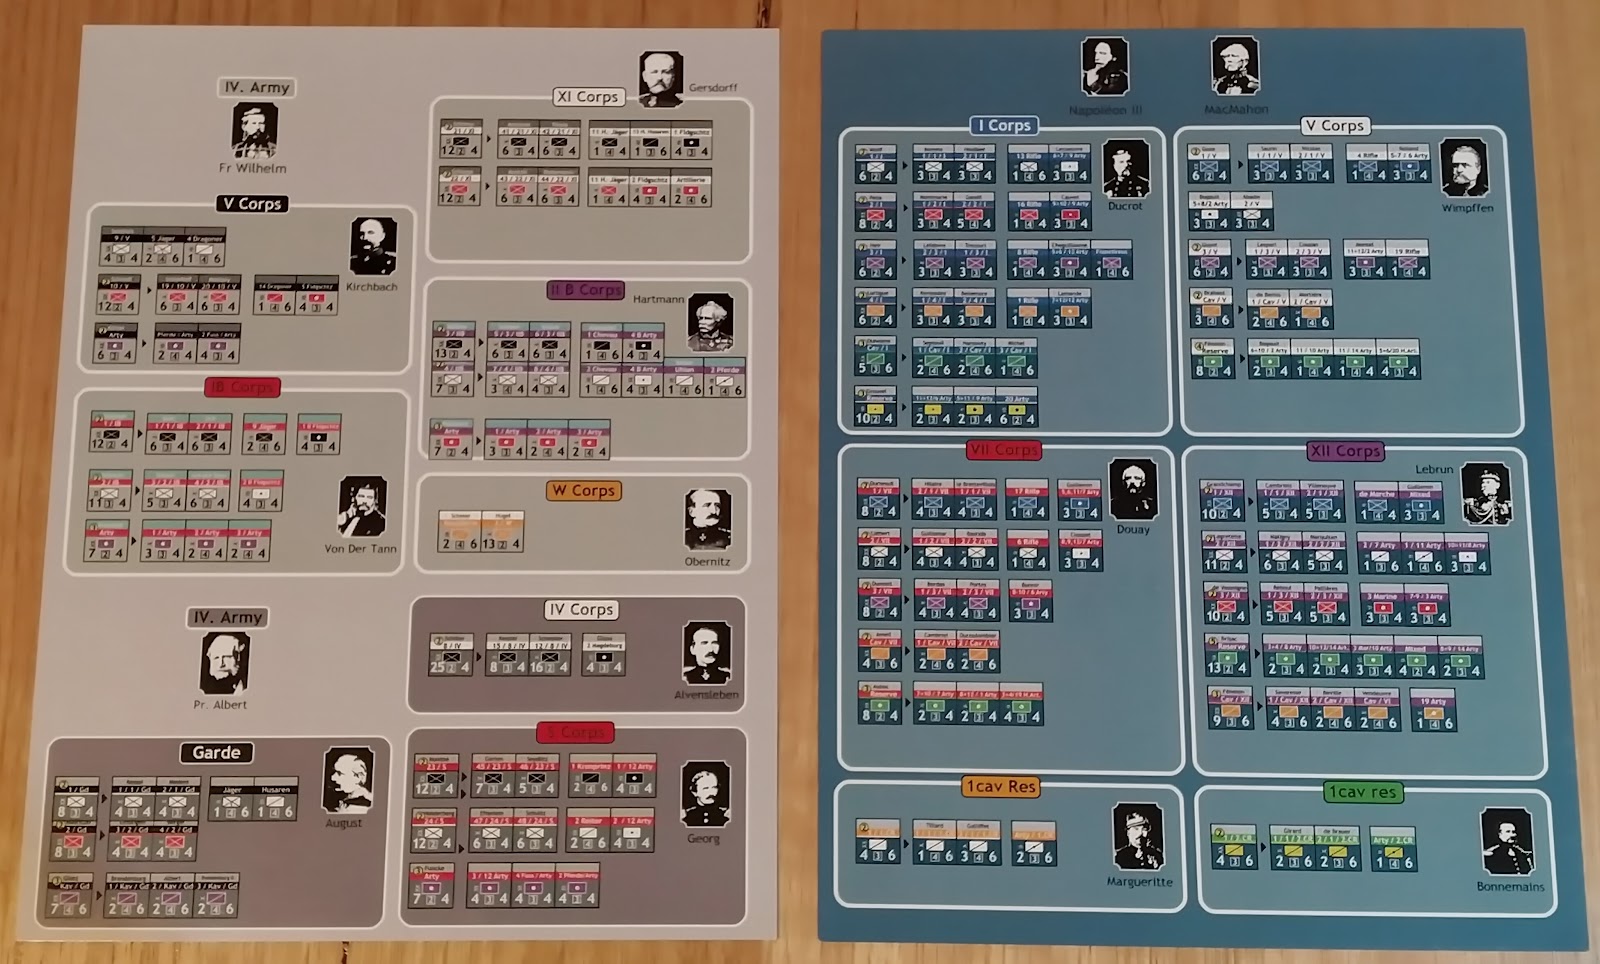
Orders of Battle. The little arrows between counter pics indicate which divisions
break down into separate brigades.

Along with a PAC, each player gets a formation card which lays out the command structure of their available forces, and to keep track of just how many units sit under each general. These cards also go a long way to explaining the relational structure of each division within a corps. Each division is made up of two infantry brigades, an attached Light  (or Jager) regiment for screening, and a cavalry squadron; some will also field their own light artillery, while the corps will usually include a battery of field guns. In most cases, the division’s core infantry can be fielded as a single entity (counter) or split into two brigades (two counters), facilitating more options for manoeuvre, but potentially making it harder in some situations to deliver the hammer-blow of a full division. Either way, it should still make for a lower counter density on the map.

A place for the disrupted and the dead.

Combat may result in units being disrupted to the point of ineffectiveness, or even eliminated in hard contest. To keep confusion descending on the game, a handy Holding Box card is included to keep your recovering units separate from those which have been eliminated. This might have been incorporated int the map, at the cost of some inches of valuable hex-grid. I’m very grateful to CSL for choosing to add one more component into the mix for the sake of a better play experience. The card is about a half-sheet size, so the extra table land-grab is minimal and worth the sacrifice for the convenience.

---

So, there you have it, my first look at We Were Not Cowards. I feel a little guilty for sitting on this for so long – several months now – but I’m looking forward to getting some time with this one. The second game in the Imperial Bayonets series, For Liberty and Lombardy: Solferino, 1859 (Conflict Simulations Ltd, 2024), is already out and available. That will probably make up a part of my next Noble Knight order. In the meantime, stay tuned for an After Action Report of We were Not Cowards for my Ten Game Challenge.


Wednesday, 15 January 2025

(P)review: With the Hammer


For those who have just joined us, I’ve been involved in the playtesting of a new game for a month or so. Because I’m attached (however loosely) to the project, I wouldn’t feel comfortable reviewing the finished product. But I’m going to try something new here; I don’t know if it’s a first in the field, but it’s a first for me. This will be a kind of review of the game as it stands. By the time it gets into the stores, there may be some subtle changes, but I think the current state of the whole thing is pretty stable and robust and the finished product will look a lot like it does now (except for the actual parts that don’t; I’ll explain this further along). So, without further ado, let me introduce…

A note on the release: For the Hammer was launched on the CSL web store a couple of days ago (and should be deliverable in a week or two – the processes used by the printer mean the maps take a couple of days to cure), just after I’d finished writing the bulk of this post. Rather than reworking the whole thing, I decided to leave it as it was. Apologies for any ensuing confusion.


A quick note on the photos. The parts you see are not indicative of the final product.
I MacGyvered a playtest set out of craft supplies and leftover parts from other
games. These are just to give you an idea of what will be in the box. For the
record, this picture is of an early version of the map. Some extra assisting
detail has since been added.


With The Hammer (Conflict Simulations Ltd, 2025) isn’t available yet. It’s a game currently in the final stages of development, but based on CSL’s track record, its publication will be imminent, within days or weeks I would think (I’m hoping some folks get to read this before it’s published).

The game covers an episode of history hereto untouched by game design; the Peasants’ Revolt in 1520s Germany. Yup, before With the Hammer crossed my field of vision, I hadn’t heard of the German Peasant’s Revolt either. You probably have heard of Martin Luther and the rise of Protestantism in central and western Europe in the early- to mid-sixteenth century. You may have even played the Protestant faction in a game of Here I Stand (GMT Games, 2006). The spontaneous uprising of the peasants through a pamphlet written by Thomas Müntzer, a clergyman who was destined to become a thorn in Luther’s side. If you want the Cliff’s Notes, there’s a concise introduction to the German Peasants’ Revolt on Wikipedia.

At time of writing, With the Hammer is probably only weeks away from going to the printers, so, here’s a quick take on the game. I’d like to reiterate that this isn’t a review, per se; I feel that being involved, however remotely, in the gestation of the game disqualifies me from reviewing it objectively, so what follows shouldn’t be taken as a purely critical appraisal. But having said that, I do think the final game will be worthwhile, and I have enjoyed my plays of it through several stages of development.


Appearance

A quick reminder that the pictures included in this post are of a playtest set I printed at a copy-store and built using left over craft supplies. The final, professionally produced game will look much nicer.

With the Hammer is an asymmetric wargame about the aforementioned German Peasants’ War. One side plays the Peasant forces seeking a better situation, led by several heroes of the movement, and the other plays the Nobles who want to put the peasants in their place.

All the artwork for the game was prepared by Ilya Kudriashov. I’m a huge fan of Mr Kudriashov’s work, which can be found in multiple CSL games, but also in games released by Compass Games, Hollandspiele, GMT, and a host of others. The map evokes the style of cartographical representation prevalent around the time in which the game is set, while the illustrations used in the components are drawn from print materials from the era.

WTH cover art. I'm pretty certain this is final.

It may take a minute to decipher the gothic lettering used for the character and place names, but it adds a level of verisimilitude to the experience of play. Nothing here is gratuitous; everything works toward making the game run smoothly, from the inclusion on-board of the all-purpose track, to the little reminder illustrations of the starting locations for the Noble Armies.

The components will have a Euro-y feel about them, labelled wooden discs for the Peasant Bands, coloured pawns representing the individual Peasant Leaders. Larger wooden blocks that stand on edge represent the Noble Armies, well trained and equipped, but monolithic and ponderous. Where the Peasant bands and the Freelancers (who we’ll come back to) have fixed strength values, the Noble Armies have a rotating three-point increment strength step system, Like Columbia block games and others. They each begin the game at 6 points but can be built up to a formidable 12.

The bottom of Turn 3. Georg von Sachsen makes his debut in the next round.

Every other turn, two dice are rolled for a d66 result (one d6 treated as tens and the other as ones). On a roll of 11-56, a Freelancer counter will be drawn randomly and placed face-down at a random locale. The Freelancers are a mix of miners and Landsknechts (mercenary companies) that may be of benefit to either side. On a 61 to 66 result, one of the players will draw an event card from a small deck and the effects of that card will usually be felt for that round.

The game includes a sheet of counters, including the aforementioned Freelancers, a mix of Landsknecht troops and bands of Miners. Other markers include the Propaganda tokens that indicate a locale’s population has been swayed by Father Müntzer tract and teachings, Two-sided markers to show when a locale has been drained of its resources (Depleted) or stripped bare by a second bite of the cherry (Exhausted), and some individual markers for recording Victory Points, Artillery Points (for the Peasants) Siege preparedness for Heldrungen Castle (these are all tracked on a universal point rack on the map), and a Turn marker for the Turn Track. A fourteen-card Random Event deck and two six-sided dice round out the contents of the game


Play

The game plays out over eleven turns, in a straight-forward IGO/UGO format. Each turn, the Peasant player can activate their Peasant Leaders (there are four to choose from, but if playing one-on-one or solo, the rules recommend starting with two), which may commit up to two actions each. The initiative then turns to the Noble player; they may activate the Noble Army or armies on the board, committing them to one action each. The Noble player begins with one Army on the board, and gains another in turns 3 and 4. If a Peasant Leader and a Noble Army occupy the same locale, combat is inevitable.

Playtest cards. Again, the finished product will look much nicer.

In their turn, Peasant Leaders may move up to three adjacent locales, inspire adjacent Peasant Bands to join them, preach about the injustices of the ruling class (and in doing so, place a Propaganda marker on the location), raid an occupied location for arms and equipment ( in the form of Artillery Points, subject to a roll for success), or parley with a neighbouring Noble Army (essentially – if successful – immobilising it for that turn). If only one or two Peasant leaders are in play, they each get two actions per turn, and may duplicate some actions. If more

In the Noble forces’ turn, they may undertake a single action each. A Noble Army may muster (increase its strength – Noble Armies start at half strength (6) and can build their strength successively through 9 to 12 points over one or two musters respectively), supply themselves for movement (although this has an adverse effect on the locale, leaving it depleted after a single supply draw, or exhausted after a second attempt in that region, which will also earn the locale a Propaganda marker), move, provided they have  collected enough supplies to pay for the movement, negotiate with unaffiliated Peasant Armies or Freelance units to dissipate or (in the case of Landsknecht mercenaries, try to hire them to join the Army), preach (roll to try to remove a Propaganda marker), or they can raid, which doesn’t require a successful roll, but leaves one more town’s peasants hatting the nobility even more.

An early two-player game, using the first iteration of the board. 

Noble armies are hobbled by their own might. Slower to move and to react, they are truly reactionary in every sense. Formal armies have strength and discipline, but they also have inflexible administrative structures, tiers of command that decelerate communication, and a voracious appetite for supply. By contrast, the Peasant leaders and their attendant forces can live more easily off the land, or the generosity of the like-minded, but they are limited in where they can go by whether a locale is swayed by Propaganda. They can preach to an adjacent locale and place a Propaganda marker the, then move to that location, but that’s their two actions for the turn. Having two actions in a turn isn’t always the great advantage it may seem.

Combat occurs when a Noble Army and a Peasant leader occupy the same locale. Combat is relatively straightforward and simple to execute. The side whose piece has moved into a locale already occupied by an opposing force is deemed the Attacker, the resident force the Defender. The antagonists each calculate their own fighting strength, incorporating any freelance units they may have picked up, and one of two tables is consulted on the Player’s Aid Card.

The two sides compare strength, establish a ratio (rounding down), establish any die-roll modifiers at play roll a die and check the result against the appropriate column on the Combat Result Table (CRT). Combat can be brutal in With the Hammer. A good negative result is being forced to retreat. Worse is if your side is routed. There is a separate rout procedure comes into play for the Peasant Leaders and the Noble Armies. Both involve the bidding of Victory Points (swinging the pendulum in the opponent’s direction; A Peasant Leader or a Noble Army can bid up to five VP, then a die is rolled; if the result is higher than the number of VP bid, that’s the end of the game for that force. It gets a little more involved with Peasant Armies and freelancers, but a rout aways carries a cost for the routed party.

Just a word about the components (in case you missed the earlier posts). The Peasant
Bands will be attractive little wooden cylinders, not Scrabble pieces like I've used.
I believe the Peasant Leader tokens will be wooden pawns like you might find in
other games (not the repurposed and repainted meeples seen here, and the
Noble army blocks will be a little smaller than the Columbia Games
spares I've used here..

A higher weight of force is always better but other factors can come into play as well. When mounting an attack, a Peasant Leader may spend an Artillery Point to effect a +1 DRM to their roll. In the reverse situation, an attacking Noble Army will receive a +1 modifier if the target Peasant force doesn’t spend an Artillery Point. (This is a really simple, elegant feature that adds to the sense of the cost of engagement. It’s the kind of detail I really like to see in a game).

Victory is obtainable several ways by each side. The most straight-forward (and convincing) way to win is to swing the scoring pendulum all the way in your side’s favour (“0” for the Nobility, “20” for the Peasants. This is theoretically achievable before the end of the game, but it’s unlikely.

If the Peasants can place Propaganda markers on all the locales (with the exception of Heldrungen Castle, which can never be under the influence of Propaganda), they win an automatic victory. I haven’t seen this happen in my games, but it’s possible for the Noble Armies to contribute to their own demise by creating dissent through raiding locales (although this can be avoided by only raiding locales who are already dissenting). Conversely, the Nobility can win if they manage to reduce the number of locales under Propaganda to five or less. This may be achievable, but it will be a lot harder.

Finally, either side can win the old-fashioned way, by eliminating a majority of the other side’s forces, three of the four Peasant Leaders or two of the three Noble Armies. I did say some fighting as inevitable.

A quick tutorial in Combat, With the Hammer-style. Trouble is brewing in Schmalkalden.
After building his strength to its highest level Johann der Beständige has chosen to attack
Hans Sippel. Combat will ensue. As the new arrival in Schmalkalden, Johann is
considered the Attacker, and will roll on the Noble CRT. 

Herr Sippel hasn't been sitting on his hands. While Father Müntzer has been preaching
across the German principalities, Hans has been gathering forces (to be fair, he started
with the Werra band and a random 
Landsknecht troop. He has since convinced three
other bands and a team of miners to take up the cause under his auspices, for a
total strength of fourteen.

Twelve to Fourteen puts the ratio clearly in the 1:1 column. Sippel has paid his Artillery
Point to deny Johann a +1 to his roll, but it still doesn't look promising for the defender.

Johann rolls a 5. That's a bad result for everyone. Both sides are thrown into disarray.
The Peasants must rout, while the Noble army may take significant damage.

The Defenders rout first. Sippel must roll a die; if he rolls above his Leadership value (4),
he has been captured. Fortunately for Hans, he rolled a 3. His troops are next. Each rolls
one die, and if the result is above the unit's Strength value, they are disbanded. Sippel's
loyal Werra band and the one-strength Salza band survived the altercation.

Those contingents who didn't make their rout checks are relegated to the Disbanded
Units box at the end of the turn track. These will count toward the Nobles' VP total.
In turn, Johann holds the field but as a significant cost. In the case of an Exchange
result, the attacking (Noble) force takes damage equivalent to half of the Defenders
losses. His Army is reduced from 12 Strength points to six. 


Assessment

This has been a very quick-and-dirty look at (not even the actual) With the Hammer. I hope it’s conveyed some idea of how the game works and what you can more or less expect in the finished product. 

It’s been fascinating to watch the game evolve from its original state to an essentially finished, ready-to-go product. At its rawest, With the Hammer was an interesting game covering a nugget of history that deserved more sunlight. I wasn’t sure it would have the replayability that I’d look for in a game like this, but before I had a chance to express this opinion, we play-testers received word that Fred Serval would be working as developer on the game. Things started to move very quickly after that. I believe it was M. Serval’s idea to introduce the random event component to the game with the addition of the small card deck. There were successive changes to the rules and some tweaking of the CRT, but with each change the game has got incrementally better, with much richer replay value. All the parts of the game work well together.

After nearly two dozen plays – mostly solo, a couple with my brother-in-law – I think I can say that, while it might look like a "real" wargame to some, With the Hammer is a historical conflict game of deep strategy. The limits on just what either side can accomplish in a single turn makes every decision important, and every choice will have an impact on ensuing rounds. I found myself thinking for a day or two (or more) about how some of my games played out, how a different action may have made a difference for the victor or the vanquished. To my mind, any game that takes residence in your thoughts after the session has ended has something to offer. 


A Fast Take: limiting Command and Control in wargames - part 3

      This will make more sense if you have read the first two parts first. You can find them here and here , respectively. If you hav...