Tuesday 27 February 2024

State of Play: Commands and Colors: Samurai Battles (Sekigahara, 1600: East of Mt Nangu)


T had a late meeting on Monday so I went to his place for our (nearly) weekly game. He said he’d set up.

At least one Mori got into the fight .

I was a little surprised when I arrived (mid-set-up) to Commands and Colors: Samurai Battles (GMT Games, 2021) on the table. I was really excited when C&C: Samurai Battles was announced; I seriously considered the Zvezda Samurai Battles (Zvezda, 2011), but I simply don’t have the space to adequately store hundreds of (admittedly really gorgeous) brittle plastic figures (it’s hard enough to find room for all of my Wings of War (Nexus Editrice, 2004) minis). The announcement back when in the Monthly newsletter of Samurai Battles being reprinted in the standard Commands and Colors format was welcome indeed.

T and I are both big fans of Commands and Colors. I’ve written at length here before about how the game helped to keep me sane when my wife had a prolonged hospital stay in 2010, which happened to be when I received the core set of Commandsand Colors: Napoleonics (GMT Games, 2010), and saw the beginning of our mostly regular Monday night game. We played C&C: Naps pretty much exclusively for nearly nine years playing through all the national expansions, before we started peppering our weeks with some Commands and Colors: Ancients (GMT Games, 2006), and then C&C: Medieval (GMT Games, 2019) when it came out.

For whatever reason, we haven’t played through the entirely of C&C Samurai Battles yet, so it was nice to get back to it again. Through chance or design, the 
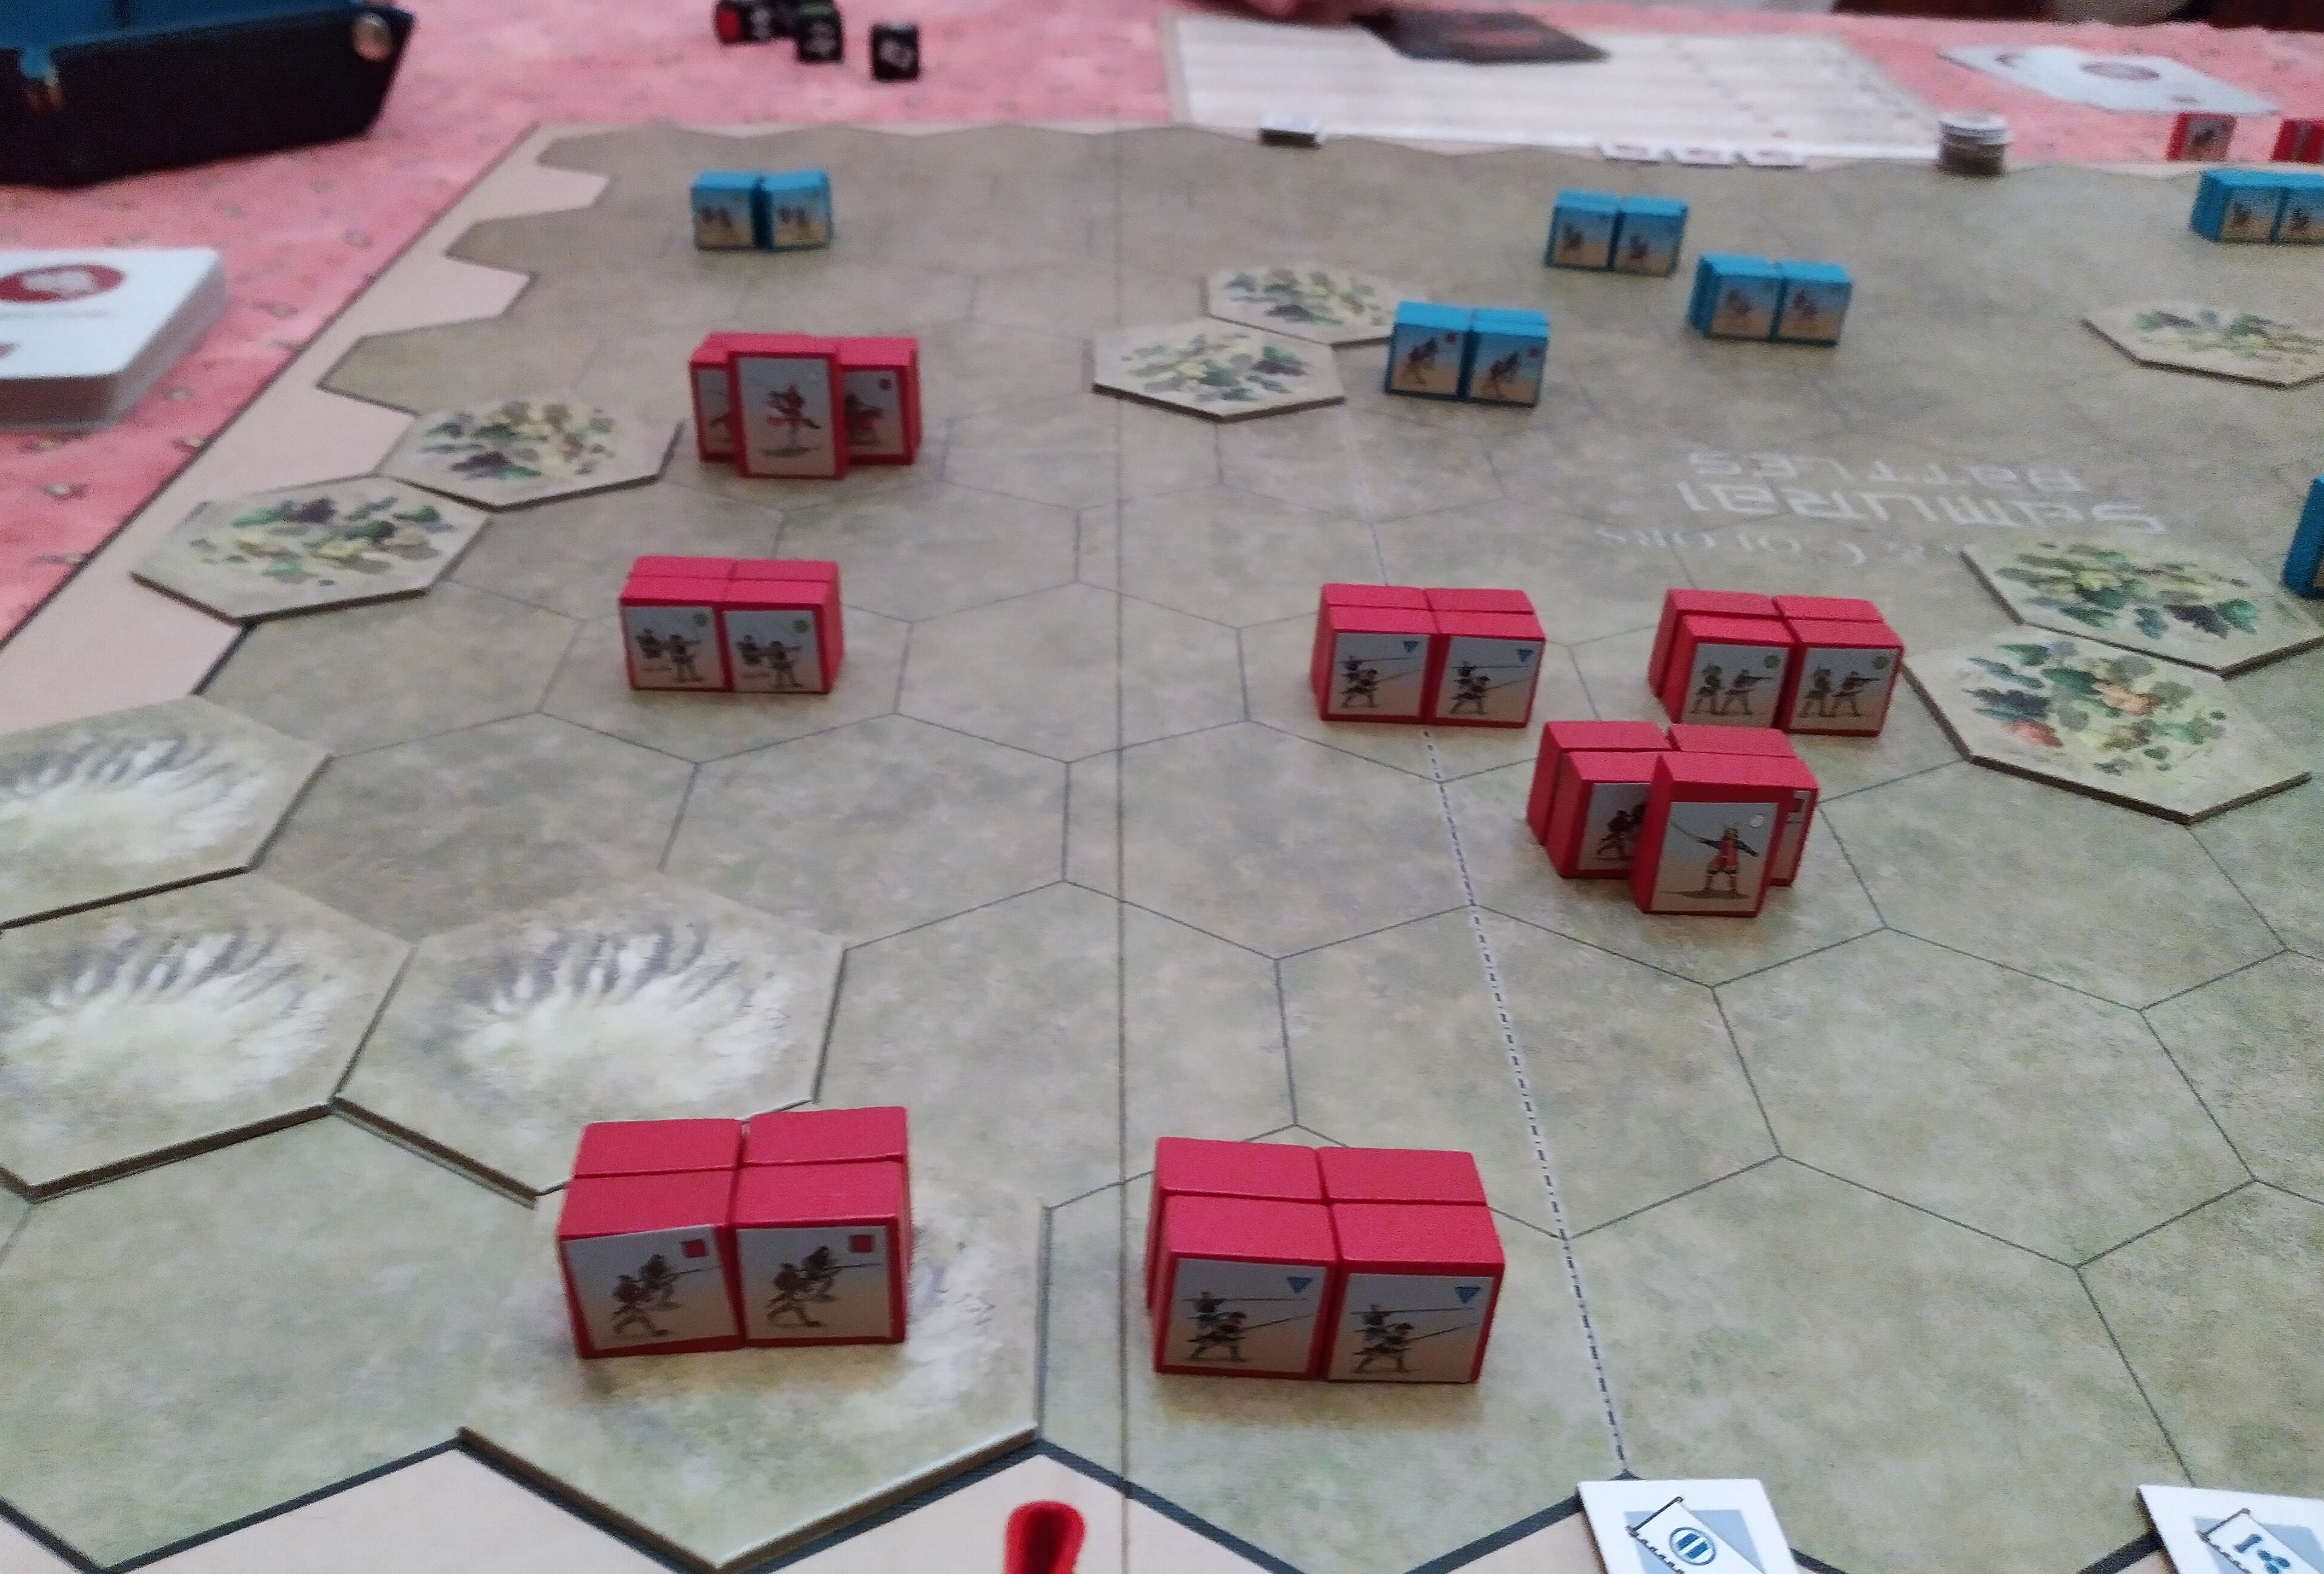
scenario T chose for the evening’s diversion was the second of the three Sekigahara scenarios, East of Mount Nangu. He’d started setting up with the Army of the East (blue) on his side of the Table, with the Army of the West (red) on mine.

Enemy casualties, with the indifferent Chosokabe forces watching on.


Much ink has been spilt on the unbalanced nature of many of C&C scenarios. I’ve always tried to take a conciliatory tone with these views, but I get sick of the evangelistic nature of some people who insist theirs is the right way to consider things. So here – where nobody visits and to no one will be offended, I will make my stand; to insist every scenario of every game should be balanced, allowing either player a close to fifty per cent chance of winning, exhibits a level of childlike innocence and belief in fair play that in another situation may even be considered charming. I’m the first to admit that the Commands and Colors system is much closer to the “game” end of the Game/Simulation continuum, but a lot of work goes into accurately portraying the situation of each scenario, which in many cases will be weighted in favour of one side or the other simply because that more accurately presents the historical situation.

Set-up map from the scenario.

Sekigahara: East of Mount Nangu is one of those scenarios that lend Commands and Colors that reputation. Anyone who’s played Sekigahara: the Unification of Japan (GMT Games, 2011) will know that the sometimes the troops of different noble houses will decide on the day whether or not they’re going to back your cause in battle. Just because hey show up for the fight, it doesn’t mean they’ll all fight. That’s the case of the Army of the West here. On the face of it, the two forces are pretty evenly matched. But under the Special Rules for the scenario we find that the troops sitting on the Red player’s back edge – the Mori (Red Left) and Chosokabe (Red Right) – cannot be activated except by playing a “Order One Unit Left/Right” card, for each unit, after which they can be ordered normally. To have a hope of getting all five units activated, you would have to cycle through the entire deck and get an extra Order One Unit Left card in your hand pretty quickly into the second round. Of course, being a Five Banner scenario (first player to reach five banners (or victory points) wins), and the fact that combat in C&C: Samurai Battles can be pretty unforgiving, the likelihood of making it through much more than half of the deck is slim. 

Because I’m a little OCD about these things, I dipped into the probabilities at play with the help of the MTG Nexus calculator (I've never been a fan of Magic: the Gathering (WotC, 1993), but they do have some very neat toys). The Command deck for C&C Samurai Battle is contains 60 cards. Four of these cards are useful in activating any of the Red player’s Mori/Chosokabe units. The chances of all four cards even showing up in the first twenty card-draws (roughly the number of cards drawn in our game, including starting hands) is 0.994%, a little lower than 100‑1. And that doesn’t take into account the split in the dealing, or the fact that the Blue player has a slight advantage with a six-card starting had to Red’s five cards (my high school math is too rusty dig that deeply). Looking at the numbers, I was lucky to get an Order One Unit Left card in my opening hand. That got the Mori Mounted Spear Samurai into the game and won me at least one of my two banners, and nearly cleared my Left flank (another special rule for the scenario dictates that a player will receive a Victory Banner at the start of each turn that there  section is free of opposition units at the beginning of the turn).

The killer blow.

The game played out fairly unusually for a C&C Samurai Battles game (almost more like a Napoleonics game). The forces available to the Army of the East in T’s Left and Center sections coalesced into a broad fighting front and advanced, picking off one or two of my units at a time, thinning the heard (I managed to break the line up with some multiple retreat rolls, but the damage was done by then). In our experience, it's often been a case of little scraps occurring between isolated single units of pairs, I had little opportunity to fight back with an unfortunate selection of Command Cards at my disposal. I chipped away at the advancing enemy, but found it difficult to land a killer blow, especially in the face of T’s superior numbers. The final score was 5-2; with one more round I may have got my score up to 3, but that's not how it played out.

That might sound like a complaint, but it’s not. Some people criticise Commands and Colors wholesale, saying that the system relies to heavily on the cards and doesn’t give the players enough agency. Without giving in to the desire to call these folks whiney little brats, I’d suggest that the uneven distribution of chances and opportunities brings a level of realism to the (admittedly rather abstracted and schematised) game that can be found wanting in traditional Igo-Ugo hex-and-counter games, where hidden knowledge is usually restricted to what might be hiding in a stack, and planning comes down to a good grasp of logistics. I was playing this scenario with one hand tied behind my back from the beginning, and that’s the way the scenario was devised, because (presumably) the Army of the West did face a slaughter that day in 1600. The scenario is unbalanced because the historical situation it portrays – a better word might be approximates – was also unbalanced. I was pretty sure, going into the game, that I’d be coming off the worse, but how glorious it would have been to overcome those odds, with some lucky cards and better rolls, and reached that fifth banner?


For what it's worth, this is my storage solution for C&C: Samurai Battles.
All the blocks fit into a $13.00 plastic craft tray with scalloped bottoms
so it's a little easier to get the pieces out.


Thursday 22 February 2024

Stripped Down for Parts: Under the Southern Cross (Flying Colors, Volume 4)


I’m fascinated by the Age of Sail; I’ve read a lot about the period, read Forester and O’Brien, watched the entire Hornblower series at east twice, and a couple of versions of Mutiny on the Bounty (Brando is still my favourite Fletcher Christian), and of course, Master and Commander. And I’ve played quite a bit of Trafalgar (Warhammer Historical Wargames, 2009), both with proper metal miniatures and with my own cheap-ass (but still quite workable) Pirates of the Spanish Main (Wizkids, 2004) plastic models. Several times I’ve come very close to buying Flying Colors: Fleet Actions in the Age of Sail (GMT Games, 2003), now in its Third Edition, but that is an awful lot of game. I know if it get’s pulled out, everyone is going to want to play a huge, sprawling campaign and lose interest half way through. Big games mean long set-up times and long breaking down times and looooog gaps between one turn and the next, and that’s just not what we’re about at A Fast Game. But nonetheless, I was still intrigued by the way Flying Colors simulates ship-to-ship combat. I’d downloaded the series rules from the GMT website and given them a cursory read. Friends had spoken of their experience, and how the game tended toward the bookkeeping end of ship management. But I couldn’t help but think that it wouldn’t be too onerous if it was kept to just a few ships a side, or even one-on-one or two-on-one frigate duels.

The original release of Flying Colors was followed up fairly quickly (in game publishing years) by the second volume in the series, Serpents of the Seas (GMT Games, 2010). This sold out quickly and requests for a second printing seemed to fall on deaf ears*. Serpents of the Seas covered the War of 1812, A period when the nascent United States was still finding its way on the world stage, fielding a navy of just six frigates and a few dozen schooners and other small craft, but in frigate duels the Americans bested the British ships as often as not and created a shockwave that ran through the fleets all the way to the Admiralty. One of the innovations in Serpents was a frigate-duel map. A giant hexagonal hex-map where a small number of ships could duke it out in a relatively fast-playing game.

Fast forward to 2023, when GMT released volume four of the series, Under the Southern Cross: South American Battles in the Age of Sail, 1811-1841 (GMT Games, 2023). Or more accurately, near the end of 2023, when I was able to pick up a copy of Under the Southern Cross for a very reasonable price in the GMT Summer Sale. Not only does UtSC offer an impressive twenty-five scenarios for fleets of varying sizes (several getting up to around twenty vessels a side) but is also comes with the ship-duel map that hasn’t been seen since Serpents of the Seas, and eighteen historical ship-to-ship encounters form the conflicts covered. What better way to learn the system.

Under the Southern Cross comes in a sturdy 2” box of a quality that has become standard to GMT in recent years. The cover art is evocative of the game’s subject, with a line of ships at fighting sail, guns run out, some having just fired. It also informs us that the volume was designed (and the historical research involved undertaken) by Steve Paul. Mike Nagel is acknowledged as the series designer, and I always appreciate it when a publisher acknowledges the games developer as well, in this case, Chris Valk. Developers are the John Maxwell to the designer’s Thomas Wolfe or F. Scott Fitzgerald; they take the raw material and they polish it (and encourage or cajole the designer to be better), often improving the final product in a dozen little ways. A good developer is above rubies.

The box back reveals a little historical context, reassures us that it is indeed a stand-alone product, not at all dependent on owning any other games in the series (phew!), and teases us with some sample counters. The play details are as follows: 1-4 players (I don’t know if there are dedicated rules or systems for solo play, but I’m not expecting there to be – probably just some advice on double-handling); the game will take on average 3-8 hours to resolve, and it’s recommended for plyers 14 and up. The complexity is rated at 6 out of 9, and the solitaire suitability is also rated at a six.

FC series Rule Book and UtSC Play Book.

The series rule book is twenty-four pages in length. That in itself isn’t a daunting prospect, but it gets better. The first two pages are the cover/table of contents, and a glossary or terms used in the rules (always handy). The essential rules for the game run from page 3 to page 17, fifteen pages of core rules peppered with helpful diagrams. I’m sure that over the several volumes and multiple printings, these rules have been honed to an effective edge. The next five or so pages cover the optional rules, with one page devoted to ship duels, and the back cover offering a reasonably thorough subject index. Not at all scary.

Play Book: sample page.

The weight of text comes in the Play book. As I mentioned, this includes twenty-five fleet scenarios (all well described, and each with its own set-u map), and notes, where appropriate, for the eighteen ship duels featured. The first five pages cover some module-specific rules, including grounding and towing-off, something that hasn’t come up in previous iterations of the game. So far it still looks manageable.

PAC-1 bi-fold (external pages).

Okay, this is where it gets a little daunting. The game comes with two Player’s Aid cards (only one of each, so you’ll have to learn to share). The front and back of the bi-fold PAC-1 are filled with useful rolling tables for movement, tacking, wind adjustment, and various hazards like grounding (a danger in river battles) and fire (a danger when you mix wooden ships and gunpowder). The scary part is in the open fold.

PAC-1 (internal spread; Hit Result Tables).

Okay, maybe it’s not as bad as all that. It just looks overwhelming at first blush. Or at least it did to me, but the Hit Results Tables are just that; tables on which you cross-reference your die-roll result against your modified firepower rating. Yes, it involves some maths, but it’s all just simple arithmetic. No trigonometry required. The firepower modifiers are also helpfully reprinted at the bottom of the Small Vessels Chart.

PAC-2 (the more useful side).

PAC-2 is the one you’ll be reaching for less often, or at least not at the beginning of the game. It offers tables for collisions, grappling and evading, the striking of colours, breaking off and disengaging (different things; who knew?). The flip-side has some scenario -specific tables for the capture of shore batteries and the removal of harbour chains. I don’t think I’ll be getting to these any time soon.

Turn Track (fleet action side).

The game also comes with a two-sided Turn Track. This is actually very useful and well designed. The turn track runs up to 32 turns, but circles back onto itself in case you can’t quite reek complete devastation on your enemies in the allotted time. Inside the track is an abbreviated Sequence of Play, but each step helpfully includes the rule-reference number, and below that, handy holding boxes for the weather and wind reminder markers. The flip side of the card is identical, except it incorporates the Duel Sequence of Play.

Maps J & K.

Under the Southern Cross comes with two sea boards, representing the open ocean. These are identified as Maps J and K, there being nine maps spread across the previous three volumes of the series. The scale is 100 meters to a hex. I suspect the colour variation (presumably indicating water depths) will be significant in some scenarios and ignored in others, but I have nothing to base that on, and I hate it when people doing unboxings on YouTube confidently make all sorts of uninformed, speculative assumptions about game components, so I’ll just shut up now.

The Ship-Duel board, featuring practically every chart you'll need.

Which brings us to the Ship-Duel board. This is also an example of excellence in design. The play are takes up maybe four-sevenths of the mapsheet, but every square inch of available space has been utilised to good effect. The Hit Results Tables and just about every other table you’re likely to need from the two PACs has been reproduced on the otherwise unused space at the other end of the map, in clear enough print to be read from either side of the table. No pesky PACs to keep referring to; it’s all right there, along with an abbreviated sequence of play.

But that’s not all. On each side of the map there are two (yes, two), templates – one at each “corner” of the map – to keep track of your ship’s – or ships’ – status so you don’t need to clutter up the board with the status markers (this is a concept we’ll circle back to). It’s an elegant design solution and I wholeheartedly endorse this product.

Counter sheet 1 - mostly ships.

The playing pieces are nearly all half-inch counters, not my preferred size to work with, but that’s not a deal-breaker here. The ship counters are all quite clear and readable, and you’re not going to confuse the nationalities with the bold choice of background colours. Similarly, the personalities – captains. Commodores, and admirals – and their three attributes are quite legible, and each even features a tiny portrait, which is very cool. The ships are double-sided. They’ll drop in several factors once they take enough damage, and then they’re flipped to reflect their sorrier state. There are only three big ships in the game, a lot less than the other volumes, but that’s reflective of the nature of the economies fighting in these battles. The big ships look cool (especially when someone posts pictures of their annual Trafalgar or Cape Jervois game on Facebook), but I think battling with the smaller ships will be just as satisfying.

Counter sheet 2 - all markers.

Flying Colors is a game of conditions, and it uses markers to reflect those conditions. Lots of markers. This can be a headache to manage, but there’s a solution. I read somewhere that series designer Mike Nagel has begun making ship cards available in sets for the four series volumes called Beat to Quarters through WargameVault, the wargame storefront for print-on-demand outfit OneBookShelf. The idea is you use the cards to keep track of each ship’s status (via the counters) and keep the ship counter on the board clear in the same fashion as the templates on the duel board.

Inside the box (cards and a die).

Speaking of cards, Under the Southern Cross comes with two 27-card decks of Initiative Cards cards, which are confusingly labelled “Maneuver Cards” on their reverse side. (the deck also comes with Serpents of the Seas). The initiative cards can be used as an option for determining initiative order in larger battles – each card has an Initiative Effects table adding modifiers to Command, Speed, Tacking, Wear and Firing for that turn. The decks are identical with one red-bordered and one blue.

Sample Activation Cards.

There is also an addition, brown-bordered card, unnumbered, with the title of Out of Command Option. I’m sure its purpose will be revealed in a thorough reading of the rulebook, but at this point I wouldn’t like to speculate. I will note that use of the Initiative/Maneuvre Cards is mandatory in the ship-duel mode of the game, so I suspect I’ll be getting to know the cards sooner rather than later.

The game comes with a single 10-sided die. As mentioned regarding the PACs, you’ll just have to learn to share. At least nobody at the table will be accused of having lucky dice. Although the die may seem to lend favour to one or the other player from time to time. I’m always astonished how superstitious otherwise rational people can become when it comes to dice (and I count myself among these – I’m not above swapping out dice that aren’t performing well for “fresh” ones).

Finally, a box insert is included in the package. It was explained to me that these exist only as a temporary fix to keep the flat components (maps, counter-sheets, etc.) from being damaged in shipping, and to offer a small recess for dice and cards and anything else that might otherwise jam into the other components. It’s not meant to be retained, but, like a lot of folks, I always feel loave to ditch it (unless I’m going to be using counter trays). In this instance, I’m going to use a trick somebody mentioned on one of the Facebook wargaming groups, and invert the insert. This involves refolding all the creases in the insert counter to their current direction, and replacing it in the box. The result will be two larger recesses with a raised centre partition. This should offer enough room for all the counter sets and their respective baggies (in theory). I'll let you know how that goes.

So that’s Under the Southern Cross. Not nearly so frightening as the original game, but it looks like it will offer a lot of replayability, both with the fleet actions and duelling frigates. It might be a while before I get this one to the table – I’ve scheduled myself into a corner somewhat for the next few months – but It will be played and I will report on how it goes. Watch this space.


* Gene Billingsley announced in the monthly GMT newsletter for January this year that Serpents of the Seas had (after a very long wait for many) made its way onto the company’s P500 list. At time of posting it had reached 213 pre-orders (which is just as well, as a pristine condition 1st edition Serpents of the Seas will set you back around US$390.00 on the secondary market).


Wednesday 21 February 2024

State of Play: playtesting Great Northern War – Part 2


You can read part 1 here, but it’s not absolutely necessary (unless you're into DIY prototyping on a budget). Also, Great Northern War’s designer, Ray Weiss, posted a short video up on YouTube offering a visual tour of the final product, which you can watch here.


Great Northern War (CSL, 2024) is an operational-level game depicting the first decade or so of the war prosecuted by Russia and her allies against Sweden and the newly crowned, eighteen-year-old King Charles (or Karl VII). The conflict came to be known as to as the Great Northern War, or the Third Northern War (or, in some countries, confusingly, as the Second Northern War). The war began in 1700 and ended in 1721, which the game covers in just six turns. This is what I should have led with in my last post. You know, for context. Great Northern War is a novel, small-footprint game that’s out now (you can order it direct from the publisher here), and I got to be a part of the playtesting team.

I wanted to be involved in the playtesting to see how the game worked, but Great Northern War had a steep learning curve for me because I’d never played anything like it before. Many of the constituent parts of the game are familiar – point-to-point movement, action bidding, dice-roll plus build points (a pre-selected card) for a combat value, cards that create rule exceptions, adjustable hand-size, and taking penalties now for benefits in later turns. The biggest hurdle for me was the trick-taking mechanic. It’s so simple, I kept looking for the complexity. Let me tell you – there isn’t any, mechanically, at least.

Leading tricks

To lead a trick in Great Northern War, you declare your intention – say, to move a Leader a couple of locations, or to try to activate one of your reserve leaders onto the board – and select a card from your hand to lead with, then your opponent selects a card from their hand to respond. It their card is lower in value than yours, you can proceed with your action. If it’s of a higher value, or of the trump suit, you can’t do that thing you wanted to do, and your opponent gets their turn. It’s such a brain-crunchingly simple way to give every decision more weight, I don’t know why more games don’t use it (maybe they do, and I’ve just been living under a rock).

Each time you try to activate a unit, you have to ask yourself, “how badly do I want to do this?” and “How hard is the other guy going to try to stop me?” The first couple of rounds you’ll just be gathering your forces, maybe trying to move to strategic advantage, but as soon as you get the measure of your opponent and start to get a sense of their operational imperatives, every choice becomes frustratingly, deliciously difficult. The trick-taking mechanic forces you to think about what you want to achieve in the round (which could run to nine or ten turns each) with the incomplete knowledge of what cards you’re holding at the moment. The game should play out inside of two hours, but if you or your opponent are prone to analysis paralysis, add another hour or two to that count.

Mistakes were made


When I first got the files, the game was nearly there, but still a little raw. It wasn’t a brain dump – most of what was on the page was coherent and made sense - but not everything was clear from the rules. There were a couple of crucial details left out. This isn’t a criticism of the game – it’s one of the reasons you get bunch of people to playtest your game for you before releasing it on an unsuspecting public.

I broke one of my own dictums early on in the testing, which is something my father told me more than once; “There are no stupid questions, there are only stupid people who don’t ask questions because they don’t want to look stupid. One of the missing pieces was that there were Russians and Swedes and there were allies of either the Russians or the Swedes. The rules didn’t spell out from the get-go who here whose allies. The first draft of the rules said simply that there were 27 leader discs (13 blue Swedish and 14 Green Anti-Swedish). It left the Ottoman leaders out altogether in the component description, only picking them up a page or two later. The Swedish were easy to pick, as we the Russians and their Polish allies. The rest were a bit of a mystery. So, rather than asking the question, I tried to work out which were which from the numbers. For my first two playtest games, Swedes played with the Saxons in cahoots, while the Russians had the two Georgs. It sorted itself out eventually, but I should have sort clarification when it first came up. One way to help the designer or developer of a game you’re playtesting is to ask a lot of questions. I wasn’t the only person working on the game, and another of the other testers must have brought it up with Ray, because the next rules iteration had the above handy explanatory pi

As I said in the previous post, I was never taught card games really as a child, so the whole trick-taking mechanic was new to me. I understood the random draw of a trump and the role of the trump for the turn, but I didn’t quite understand the power of the trump. In Hitler’s Reich (GMT Games, 2018), the suits represent nationalities or coalitions – two represent the Americans and the Commonwealth (and Free French, Free Poles, etc.), while the other two represent the Germans and the Italians. The neat trick with Hitler’s Reich is, when each player plays the same value card, the Germans always win ties, but the Italians always lose in a tie. Without exploring further, I assumed that a played trump card would win ties, but beat any other suit as is the case. In this instance I did ask the question, and Ray cleared it up for me. A short explainer made it into the rules for any folks unfamiliar with the like me.

The acquisition of cards took a little working though as well. The jokers, face cards and aces in GNW are separate from the draw deck, and they have escalating powers. You can try to “purchase” them, one at a time, by leading a trick. If you’re successful, you can pick up the card and use it or hold on to it, depending on what it does. Some cards begin the game in front of one or the other player, being solely for their use, subject to certain game conditions being met (this wasn’t perfectly clear in the initial rules version I saw, but it should be obvious enough for new players in the printed rules).

After the first couple of plays, the Decision cards were making a lot more sense. I don’t think every single one came out across the playtest games I played, but I grasped the potential of each one to add to my game or to foil an opponent’s intentions.

The process

This wasn’t my first rodeo; I’ve done a bit of Role-Playing Game proofing work and some playtesting in the past, but this was my first wargame. Everyone has their own way of doing it, and I suspect different designers or developers may be looking for different things from play-testers. Some might have a form to fill out or a specific set of questions they’re looking for answers to. In this case Ray Weiss offered the rules and components and said have at it. I think he was already confident he had a workable game but was looking for some finessing. I can late to the playtesting, so I don’t know how radically the game had changed from what it was in the beginning; what I received was a really well-balanced game already (either side could win and did, and with fortune smiling on your card draws, you might even be able to snatch victory in the third or fourth round).

Early playtest game. Saxons mistakenly in service of the Swedes.

I like to think my contribution to the game was probably more in the presentation of the rules than in the game itself, but that’s my skillset (though it may not seem so reading this). The game mechanics had been stress-tested before it got to me; all that was left was the polish. I confess it was nice to be able to work with Ilya Kudriashov’s gorgeous map rather than a typical function-over-nice playtest board.

Playtesting forces you to think differently about a game. These days I look at the dames I play differently because I’m thinking about how to present it in a review. Playtesting pushes you to think about a game another stratum or two deeper, looking at why a particular mechanic is fashioned the way it is, and whether it accomplishes what it sets out to do. And whether it might be better done in another way, or ignored altogether.

After this experience (you always remember your first), I’d be happy to step up to the plate and take on another playtest. Ray has mentioned on Facebook working on a solo game about John Brown’s raid on the Federal Armory at Harper’s Ferry, so that would be interesting. Meanwhile, a new iteration of the DAMOS series rules should be coming through sometime soon.


Great Northern War is now available directly from the publisher and decerning purveyors of fine wargames.


Sunday 18 February 2024

State of Play: playtesting Great Northern War – Part 1


I’ve been taking some time away from my regular playing and writing lately because I’ve been working on something that I didn’t feel at liberty to write about. But it’s now out in the world, and I can now talk about a new game from designer Ray Weiss and his company, Conflict Simulations LLC, Great Northern War (CSL, 2024). Let me say at the outset that this isn’t a review, because I haven’t seen the finished product, but this is the kind of game that might be lost in the maelstrom of neat games from small publishers, so I wanted to highlight what I think makes Great Northern War special. I’m going to look at the game in two parts. Here, I’ll show you what my kit-bashed prototype looked, and talk a little about how it all fits together. In the second part I’ll talk about the playtesting process, the inevitability – and the virtue – of making mistakes, and how we (probably) helped make a really good game a little better.

I’d been proofing the system rules for Afrika Army Korps, the next game in Conflict Simulations’ DAMOS series. CSL has three DAMOS titles out currently, Army Group North (CSL, 2019), Army Group Center (CSL, 2019), and Army Group South (CSL, 2019). These can be played in one grand campaign game with combined maps.

While I was going through the DAMOS rules, the Great Northern War rules arrived. Ray had set up a Table Top Simulator module for playtesting and asked if I’d help out, but I’m a klutz when it comes to technology and could not get it to work.* But taking a first pass at the rules, I was intrigued; this was a different beast to any wargame I’d come across before. I really wanted to see how this would work, so I asked Ray for the artwork, and he forwarded me the files.

Build me a game

DIY Control Markers (not pretty, but functional).

After a trip to Officeworks for the colour printing, I set about building my own copy of Great Northern War. The result wasn’t pretty, but it was functional. The game components are cylinders labelled with the unit facings, like a Columbia block game, but for ease I used left over Commands and Colours: Napoleonics (GMT Games, 2010) blocks, the spares you always get in the sets. French (navy) and Russian (green) blocks with allies in other colours matching as close to the instructions as possible and glued the printed-off leader labels on them with a glue stick. I used wooden blocks from another game as the supply dump tokens and used some blank 9/16ths chits as reversable control markers. The play map I printed at A3 size – about 140% larger than the actual board, partly to compensate for the oversize pieces, partly because I’m old and big enough to admit small print can be a challenge.

DIY Leader markers (Ottomans not mounted yet).

I had a cheap set of playing cards and some spare Avery label sheets and made my own Decision Cards (face cards, aces, and jokers). The game is influenced by the Event Cards of Hitler’s Reich (GMT Games, 2018) that can be purchased by the player for a one-off or on-going benefit, at the cost of a card from their hand (sometimes two), reducing their temporary hand-size. Hand-size is something I’ll swing back to in a minute. The 10s are also separated out. These can be purchased as well, and their virtue is you can play them once per round, but they stay with you (they don’t go back into the draw deck), and they don’t count to your hand-size.

DIY Decision Cards (and tens, Black suits for Swedes, Red for the Coalition).

How it works

The remainder of the deck – the twos through nines, minus the drawn trump card – make the draw deck. Each turn, the players are dealt a hand each, according to their hand size (this is a crucial factor in the game; again, like in Hitler’s Reich, if you can manage to reduce your opponent’s hand-size to zero, you get an automatic victory – and control of trade in central Europe for the next twenty or thirty years). When to play a trick, or respond to a trick from your opponent, you’ll be using a card from your hand. Each time a trick is played, both players draw a replacement card from the draw deck. When the deck is empty, all the cards are reshuffled, the turn marker moves up, and a new trump is drawn.

Trick-taking is the driver of the game. Whatever action you want to take, you’ll probably have to lead a trick. If you win, you get to do the declared action; if you lose, play goes to the other team.

Initial set-up, with Turn and Diplomatic Appeals tracks, and 
blue cubes (off-board) for Swedish supply  depots. 

Each turn, a new trump suit is drawn and marked on a track on the board. When playing a trick, the higher-value card will beat the lower one, but a trump suit card will beat anything except a higher-value trump. Before Great Northern War, I’d never played a trick-taking game before – growing up we never even had a deck of cards in the house – so this was all new to me.

Both sides begin with some of their Leaders already placed on the board. Leaders represent the military leader and their associated strength of numbers. To deploy a reserve Leader, first you’ll have to win a trick. To activate a Leader for movement, you’ll have to win a trick.

Combat is a little different. When you engage in combat, attacker and defender will each choose a card and place it face-down in front of them, to be revealed simultaneously. The card value will be added to the command value of the Leader engaging in the battle, along with any modifiers, then each player rolls a pair of dice, and that result is added to the total. The higher number wins (draws to the defender), but the margin of victory is where things get interesting. A margin of a couple of points might see one or the other side have to retreat a space or two to avoid a loss point, but a big enough margin could see the losing side’s troops removed from the board, and if a recovery roll goes badly, even permanently from the game.

Setting up an early game (Hand-size tokens missing, Anti-Swedish
track-marker at wrong end of track).

There is a lot going on in Great Northern War. It really is a simple game to learn and play, but it’s strategically deep, with multiple pathways to (a potential) victory, and the brinksmanship with the trick-leading driver adds a constant undercurrent of stress. As does the general hand-management required to ensure you’re not caught out cardless. Taking your opponent’s capitals will reduce their hand-size (there’s a handy hand-size reminder on the right-hand side of the board) but taking them and keeping them is harder than you might think. Combat is swift and often brutal. And every time you want to take an action, even something as simple as waking up a general and getting him to haul ass to the neighbouring town or set up a supply dump, there’s a good chance that your intentions will be frustrated by the turn of a card.

I’m trying hard not to write a review of the game – I’d feel weird about reviewing something I was involved in developing, even this tangentially – but I will go a little further into what I think the game gets right and who it will likely appeal to.  Here I've tried to offer a glimpse at how the game works, in pretty broad brushstrokes. In Part 2, I'll take a deeper look at the game's internal interactions, as well as some of the dumb mistakes I made on the road to learning all of that, and what came out of it in the end. 


* This was all on me. In truth, we replaced the old desktop a month or two before Christmas, and I’d simply forgotten to install it on the new machine. If You have access to TTS, I believe the playtest module may still be available; search for Great Norther War on Steam.


Friday 16 February 2024

By the Numbers: Final-ish Game Plans for 2024; and 100 posts!


This post marks my one hundredth submission to A Fast Game is a Good Game, two weeks into the blog's second year. I’ve talked about why I started A Fast Game and how its direction and purpose has changed over time several times before, and in a previous post I sketched out some ideas I had for my gaming program for this year. Well, a month-and-a-half in to 2024 and I haven’t locked down every detail, but I’ve got some things to share, and I thought that would be a good way to mark my hundredth post.

6x6 now 5x3

If you’ve been reading from the start you’ll know that I initially started A Fast Game as a way to track my progress at my self-imposed 6x6 challenge, i.e., playing six designated games six times each, against a face-to-face human adversary. That turned out to be a lot tougher than I first thought it would – mostly due to the difficulties scheduling, so I’m adjusting my expectations. 

This year I’ve been working on picking five games to play three times each. I’m still going to try to finish the outstanding 6x6 games (as a manner of penance for my overreach – I had seventeen unplayed sessions at the beginning of the year, and that’s now down to fourteen), but looking back over the year, I’ve come to the conclusion that three runs at a game is a pretty solid position from which to critique it. While I understand why it happens, I really hate it when people review games after a single play-through. I don’t think it’s fair to the game or to the audience. Six games is great, four or five is swell, but I think three is the minimum number to begin to get a solid feel for a game. To wit, I present the titles I’ve so far settled on for the 5x3 challenge:

 - Brothers at War,1862 (Compass Games, 2022 (see the unboxing here))

 - Dawn’s Early Light: the War of 1812 (Compass Games, 2020)

 - Napoléon 1807 (Shakos, 2020)

These three are firm choices. I did a solo run-through of Brothers at War and was really impressed. I’m looking forward to playing it against an opponent. I spent some time with Dawn’s Early Light last year (and wrote positively about it here). I think that is a strong candidate for my favourite CDG. And after my experience with Napoléon 1806 (Shakos, 2017), I was keen to see how the system will play out over a bigger play area and multiple scenarios with differing strategic goals.

C&C: Ancients - both fast and good.

For the last two slots, I’m tossing up between Undaunted: Battle of Britain (Osprey Games, 2023), No Retreat!: the Polish & French Fronts (GMT Games, 2018), Fate of the Reiters (Hexasim, 2019), Dunkirk: France 1940 (Worthington Publishing, 2018), Old School Tactical, Vol. 2 (Flying Pig Games, 2017) and a Columbia Games block game, maybe Athens and Sparta (Columbia, 2007). If I can’t choose and I’m feeling game, I may stretch to a 6x3.

Solitaire Play and Review Challenge

I mentioned this in my previous goals post. In the past couple of years, I’ve built a decent collection of solitaire or solo-friendly games. I’ve managed to play quite a few, but certainly not all of them (probably about half), and most of them have gone unreviewed (well, five of the twelve reviews I posted last year were solitaire games, but I feel like I could have done more). I said in my last By the Numbers post that I was going to aim for twelve solitaire games, wither new or revisiting (I’ve recently had a hankering to get Skyhawk (Legion Games, 2022) to the table again). I’m going to wind that target back to eight, but I’ll concentrate on new games, or at least, games I haven’t played yet. This will also be open to games with a dedicated solitaire mode (like Atlantic Chase (GMT, 2021) and Pacific Tide (Compass Games, 2019).

My most recent acquisition.

I haven’t settled on all the solo games I’ll try to get played through the year, but I’m planning on starting with titles I already own. The first couple off the rank will probably be:

 - Skies Above Britain (GMT Games, 2023)

 - Redver’s Reverse: The Battle of Colenso, 1899 (Legion Wargames, 2016)

 - Midway Solitaire (Decision Games, 2017)

 - Beneath the Med: Regia Marina at Sea1940-1943 (GMT Games, 2020)

Redver’s Reverse, set during the Anglo-Boer War, only arrived this week; I’ll post an unboxing in the next week or so. I’m currently reading though the rules, and it looks promising, if a little daunting. Technically, I have played Beneath the Med before; I ordered it through GMT’s P500 program and played it when it arrived, but it’s been a while and I’d like to run through it again to get reacquainted before reviewing it.

I’ll aim to play all these at least three times, and review each of them here at A Fast Game. This should help toward my third goal for the year.

Twenty considered, generally positive game reviews in 2024

My first year of A Fast Game saw me post a total of game reviews. The reviews I post are the most popular features on the blog, read by an order of magnitude more folks than anything else here. Not to blow my own horn, but I feel like I’ve gotten better at writing my reviews. And it can be tough, but they are the most rewarding posts to put together. I think I can put twenty reviews up this year (I’ve already posted one in January for Napoléon 1806, so only nineteen to go). Eight solitaire game reviews, five or six for the 5x3 challenge and three more for my outstanding 6x6 games will get me most of the way there.

1944: D-Day to the Rhine (Worthington Publishing).

At this point, I’d just like to reiterate for anyone who’s joined us recently that you’ll only see positive reviews here. I don’t think I’ve come across too many games over the years that I absolutely didn’t like or that I couldn’t find any redeeming factors in, but if I do through the course of writing about games, I won’t review it. This is partly because whatever I don’t like, somebody is going to think it’s the best thing since the last really good thing, then they’re going to start spamming me with vitriol and I don’t need that. I used to write music reviews back when the internet was still shiny, so I know of which I speak. Mostly, though, it takes time an effort to write a review, good or bad. If I’m putting that much effort into a piece of work, I want to promote something I think is worthwhile.

Extra Credit Goals

At the beginning of the year and the first flush of enthusiasm over new beginnings and such, I had a list of things I hoped to achieve in the coming twelve months. With just ten and a half of those months left, I’m trying to be a little more sober-minded about what I can accomplish. So, there are a couple of things I’d like to do, but I won’t castigate myself if I don’t get there. Part of the reason I didn’t complete my 6x6 challenge last year is the multifarious ways life outside of gaming would trample on plans and curtail the best intentions.

Fire and Stone (Capstone Games).

I already written up a wish-list of extra-curricular accomplishments I’d like to make happen this year, so I won’t reiterate it here. The most realistic might be learning Fields of Fire, Vol. 2 (GMT Games, 2019), as that would tick off another solitaire game, but if I don’t get tick any of them off this year, I’ll still be cramming in a lot of gaming goodness.

So, if you’ve been following A Fast Game for the duration, thank you, and I hope you’ll stick around. If you’re a newcomer, please don’t feel like you have to go back and read everything, but browse the index and see if there’s anything of interest (some of the reviews are quite good, and if there’s a particular game you’re interested in, you might find some of the AARs interesting). Here’s to a game-rich 2024 and a diverting blog going forward.


Stripped Down for Parts: The Lamps Are Going Out: World War I

       World War I, or the Great War (or The War to End All Wars), as it was referred to at the time, holds an abiding fascination for me as...