Wednesday 23 August 2023

State of Play: Commands and Colors: Ancients – Expansion 1: Greece and the Eastern Kingdoms (4/6)


Having finished our exhaustive play (six games) of French and Indian War, 1757-1759 (Worthington Publishing, 2020; read my review of the game here), I’d planned to go on to This War Without an Enemy (Nuts! Publishing, 2020). The campaign game is too long for a weeknight game, but there are a couple of shorter (four and six turns) scenarios that I thought might be doable in an evening. I got This War to the table on the weekend with the intention of just setting it up and pushing some blocks around, maybe playing through a turn and set-piece combat situation, to get a feel for the game before inflicting my inexperience on somebody else. I didn’t get that far; it took me the better part of an hour to set up the Royalist faction for the scenario and start placing the Commonwealth units. This War is a really promising game, with gorgeous components, but anything that challenging to set up is not going to be suitable for a school-night. I’m certainly not giving up on it, but I’m going to have to drop it from my 6x6 list. Hopefully the Christmas break will provide a clear afternoons to tackle the whole magnificent beast.

Theorie...

As it turned out, T needed to be at home Monday night, so I went around to his and we played the Issus, 333 BC scenario from Commands and Colors: Ancients, Expansion 1: Greece and the Eastern Kingdoms (GMT Games, 2006). T’s a big Commands and Colors fiend; we started playing through the C&C Napoleonics (GMT Games, 2010) base set on Monday nights while my wife had a protracted stay in hospital back in 2010, and we just kept going with it. We’ve played nearly everything Napoleonics, and a lot of the C&C Ancients Roman scenarios, but until this year we hadn’t played any of the Greece and the Eastern Kingdoms scenario; looking back over my game notes for the year, I was reminded that we spent one Monday evening in January this year stickering-up the Greek and Persian armies because hadn’t got around to them in however long he’s had his set.

...und Praxis.

Another complication I the set-up was that some of the terrain tiles seemed to me missing (probably stashed in another box – wouldn’t have happened at my house; just saying). We made do with a couple of river bends and a straight stretch of coastline and got on with it.

Issus was a peculiar battle; it saw Darius get something of an upper hand on the seemingly infallible Alexander, manoeuvring behind the Macedonian leader and cutting his line of supply. Alexander reversed to meet Darius on a battleground of the latter’s choosing, the banks of the Pinarus River.

Alexander's cavalry, left flank.

Looking at the disposition of the two forces, you could be forgiven for thinking that Darius has the upper hand. More units on the board (by nearly half a dozen) and more cavalry to hand. But look closer and you’ll see Alexander has the greater weight of force (a majority of Medium and heavy troops) and six Command Cards to Darius’s four. And he begins the battle.

In truth we both seemed to be hampered by our card draws. Most of my options were left-flank movement, while T could only seem to bring up his centre in the very beginning. I tried to make a virtue of necessity and get my auxilia and light bow on the left into an actionable position, then taking the forward and auxilia into the hills, where they took some hits from missile attacks but gave back more in melee, holding the defensible high ground.

Parmenio surrounded.

A double-time order gave T the opportunity to bring his heavy infantry into striking range, which withered my light units in the front, costing ground and allowing T an early lead in points. My medium foot held their ground, while my single heavy cavalry unit was finally able to come up and maul the attackers (due mostly to some uncharacteristically good dice rolls), taking out Craterus’s personal guard and forcing him take flight to the rear. Well into the battle (around five banners each) cavalry order allowed me to bring my medium and light horse under Narbazanes to get up and hit T’s shallow left flank, causing terrific strife. Sadly, Narbazanes was lost in the fray, as was Parmenio of the Macedonians. Two more rounds, and it was here the battle was won, with the last banner claimed by the Persian heavy cavalry who had pursued Craterus across the field of battle to the Alexandrian rear, swiftly disposing of the medium cavalry the general had tried to rally, though wily Craterus himself eluded capture once more.

The killing blow.

It was a close game, with only two points in it at the end (8-6 in favour of the Persians). An ahistorical result, which for all the complaints of lack of balance in C&C scenarios, does happen from time to time.

One odd artifact of the Command Card selection was that neither Alexander and his companion cavalry, nor Darius and his Immortals were ever activated, even to defend. The battle raged and (due to the vagaries of the draws) neither leader was roused to action.

Macedonians casualties.

All in all, a good game, well-fought. At this point, the plan for next week is to return to Napoleon 1806 (Shakos, 2017). We played the introductory scenario twice early in the year, but have yet to play the Campaign scenario. Tune in next time.


Sunday 20 August 2023

Stripped down for parts: The Dark Summer: Normandy 1944


Q. How many D-Day games does a man really need? A. Just one more. (They’re called truisms for a reason.)

The Dark Summer: Normandy, 1944 (GMT Games, 2021) isn’t that new a game, but it’s on GMT’s 500 list for a second printing, so I thought it might be worth stripping down for parts, so people can see what they’re getting for their buck, should they decide to order it. I did have it on order myself, until I had the opportunity to nab a copy still in its shrink wrap. The new printing is a straight reprint (“with any known errata corrected”), so I thought, why wait? And now you, the reader, get to benefit from my lucky find. This is my first DARK series game, but I've heard and read a lot of good things about the system and the games, so I'm looking froward to diving into this one.


The Dark Summer is the third – no, fourth – game by designer Ted Raicer using his DARK system, first seen in his now classic The Dark Valley: the East Front Campaign, 1941-1945 (GMT Games, 2013), Which, incidentally, is now also on the P500 list for a reprint of the Deluxe edition (which, of course, having missed out on the last printing, I have pre-ordered; how many Eastern Front campaign games does a man really need...).

Subtitled “The Battle for Normandy, June 6 to August 21,” This game covers the invasion and establishment of the beachhead, through to the breakout by allied forces. 

The box is a solid 1½ incher; the quality of GMT boxes has generally improved over the last five or six years I think, with the sturdier boxes being used for every release, not just the bigger, higher-profile ones. The back of the box tells us that it's a regiment/brigade-level game (some battalions also, which makes sense, given the subject), and that each turn is roughly a week. It's a two player game, but has a reasonably high solitaire suitability (no dedicated bot, but being a chit-pull system, is eminently solo-able, playing both sides to their best effect). At four-plus hours, it's probably not a game for a school-night, but definitely doable in an afternoon.

The game comes with two counter-sheets, the majority of which are unit and combat support counters. For a chit-pull activation game, The Dark Summer seems to have very few admin counters (maybe 60 or so?). The forces appear in traditional colours; Americans in olive drab, British and Canadians in khaki, German regulars in light grey, SS in black. The counters use mostly NATO symbols with some silhouettes for unusual units. All the information is clearly presented. I haven't stopped to check, but I think they're nine-sixteenths of an inch in size.

I couldn't take a decent photo of the map to save my life, but there's
a full-sized image on BGG, courtesy of Jay Townsend.

The map covers the region of the French coast essential to the story it’s telling. The map’s scale it 2¼ miles to a hex, to the landing coast runs from about ten miles north-west from UTAH to the port town of Deauville about twenty miles east of SWORD.  The Cotentin Peninsula has been lobbed off, with Cherbourg being represented by a Cherbourg Box at the edge of the map top left-hand edge of the map.

The rulebook and playbook are printed on a good weight of the familiar glossy paper we sometimes get from GMT. I don’t really understand how it’s decided which games get the glossy paper and which get the slightly lighter-weight matt finish paper. It’s one of life’s mysteries, but I’ve reconciled myself to this.


Rulebook (above) and Playbook sample pages.

The rule book runs to twenty-four pages (twenty-two if you subtract the cover and contents pages). The rules are sensibly laid out and seem clear to read – I’m only part-way through them, but no complaints so far. The back-of-the-box tells us that the good folks at GMT want us to know they think it's a medium weight brain-load of game (5 out of 9 in Complexity). I'd question the rating on some games, but that feels about right for this one; I think I'd want to do a second-read-through and do a couple of turns solo before I sat down with another actual person to teach them the game, but the rules are simply presented and nothing I've seen so far seems brain-breakingly difficult.

The game also includes a playbook, which is comprised of a twelve-page, thoroughly-illustrated Extended Example of Play, an interesting and worthwhile two-page Designer’s Notes essay, front and back pics of the two counter sheets, and a pretty thorough three-page rules index. This is particularly handy, not being stuck on the end of the rule book, as you can have the index open in front of you while you scour through the rulebook. The references are to the rule numbers rather than page numbers, so it should be easier to get to that rule you need to check mid-turn.


Player's Aid Cards 1 (above) and 2.

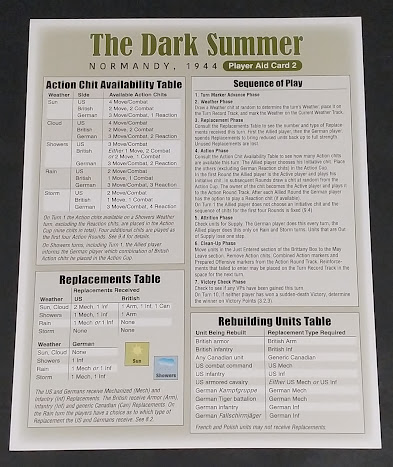
For the most part, though, you should only need to refer to the Player's Aid Cards (PACs). PAC 1 offers the CRT and a separate Cherbourg Combat Table, Weather Effects on Movement and Combat, and on the reverse side, the Terrain Effects Chart; there are two of these. PAC 2 has a concise Sequence of Play, an Action Chit Availability Table and Replacements Table (both of these functions are dependent on the weather for a given turn, which is interesting), and a Rebuilding Units Table (describing what replacement type is required for which type of unit) on the front; the reverse side offers a list of general rules reminders and the Victory terms for the two sides. There's only one of these. If you don't like that, they have photocopiers now.


Needless to say, The Dark Summer comes with a single six-sided die – which is all you need for the game – couched in the narrowest box insert gutter I have ever seen in a game box. During my research for this piece, I came across a great idea from Chad Egbert on BGG; he inverted the game insert in his copy, so that the gutter was raised, leaving plenty of room for counter baggies. If you’re more of a chit-tray user, you’ll probably just be ripping it out and popping it in the recycling. I’ll probably do that eventually (I’m out of spare trays at the moment), but in the meantime, this neat little fix gets my endorsement.

I hope this has been interesting or helpful, of just distracting for a few minutes. If you'd like to see more games stripped down for parts, let me know in the comments.


Friday 18 August 2023

Review: French and Indian War, 1757-1759


Worthington Publishing (and the company’s previous incarnation, Worthington Games) have a long and deep connection with the French and Indian War, as the North American theatre of the Seven-Years’ War (1754-1763) between the empires of Britain and France and their subjects and allies in the New World. Hold the Line (Worthington Games, 2008), and its revision, Hold the Line: the American Revolution (Worthington Publishing, 2016), each saw its own French and Indian War expansion (Worthington, 2008, 2016).

I was on the fence about French and Indian War, 1757-1759 (Worthington, 2020) game when it was first announced. Because of financial pressures at the time, I didn’t end up backing the Kickstarter; shipping to Australia always add around half to two-thirds the cost of the pledge. I like a block game, and I was thinking about grabbing a copy through Noble Knight, but I already owned Volko Ruhnke’s classic, Wilderness War (GMT Games, 2001). With limited storage space and a lot of historical areas my smallish-but-respectable collection doesn’t yet cover, could I justify buying a second French and Indian War game.

What convinced me was Bill Molyneaux’s review of the game on BoardGameGeek. Bill designed the well-received Wilderness Empires (Worthington Publishing, 2015), as well as a sack-load of other games set around aspects of the conflict, and is a historian and heavily involved in the F&IW re-enaction scene. He said it was, to his mind, the best game covering the conflict (and mentioned that his son prefers it to Bill’s own game). I confess, I haven’t played Wilderness Empires, but Molyneaux is a consistently solid historical game designer, so his endorsement counted for something with me. After reading his thoughts in it, I pulled the trigger on French and Indian War.

Having played it now half a dozen times and spent a lot more time thinking and writing about it, I feel like I’m in a good position to talk about this game. Having said that, I feel like it eludes me somewhat. It’s a simple game, very easy to pick up. I’d say it’s an excellent game for introducing new players to wargaming, and to block wargames in particular. But underneath its veneer of simplicity, there’s an awful lot going on in this game, and I’m certain I won’t be able to cover it all in this review.


Appearance

French and Indian War, 1757-1759 (F&IW) is a spare game, the mounted board is a narrow, four panel item (11” x 32”), representing the region in which the bulk of the action in the conflict took place from the northern shores of the Great Lakes to the frontiers of Pennsylvania, New York state, and New England, with key locations marked out, along with paths connecting one location to the next. The colour pallet is muted but nonetheless quite attractive; highlights the action rather than smothering it. The board also features a Year-track (1757-59), and turn-track (11 turns with a possible 12th on a successful die roll for a late winter), and points tracks for each side (running 0-12).

F&IW is a block game, which isn’t everyone’s cup of tea. If you’ve read this far, you’re probably a fan or at least curious. The blocks in F&IW are of a typical size for a block game (comparable to the Columbia Games’ block games or the Cavalry blocks used in GMT’s Commands & Colors family of games) The British blocks are in a red very close to the British Redcoat uniform crimson; the French blocks are in a rather pale blue (which is historically more fitting than the expected royal blue). Two sets of stickers are provided with the game; these are applied to one side of the blocks, and represent the three types of units available to the players (French unit stickers on the blue blocks, British on the red). The differences in the sets are purely ascetic. I went with the more conventional of the two sets.

Also included are a handful of small black cubes intended for track markers. There are several more then are needed on the board, so we placed an extra one or two (as appropriate) on the 0-box to mark when the twelve-point track had been lapped (i.e. a 0 block and a 3 equals 15 points, two 0 blocks and a 2 would equal 26 points). We also used a spare block as a mnemonic for the location of a battle, as the pieces are all removed to a battle board for combat.

The Battle Board is where conflicts are resolved. This is a thick 11” by 8½” panel with a combat ranks and instructions printed on one side. On the reverse side is a break-down of the historical set-up for the game.

The game comes with six custom dice, used in the combat rounds. Units hit on their own symbols, of which there is only one face on each die; Regular army units hit on their respective flags, Irregulars hit on crossed tomahawks, and Militia on a roll of crossed muskets. The game also comes with a single regularly-pipped six-sider, for rolling at the end of the game-year to see if a late winter allows an extra turn that year.

French and Indian War comes with two copies of the rule book; this is something Worthington started doing a few years ago, and it is such a boon. The rules run to eleven of the twelve pages, and these include solitaire play guidelines and the option for hidden simultaneous movement (the game also comes with a pad especially for recording your movements before the simultaneous placement), which I can’t speak to because we haven’t tried that, but now I’m really wishing we had for at least one game; when we get around to playing this again I'll make sure to use the hidden movement rules and report back. The last page has a map with abbreviations for the hidden movement mode, but it doubles as a player’s aid (a good thing there’s two copies of the rules).


Play

The forces in French and Indian War are comprised of regiments Regular (professional) soldiers, cohorts of Militia, bands of Irregular units (Indians and Rangers), and naval units for gaining or challenging control over the Atlantic. These units are represented by labelled blocks, Red for the British and their allies, light blue for the French and their Indian tribes allied to Louis. The strength of each unit is indicated by a decreasing number of pips on the sides of the edges of the block sticker; as is typical with most block games, when a unit takes damage, the block is rotated counter-clockwise so that the upper edge always represents the current strength of the unit (i.e., a four-pip regular unit takes a hit; it is rotated so the upper edge now shows three pips). Combat rounds go rank by rank; first Irregulars, then Regular troops, then Militia. Defenders roll first, and hits are taken immediately, so there’s always the possibility of disadvantage as the attacker, especially when attacking a fort or a port settlement (attacking Irregulars and Militia roll with one les die on their first round).

The game is divided up into three years of 11 or 12 turns to a year, depending on the roll of a six-sided die to determine whether Winter sets in early or late (on a roll of 4-6, the players get one more turn for the year; on a 1-3 the snow comes early). Each location has a victory point score, which also corresponds to how many units can winter in that location. A winter garrison can exceed the VP number by one irregular unit and take no penalty, but any further units will take a one-pip drop in their strength (reflecting desertions, Militia members returning to their homesteads, etc.). Getting caught with a larger formation in a small town can be devastating.

The play action of French & Indian War is deceptively simple; with each turn, each side – beginning with the British – may move a unit of units from one location. These units can move from their point of origin to a single location, or they may disperse to separate adjoining locations, but most can only move to an adjacent location. The exception to this is the Irregulars – the allied Indian tribes and local Ranger units – who can move to a second connected location.

When you arrive at a location already inhabited by the enemy, you fight. The number of pips across the units in a rank dictate how many dice you roll for that rank, and you hit on that ranks’ symbol (crossed hatchets for the Irregulars, crossed muskets for the Militia, and the Union Jack and Fleurs de Lys for the British and French Regulars respectively). In this game the dice are unforgiving. Whatever you are fighting with has a one-in-six chance of raining hurt down upon the opposing side. Sometimes a whole round or two of combat will prove ineffectual for both sides. But occasionally a single roll can be devastating. Only occasionally, though (statistics say so). Being a block game, you don’t know what your opponent has placed where until you test it, and in this, combat can have as much use as a method of probing for intelligence as its more obvious purpose. Knowing where the other side is strongest can deliver vital information regarding your opponent’s intentions.

For all the reduced movement options and sometimes sluggish combat resolution, French and Indian War is a remarkably fast-playing game. Our first run at it had all the usual qualities of a learning game, and so ran to about two hours and twenty minutes, but from the third game on, we managed to keep play within the 90 minutes suggested on the box. French and Indian War is a tight game that flows easily, so long as you’re not given to labouring over every difficult choice.


Appraisal

F&IW involves a combination of strategy, guesswork and, to a degree, dumb luck, though not as much as it might appear on the face of it. To win, one side must gain a clear ten-point majority in points at the end of a year, after any territorial gains have been tabulated. Each unit destroyed offers the victor a single point, but you’re not going to win by killing the enemy. Taking territory is where the points are, but it’s not enough to push the enemy out of his homes; to claim a location as a prize, one of your units must reside there at the close of the year. That means, to have a chance at winning that ten-point lead, you will have to spread your forces fairly thinly in an effort to gain those extra victory points. And if you don’t win the game that year, you’ll be spending turns gathering up your units for another fight or two before trying to claim all that territory again. This also means that a fight to the death isn’t in your interests. If you knock out two of the other guy’s units but lose one or two yourself, you may not be able to cover the terrain you need for those elusive points. French and Indian War is a long string of difficult choices.

While it is a relatively simple game to learn, and only really has one scenario (two if you count the historical set-up and free placement as separate scenarios), French and Indian War is a rare gem of a game; I found it reveals its depths slowly, rewarding multiple games with new insights. It elegantly captures the difficulties of waging a frontier war with restricted movement options, limited resources and manpower, and a mutual enemy in the harsh North American winters I’d put it on the same level as the best of Columbia Games' block games. I think the key to approaching the game is to adopt a guerrilla mindset, more Mao Zedong than Antoine-Henri Jomini. It was impossible to run a set-piece decisive battle in the vast wilderness the Great Lakes region in the mid-eighteenth century. Most actions in the game are small concerns, with one side conceding the ground and backing off to maintain their force strength of another day. Sometimes it can feel like whack-a-mole; each side is limited in its resources and stifled in its manoeuvre options, and I can see how some might find the frustration insurmountable, but its these elements that make the game such a strategic showpiece. It’s difficult to spring a surprise on your opponent when it takes your forces three turns to get into a position to pounce. This game rewards a flexible approach to fighting, and makes unanticipated demands on its players.

I’m sure some folks will balk at the ponderous nature of F&IW; the limited movement, the potential for successive rounds of ineffectual combat, and the requirements of winter-quartering potentially chewing up your last three or four moves for the year. But all these aspects work together to abstractly recreate the difficulties of fighting a war in the truly untamed and inhospitable environment of the Great Lakes region. Dealing with these restrictions through the course of play elevates this game of simple mechanisms into a deep historical simulation. French and Indian War is a deft and elegant example of game design.


Wednesday 16 August 2023

State of Play: French and Indian War (6/6)


T and I played the final game in my six-game cycle of French and Indian War, 1757-1759 (Worthington Publishing, 2020) on Monday night. This has been a journey. On the face of it, F&IW is a relatively simple block wargame, but as I may have said before, it has hidden depths of strategic complexity, and I feel like after six games we’ve barely begun to scratch the surface. But I’ll come back to this. First, I have to tell you how I had my hat handed to me by a particularly tenacious French foe.

The balanced disparity of the starting forces.

This was our second round with free starting placement, rather than setting up using the historical placement of the forces. After five games with four wins, I thought I had a reasonable understanding of the strengths of the two armies. I’d prepared what I thought was a good starting pattern. I had a medium strength cadre in the West, held back in Alexandria, which I hoped would lure T’s units out of Fort Duquesne to try to seize Cumberland, so I wouldn’t have to give him the defensive advantage attacking him in the fort. I’d made a show of force in Halifax though it was only two Militia regiments. This tied up two of T’s units opposite, in Louisbourg. My ships took to sea in the second turn of 1757 and each year I retained naval supremacy unchallenged. T didn’t need to engage in maritime assaults, as we shall see.

The western theatre, at start.

The eastern theatre, at start.

In the centre I placed a convincing force in Fort William McHenry – two Regular regiments and a supporting Militia unit, which could jump back to defend Albany, gateway to the major coastal cities, if need be. I put two Irregular units in Oneida, so I could quickly take Fort Niagara and Toronto at the end of the year (if they remained unchallenged). I thought, correctly as it turned out, that T would take an offensive stance early, and try either to take Ft William McHenry by force majeure, or to sneak around through the eastern backwoods trail through Hampshire and Deerfield, threatening Boston. By the end of the 1757, T had started both. My aim in 1757 was to hold the crossroads of Albany and Deerfield until winter, take as few losses in winter quarters as I could manage, and push back with renewed strength (five reinforcements, nearly all regular units, to T’s three). Pulling back my troops in the face of winter left me thin at the front, but I reasoned it was necessary. So, in the last three turns I pulled back. T did as well in his turn, but not to as great an extent. He was willing to lose a strength point here and there to maintain superior numbers.

The situation, late '78.

With the eleventh turn, I rolled for a late winter, which it proved to be (in fact, for the first time in our playing, all three years gained an extra turn through late or mild winters; go figure). My western group had chased T out of Cumberland, and with the extra turn I risked a move against Fort Duquesne. This audacity paid off, and I pushed the French back to LeBoeuf. This was to be my last victory.

Thin ranks in Boston.

In 1758, I reinforced Philadelphia, New York and Boston with Regulars. But I couldn’t get them up quickly enough to counter T’s attack on Ft William McHenry. The next turn he pushed forward to Albany, then into New York! The dice were friends to nobody, but T seemed to be favoured a little more than me. I eventually pushed him out of New York, but for the remainder of the year, two intact French regiments resided in Hartford, seeing off challenges from ever weakening attacks from New York and Boston, before finally rousing themselves to push out my battered units and take winter residence in New York. At the end of 1758, T had a nine-point lead on me. I’d only managed to get that lead down to a nine point margin by a last-ditch march from Oswego on the undefended Fort Niagara and Toronto by two depleted units. I should have taken the loss stoically at that point; I would have spared myself the further deprivations of 1759.

Six fresh British regiments (raised from the losses I had so recently suffered) arrived in the Spring of 1759, but these proved no match for the truly God-like efforts of the New York-based French army. A renewed two-pronged offensive from Fort Carillon saw Ft William McHenry fall and a huge warband of native allies move swiftly through Hampshire to take Deerfield, and in the next turn, Boston.

A remarkably effective attack.

My foolish pride wouldn’t let me concede, so I went on sniping at the edges of T’s victory, but in the final call, the numbers spoke of my shame; T lapped the twelve-point score-track twice for a total of 31 points to my 19.

And an embarrassingly comprehensive French victory.

It was an inauspicious way to end our tour of the French and Indian War, but it was nonetheless a satisfying game. Through his early losses, T still proclaimed how much he enjoyed this game. I’m looking froward to stepping away from this for a while (not before next year, in all likelihood), but I’m sure we’ll come around to it again. It still has a lot to teach us.


Thursday 10 August 2023

State of Play: French and Indian War (5/6)


On Tuesday night, T and I played French and Indian War, 1757-1759 (Worthington Publishing, 2020), game five of six. We had planned at the outset to do two games each playing the British/French using the historical set-up, with the last two games taking turns at each side with free-form set up. I’ve really enjoyed playing the historical set-up games, and while set the board for each game, I can’t keep in my head the disposition of the opposing army (beyond say, playing the French, remembering the British have two regular units holding Halifax). After this game, though, I think it’s the free-form set-up where the game really shines.

Starting disposition, East (for reference, New York - top right corner).

We diligently tried to set up to our own respective strategies, ignoring as best we could the opponent’s placements. After set up, T – as the British – took the first move, and too to the high seas, claiming control of the Atlantic Ocean. I had placed four units in Louisbourg, but they were all Militia; I wanted the appearance of a reinforced garrison, but I’d located my available Regulars at Forts, Carillon, Duquesne and Niagara. Inexplicably, T had left Halifax unoccupied in his set-up, concentrating his forces in the major cities and on his land borders.

Starting disposition, west (for reference, New York, top-left corner).

I wanted to push hard on t least two fronts and make gains before the end of the first year, and maybe even take the prize. In my first handful of turns, I did manage to take Fort William McHenry, which had also been left unattended, and Cumberland, where offered stout resistance for several rounds, but withdrew in good order, perhaps sensing a burgeoning threat in the central corridor leading to New York.

I did make a show of attempting to wrest control of the Atlantic from the British, and I saw off one of his ship units, before being expelled myself from that field of conflict. Britainnia indeed ruled the waves.

By the end of the first year, I had conceded two units to T, and he had lost four. These translated to that many points each. After we’d dealt with winter attrition, we countered off the enemy locations held. I gained another seven points in this way; a worthy effort, but not quite enough for the required 10-point margin that would have given me victory in the first year.

Situation at the end of 1757 (before deployment of reinforcements).

The Second year began with reinforcements. I had relinquished an Irregular unit and a contingent of Militia. I spent my measly three reinforcement points for 1758 on a fifth Regular unit and two Irregulars, and this turned out to be a wise move. I suspect T spent his five reinforcement points on Regular units, and had he put them all into the field, the course of the war may have been altered. As it was, he placed two units in Halifax, where they would stay for the remainder of the game.

A war party of Indians allied to the French made it as far as the outskirts of New York, before being turned back by a Large conventional force, thus tying up resources that should rightly have been taking the fight to my (now shaky) front in the west. I admit I went into the game with the sketchiest of strategic plans – mostly I took opportunities as they presented themselves, but the opportunities kept coming, and I exploited them as best I could.

I didn’t get it all my own way, but with the end of the year nearing, T began to pull some of his troops back to the larger cities and towns to preserve them over the winter. I used the last two rounds to disperse my troops, especially the ranging Irregulars, to as many uncontrolled British towns as I could reach. This tactic won me the game at the end of 1758, with an end score of 21 points to T’s nine.

Situation at the end of 1758.

The takeaway from this game, for me, was something I had suspected from playing the French for the first two games. French success, I think, is dependent on the maintenance and judicious deployment of the Irregulars. Their ability to move two locations when activated is key to claiming points for captured locations for end-of-year scoring. With some forethought-outplacement of my Indian allies, I just managed get over the 10-point victory threshold at the end of 1758. I think to be fair I should also mention T’s assistance in my victory; we both conceded points for lost units, but where I would sacrifice a Militia unit to preserve my Regulars or Irregulars, T would doggedly stay in the meatgrinder of prolonged battle in the hopes of weakening my troops overall. Across the game I think the unit loss was roughly 1:2 or maybe even 1:2.5 in my favour. That was a solid contribution to the French victory.

One more game – at this point slated for next week – then we move on to another game. I’m not sure what we’ll go on to yet, but I’ve got an itch to get This War Without an Enemy (Nuts! Publishing, 2020) to the table. Given we can really only play on school nights, we’ll probably have to stick to the shorter scenarios. Anyway, I’ll confirm the next game in the final report, and I’ll post a full review of French and Indian War within a couple of weeks.


Sunday 6 August 2023

Stripped down for parts: 2 Minutes to Midnight


Charles S. Roberts Award nominee: Best Modern Wargame


Soooo much game.

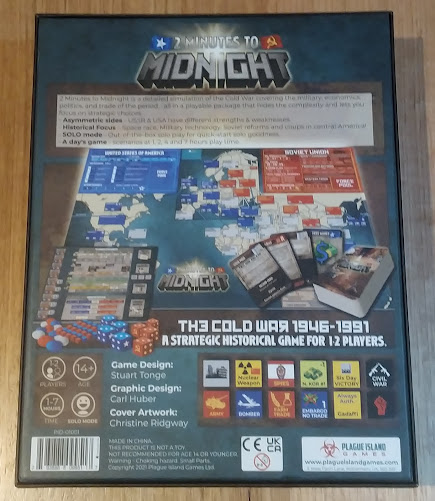
I was aware of 2 Minutes to Midnight (Plague Island Games, 2022) having a relatively successful turn on Kickstarter a few years back, but as a Cold War kid, the subject didn’t really appeal to me. Over the last couple of months, though, I’d read some good things about, mostly about how it takes a different approach to the benchmark game of the period, Twilight Struggle (GMT Games, 2005). I was intrigued, and when a copy became available at a reasonable price, I gave in to my curiosity.

What I got was much more game than I expected. In the stuff I’d read about the game, people tend to talk about 2 Minutes to Midnight (hereafter 2MtM) as a card game; not a card-driven game, or a card-assisted game, but a card game. Maybe they couldn’t decide which is was closer to, so went with ”card game” as a catch-all. Let me tell you now. Yes, there are cards; quite a few cards (including a short deck to facilitate solo play). But 2MtM is a definitely a board game, but I’ll come back to that later.

But for now, on with the scheduled presentation. Given what’s in the box, I’m going to take an archaeological approach to 2MtM, and excavate the contents, layer by layer.

The box for 2 Minutes to Midnight is a nice, solid container, with a moulded plastic insert. The box lid is a firm fit, but eases off without difficulty rue to the metric shit-ton of contents.

2MtM Rule book, in situ.

The rule book runs to 40 pages, but it is printed in a good-sized font, in double columns for ease of reading. That reading is pretty dense, with few illustrations beyond counter explanations and such, but the rules themselves are – to my mind, at least – clear and articulate. When I actually get some time to spend with them that view may change, but after a cursory read-through, I don’t think this will be a difficult game to understand or to get to the table.

NExt, we have a cellophane envelope containing seven Scenario Cards. The game has six scenarios (running from shorter 60-90 minute games to the full seven-hour campaign, along with a solo, out of the box Introductory or learning scenario). The Scenario cards are double-sided with an easy to follow (with a magnifying glass) guide to board set up, and written instructions for the scenario on the back).

I’m always looking for games with multiple scenarios or play options. A seven-hour game might be an option for me once or twice in a good year, so shorter play options are always appreciated, and two of the scenarios in 2MtM claim to be playable in and hour.

We take out the Scenario cards to reveal the Technology Advancement Board (yes, Board). This is a secondary board to the main play area. It’s kind of half-way between the Space Race track in Twilight Struggle and a Technology Tree in a computer game like Civilization. Developing technologies will give your side distinct advantages in 2MtM, but it will come at a cost, and becomes one more layer in the hard choices stakes of the game.

After the scenario cards, we come to the counter-sheets, of which there are three. These constitute some generic force counters for the antagonists (Army, Bomber and Nuke counters), but are mostly status markers for various mechanics in the game (from civil unrest to industrial espionage). This is a game with a lot of levers.

The counters are of the pre-rounded, easy punch variety that we’re seeing more and more of in some games from publishers like GMT, Compass, and Worthington, but that some European companies (Hexasim, for example) have been doing by preference for years. They tend to be a little larger as well, which goes to readability (you kids with your dumb haircuts and 20-20 vision don’t know what it’s like).

The game comes with two pairs of Player’s Aid Cards which, between them, look like they cover all the basic operations for your turn. A cursory look-through suggests to me that within a few turns on your first game, you should be reaching for these rather than the rule-book; they are that comprehensive.

Also included is a fifth PAC for solo play (presumably you’ll still be referring to the other two as well).

The actual game board is where the action happens (scroll down a few pics to see the board laid out alongside the Technology Advancement board). The board has a stylised map of the world, with activity boxes zeroing in on the hot-spots across the globe (more similar to Labyrinth: the War on Terror (GMT Games, 2010) than Twilight Struggle). The board also features two boxes in the upper corners for the belligerents (ironically, with the US on the left and the Soviets on the right, but to be fair, it makes sense with the map orientation.

Soviet tracking board insert.

Speaking of the main board, there’s a nifty little extra that appeared in the box-dig a couple of stratum ago; a separate board that duplicates the Soviet status area. Chances are, if you’re playing a two-player game, you’ll be seated opposite each other with the board in the middle. This extra board is here to place over the board-printed Soviet status box, but inverted, so the poor, economically beleaguered at least keep track of their fortunes without having to read everything upside-down.

We’ve now burrowed down to the last stratum, a veritable dragon’s horde of components.

The game is replete with bits. It has wooden blocks and discs, and translucent plastic markers, along with the aforementioned three sheets of cardboard counters. (It should come as no surprise that zip-loc bags for counter storage also come with the game).

I haven’t read through the rules far enough to say with any authority what role each of these pieces play in the game, but I did look up the clear plastic discs. These seemed to me a bit disappointing, something you’d find in a kid’s stocking stuffer present for Christmas. I was wrong. These components were chosen especially so they can each mark a value on a track, while allowing you to see the value they are marking. That’s brilliant; that is good design being put ahead of silly prejudice, and I feel like I should apologise to the designers for thinking poorly of them.


The cards are printed on good stock, and there are a lot of them, 179 in all, though 20 of these make up the solo-play deck. They are functional and clear to read. Some might be disappointed by the lack of evocative photos on the cards, but with all the other effort that has gone into the presentation of 2MtM, I think it would be a bit churlish to try to make a thing of that.

The footprint of the game is large. Not A Victory Awaits (Multi-Man Publishing, 2022) large, but comparable to Mr President (GMT Games, 2023). This may seem daunting, but it shouldn’t. 2MtM is kind of upscaled compared to comparable American games. There’s been a premium put on usability in the design of the play-space. Everything you need fits onto the board, but it doesn’t feel shoe-horned at all; adding a second board for the Technology Advancement stuff actually makes the prospect of the game less overwhelming. You’re not trying to move tiny markers around on tiny tracks without accidentally bumping other markers. The whole thing is very player-friendly.

Detail of the Introductory Scenario set-up.

In short, the game looks great, and it looks like it will play smoothly, for all its buttons and levers. A lot of attention has gone into the details of this game, from the play to the packing. I don’t think I’ve ever come across an insert so perfectly crafted to not only house, but to protect all the stuff in the box (although Undaunted: Reinforcements (Osprey Games, 2021) deserves an honourable mention).

2 Minutes to Midnight promises to be something special. I’ll post a full review when I’ve played it enough to feel comfortable talking about it. In the meantime, I’ll post some first impressions in subsequent State of Play posts. Watch this space.


Stripped Down for Parts: The Lamps Are Going Out: World War I

       World War I, or the Great War (or The War to End All Wars), as it was referred to at the time, holds an abiding fascination for me as...