|
Sending season's greetings.
|
“And now
we welcome the new year. Full of things that have never been.”
–
Rainer Maria Rilke
For a more complete picture of how the year panned
out, I'll refer you to my previous reports for Q1, Q2, and Q3.
About this time last year, I wrote a By the Numbers
post called What I did in 2024. I made a kind of checklist of general subjects
that I could quantify, like the number of games I’d bought or played over the
course of the year, and the kinds of things I’d posted to A Fast Game, and I
also discussed some more qualitative stuff. Over the course of 2025, I’ve
fallen into using this model for a more structured quarterly report, so no more
“What I Did” pieces from hereon in, just the quarterlies. I will probably talk
a little more broadly about some aspects of the year, but I’m not going to duplicate
great swaths of previous reports. Here you’ll get the whole numbers for the
year as well as the last quarter, but if you want to see how my collection grew
over 2025, I’d point you to the links to the previous three quarterly reports
for the year at the top of this post. You’re welcome.
2025
was a strange year in a couple of respects. I’m not going to get into a
discussion about tariffs or shipping price-hikes, but there was all of that. 2025
was a year I spent much more time thinking about wargames than playing them.
Part of this was circumstantial, part of it was accidental, but another part feels
like it was avoidable, after the fact.
Games purchased
In last
year’s What I did post I wrote that I gained 34 games in the course of the
year. In my Collection-to-Games Played Ratio I said I’d purchased – or more
accurately, received – forty-one games (actually forty-two, but I’ll come back
to that). There are a couple of reasons for this discrepancy, but they all boil
down to me being an idiot. The list I was working off for the Games to games
played piece was an extract from my Owned list on Boardgamegeek.com; yes, I
list my collection on BGG, and it’s public facing, if you’re at all curious. It
also includes the family games we play, so the count blows out to over 300
titles. I’m usually fairly diligent about adding newly acquired titles to my
BGG record, and I’ve come to rely on it as a single source of truth. Except the
system isn’t foolproof and sometimes things slip through the cracks. While I
was preparing the current list, I realised there were about three titles I’d
neglected to add, including A Most Fearful Sacrifice: The Three Days of Gettysburg (Flying Pig Games, 2022), which I was certain had been on the
list, but was not.
 |
Fourth quarter haul. The Combat Commander Minor Nations folio with the extra
material included in the new combined Europe/Mediterranean box is missing
from the photo. |
In the
fourth quarter, the collection grew by six games (plus one extra, which I’ll
get to) and an expansion (Combat Commander: Minor Nations. Three of those were
Legion Wargames games I’d been keen to acquire for a while (I’m working through
an unboxing sequence, starting with The Battle of Blenheim, 1704 (Legion
Wargames, 2018), which you can read here), second hand copies of Charioteer
(GMT Games, 2023) and Beware the Ides of March (Hollandspiele, 2024).
I’ve always
maintained that I will not solicit review copies of games from publishers, but I
attended the last Compass Games Town Hall for the year – Bill Thomas and
this team do a live fortnightly show on YouTube, and give away a copy of their
latest release via a lottery system. Except for the end of year show, Bill was feeling especially generous, and gave
away about a dozen games and copies of Paper Wars that had been released in 2025, and I was lucky
enough to have my name drawn for a copy of Mike Vitale’s Desert Blitzkrieg: Rommel's
North African Campaign (Compass Games, 2025), which arrived today, in time
for the 2025 count. Rest assured, an unboxing post and AAR will be coming in
the new year.
 |
| This, apparently, is what winning looks like. |
This was one of two wargames I won in tottery draws this year. Grant from Pushing Cardboard had a giveaway on his website, and I was drawn for a copy of Italy '43 (GMT Games, 2025). I already have a copy on its way (hopefully due in a fortnight or so), so I'm tossing up what to do with this copy. I may run some sort of competition on A Fast Game, but I'm not sure how that would work yet. Stay tuned.Over
the course of the year, I’ve received thirty-seven games* (and two supplementary
materials, GMT’s 2024 Replacement Counter-sheet, and Combat
Commander: Battle Pack #8 – Minor Nations (GMT
Games, 2025). This is up three titles from last year (after me saying 2025 was
the year I would wind back my game purchasing), and I’m expecting a GMT
delivery (three games) and another game each from Sound of Drums and Les3 Zouaves early-ish in the new year.
We live
in an apartment, and not a particularly large one. I’ve estimated previously
that I can probably accommodate around 300 wargames before I need to start
weeding the collection. Here, at the end of 2025, I’m sitting at 248; not “peak
wargame” – well, not quite – but my buying habits will have to to adjust accordingly.
Addressing
that in a small way, 2025 was they year I went hard on computer games, or more
accurately, computer ports of existing board wargames. I bought Rebel Fury,
Waterloo and Gettysburg (for a bundle discount), Saratoga
(a port of the Battles of the American Revolution game from GMT), all
from Hexes of War, and SpaceCorp (Logix Interatvive,2025), Britannia and
Napoleon’s Eagles from Avalon Digital, and Bill Kalapoglou’s Arete
(Molotov Cockatiel Games, 2025), all available via Steam.
Games played
I’ve
posted a separate account of games played here. It turns out I had
played more games through the course of the year than I had expected, but less
than I would have liked. These weren’t all wargames, but engaging in any game
is a chance to learn something new. There
were more role-playing sessions with the Wednesday group than last year, but
RPGs are what brought that group together in the first place, so I can’t really
begrudge that. I’ve been a part of the Wednesday group for seventeen years next
March. In that time, we’ve played a number of wargames (mostly miniatures, but
others ranging from The Grizzled (Sweet Games, 2015) to Here I Stand
(GMT Games, 2015)), but it’s not a wargaming group, and I can’t count on getting
my fix here. This year we played sixteen games (we played Border Reivers: Anglo-Scottish Border Raids, 1513-1603 (GMT Games, 2023) and Successors (Phalanx, 20, each over two weeks).
Our host is an inveterate lead-pusher as well, and will often have a game already
set up from another weekly game night, so I got to try three different,
new-to-me miniatures rulesets; Lion Rampant, Second Ed. (Osprey Games, 2022)
for Saxons and Late Romans, Pikeman’s Lament (Osprey Games, 2017) for the
English Civil War, and Valour & Fortitude (Perry Miniatures, 2022)
for some Peninsula action.
Long-time
readers may remember I started this blog as part of a project rather misguidedly
inspired by the War Room’s annual Ten Game Challenge. So, I thought it would be
fitting to actually take part in the official proceedings.
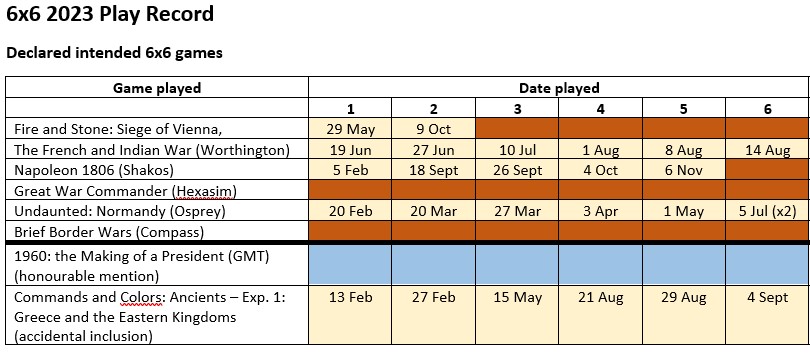
I
signed up for the War Room’s Ten Wargame Challenge for 2025; not only have I
fallen short of playing ten of the nominated twelve games (two back-ups were
allowed), but the War Room as a collaborative YouTube entity has ceased be. I’m
not so narcissistic as to think I singularly brought on the institution’s end,
but I possess enough inherent paranoia to wonder, “Did I jinx it?” When the War
Room fell over, there was a lot of discussion on Facebook and elsewhere about
whether people should still try to finish their challenge lists (a dozen or
more had already ploughed through there ten, and at least one FB friend had
actually played all twelve games on his list. I wanted to finish my list; it
was furnished with games I’d wanted to table for a year or more in some cases.
But internal and external pressures prevented me from getting past the five I
managed to get played (I played a Rebel Fury (GMT Games, 2024) scenario Spotsylvania on Steam, but never
got around to writing it up).
For
fifteen years now, I’ve been spending a Monday evening – sometimes Tuesday (and
since his schedule has cleared, occasionally Thursday) – playing wargames
nearly exclusively, face to face with my brother-in-law, who I refer to here as
T. In the past we played Commands & Colors: Napoleonics (GMT Games,
2010) exclusively; after about the first nine years we branched out into other
C&C flavours, and in recent years, I’ve got him to play other games as well,
sometimes. In the earlier years we’d consistently play between forty and
forty-five weeks out of the year (and usually get a Wings of War (Nexus,
2004) or a Trafalgar (Warhammer Historical, 2009) game in on Boxing Day.
This year we only managed twenty-six games all up. The other twenty-six were
lost to a combination of sickness, travel, and family commitments (T is now a doting grandfather). I don’t resent the lost opportunities, but it was another reason
for my game count falling off this year.
Another
reason was, I simply didn’t take all the opportunities I had to play a game
when they presented themselves. Which segues us into the next section.
Games unplayed
This is
a new subheading that will probably only appear in Q4 reports. Or maybe not;
let’s see how it goes. Since the beginning of A Fast Game, I’ve always begun the
year with grandiose plans of what I hope to accomplish, then it gets to the end
of the year and what do I have to show for it? Admission is the first step to
healing, so here is where I’ll fess up to all those things I declared I wanted
to do but didn’t get done. Kind of a psychoanalytic version of a shelf of shame
selfie.
The
American Civil War remains under-fought in my household. I had planned to get By Swords and Bayonets (GMT Games, 2025) and A Most Fearful Sacrifice to the
table as part of my Ten Wargame Challenge, and Flanks of Gettysburg (Compass
Games, 2024) in 2025. This didn’t happen. I even told designer Herman Luttmann
that I was finally going to play AMFS this year, and I didn’t follow through. This
was why I had both AMFS and By Swords and Bayonets on my Ten Game Challenge
list.
Crucially,
2025 was meant to be the year I learned the Great Battles of the American
Civil War (GBACW) system, something I said I was going to do in 2024 as well. This didn’t happen, either. With BS&B,
I now own four GBACW titles – the three most recent box games (BS&B, Into the Woods: The Battle of Shiloh, April 6-7, 1862 (GMT Games, 2022), and Death Valley: Battles for the Shenandoah (GMT Games, 2019), plus Wilson's
Creek: The West's First Fight, August 10, 1861 (SPI, 1980) from Strategy
& Tactics, issue 80), but all remain unpunched, glowering and taunting from
their shelf.
This year,
after resisting the siren call for some time, I finally gave in and bought my
first Great Battles of History (GBoH) game; the one that started it all,
The Great Battles of Alexander: Macedonian Art of War (GMT Games, 2015).
A second-hand copy of the most recent printing (including the Tyrant expansion)
came up for sale, mostly unpunched, and bearing a faint mothball odour. This was
apparently enough to put one off, and when it was still available after about
four months, I thought it was meant to be. This now sits on the shelf next to
the GBACW games and is picking up their glowering habits. I’ve said for the
last two years that this would be the year I’d crack GBACW.
Many of
the games I didn’t get to on my Ten Wargame Challenge list because I was
holding out to play them against an opponent instead of two-handing them,
including We Are Coming, Nineveh (Nuts! Publishing, 2023 – this game
actually come solitaire rules, so doubly no excuse), Waterloo, 1815: Fallen Eagles II (Hexasim, 2022), and Imperial Bayonets: We Were Not Cowards –Sedan 1870 (Conflict Simulations Ltd, 2020), when I really should have
bitten the bullet and played them solo. This is what I did with Drop Zone: Southern France (Worthington Publishing, 225) when T cancelled our game
that week at the last minute. In fact, I haven’t played that many solo games this
year at all. In 2025 I played six separate times spread over four games.
This year
I struggled to get motivated to play. Quite a bit, in truth. Some times when I had the oppotunity to play even something short, just setting up a
game often felt insurmountable. This was a symptom of something else going on,
unrelated to gaming, but that nonetheless affected this and other parts of my
life adversely (I’m sure this was a contributing factor to my posting output
slowing over 2025 as well). I wouldn’t say I’m much better than I have been,
but I think I’ve turned a corner in this regard, and I’m looking forward to a
more play-full coming year.
Blog matters
I have
written quite a bit though 2025, though not quite as much as the previous
couple of years. At time of writing, I have posted around 358,500 words to A
Fast Game since its start at the end of January, 2023; If it were a novel, it
would be longer than The Brothers Karamazov, nearly as long as David
Copperfield, but a lot less compelling than either. This is in the space of
a little less than three years. Not counting this report, I have posted sixty-one
posts since February 1st. I haven’t written or posted as much this year as I
have in either of the two previous years, but you have to keep in mind that the
technical year-end for the blog is the end of January, so I may catch up a
little here (check in again around January 31 for the third anniversary post).
In mid-October
A Fast Game hit 50,000 views, and half of those came from readers over
the most recent ten or so months. As I write that number is a little shy of
62,000. I’ve had various posts mentioned on The Armchair Dragoons and grognard.com,
and the good folks at GMT continue to add my unboxing and review efforts to
their product pages, alongside the work of more celebrated critics.
When I
started writing A Fast Game, I was still finding my feet with the blog, after a
long absence from writing anything consequential. Frankly, some of the stuff I
wrote in the first six months is a little embarrassing, but You have to start
somewhere, and I think I have become a better writer in the intervening couple
of years. I made a conscious effort to post useful material. When the Charles
S. Roberts Award nominees were announced, A Fast Game was the first (and so far
as I am aware, the only) place on the web to post a complete list of nominees along with links to their respective BGG pages. This year I also
published my first feature article, a survey of the value of wargame awards for publishers, which took time and effort and the
good graces of many publishers who responded to my cold-call questionnaire.
This was fun to put together and I would definitely do a research project like this again if I find an interesting enough subject. Suggestions for future feature subjects are welcome.
I feel
like the writing and the arguments behind it have matured somewhat from that
first year. I’m a little surer of what I mean to say, and more willing to not write
about something unless I feel I have something to contribute to the
conversation. I still tend to apply an irreverent tone to most subjects, but that’s just me, and it comes
from a place of love and respect. That won’t be changing.
Extra-curricular activities
I did
some scenario development and layout work for Ray Weiss’s Afrika Army Korps
(Conflict Simulations Ltd, 2025), which was released earlier this year. Since
then, I’ve backed off from pretty much everything wargame-related except playing, posting to A Fast Game, and engaging with the Pushing Cardboard Discord channel. Grant Linneberg has built a friendly, respectful, and welcoming community of serious gamers, and I feel lucky to have been accepted into it.
I tried out for proofing work with Decision Games (for their bi-monthly
magazines, Strategy & Tactics and World at War), and with GMT
Games, but didn’t get a guernsey in either case. I’m not all that upset about
this; it would be nice to contribute to the hobby with more than half-baked
opinions and the occasional rant, but doing this kind of work would seriously
eat into my ranting time. So, for now, I’ll be sticking to A Fast Game as my
sole avenue of contribution.
I
posted a printable copy of the Scenario set for AAK on the game’s BBG page (it’s
in letter – I submitted an A4 colour version as well, along with Printer-Friendly
versions of both standard sizes, but only the colour Letter-sized version was accepted).
I’ve yet to find a retailer in Adelaide that stocks Letter-sized paper, which is
disappointing, considering A4 sheets don’t easily fit into American game boxes.
If anyone can tell me where to get some (besides on Amazon with their extortionate
prices), please let me know in the comments. I’m still thinking about some
additional scenarios for AAK – it’s such a great sandbox game, it really
deserves some more love. I’ll (try to) post each new scenario to BGG as they
become available, and I’ll let the faithful know on this blog.
What’s next?
Last year said I wasn’t going to commit to anything
gaming-wise, except maintaining work on A Fast Game, then I fell off the wagon
and signed up for the War Room’s Ten Wargame Challenge. I’ve already talked here
about how that worked out. I think I’ve finally learnt my lesson and so I’m not
going to make any hard and fast declarations about wargaming intentions. Well,
at least for this year -no challenges, not numerical goals. I’m going to make more of an effort to learn a handful
of game-systems, and GBACW will be on this list. Given my limited storage capacity,
system games are gaining in appeal. I’m hoping I like GBoH as well, as that’s a
particularly rich vein to extract. If I settle on a short selection, I may
write something about it in the new year, but it will be at best an intention,
not a commitment.
 |
Impending Allied assault on Sidi Barrani; Operation Compass scenario,
Afrika Army Korps (CSL, 2925). |
Turning to extra-curricular activities, if I can get myself in the right frame of mind again, I'd like to write up two or three more short (four-eight turn) scenarios for Afrika Army Korps, including Operation Battleaxe (which was incomplete at time of publication) and a hypothetical of the planned, but never executed Operation Silk. I've been kicking around an idea for a solo print & play game covering a siege from the Thirty Years' War, but I wouldn't expect to see that in 2026. I wrote a solo journaling game about a secretive cabal a while ago on an interstate flight. It needs a rewrite, but I promised my wife I would finish it off and and send it out into the world this year. All of this is wish-list stuff, except for the journaling game (a promise is a promise), but I tend to get restless without a couple of things on the go.
As for the blog, I will keep doing what I’ve been
doing with A Fast Game. This has become more important to me than I would have
ever expected. It has garnered praise from people whose opinions I respect, and
it helped a handful of people find new games and new experiences they otherwise
may not have stumbled across. I would be open to trying new types of post, if
anyone has any suggestions (I have done this before), but in the short term, I
will be sticking to what I know works. Unboxings will often include art history
lessons, and After-Action Reports will still highlight the mistakes that were
made (we screw it up so you don’t have to). And I’ll try to knock out more than
five game reviews over the next twelve months. No promises, though.
I began writing the quarterly reports for the same
reason I began writing the blog in the first place; to hold myself to account regarding
whatever goal or quest I’d set for myself. If I’m not setting targets, there
seems to be less need for a status update every three months. But… I’ve come to
look forward to writing these reports. They are way for me to keep in mind what
I’m spending my hard-earned on, and where I’m putting my time. So, I think I’ll
be sticking to these as well.
So, that's the year that was, and a glimpse into what's to come. All that's left is to thank you, gentle reader, for persisting this far. I hope you've enjoyed the blog this year, and I hope you'll come back again in 2026. Happy New Year, and I'll leave you with a toast that a late friend was fond of giving:
We may not always get what we want,
and we may not always get what we need;
just so long as we don't get what we deserve.
*Make that thirty-eight games - I really wasn't expecting Desert Blitzkrieg to arrive before the New Year.